Historical Background: Salamanca (1812 AD)
The battle of Salamanca in Spain was a part of the Peninsular Campaign which lasted from 1808-1814. It was as a result of Napoleon invading Spain and putting his brother on the throne of Spain. It also resulted in a British general in winning fame and glory. Wellington would begin his winning streak in Spain. Salamanca was the most decisive battle of the entire war which smashed Marshal Marmont`s French army. Although the war would continue for two more years, the French were put on the defensive, as the British, Portuguese and Spanish troops harassed the French until they were pushed back over the Pyrenees mountains into France. Salamanca also saw a famous event where Lt. Pierce of the 44th Regiment captured the Eagle of the French 62nd Regiment.
This battles hasn't been playtested yet.
Rules
Building the Armies: A number of companies (Italeri, HaT, Revell, etc.) make figures in 1/72 scale plastic that are suitable for this battle. Visit Plastic Soldier Review to see what's available. Here are some paper soldiers you can print and use. Infantry should be mounted with two figures per base. Commanders are based singly. Cannons are represented with 1 gun model and 1 or two crew. Bases are 3/4" x 1 1/2" for infantry and commanders.
|
British & Portuguese
|
French
|
The Board: Salamanca was fought on a plain which was dominated by two hills which the local Spanish people call Hermanitos (two brothers). The British right flank was deployed at the base of the Lesser Arapil and 600 yards to the south is the Greater Arapil which is 300 yards long. This scenario is based on the British 3rd and 5th Divisions advancing to drive the French off the Greater Arapil.. For the battle, a table of 1.5 meters by 1 meter. Both hills must be modeled either with cloth or paper pieces.
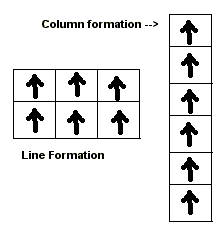
 Formations: There are only two formations - line
and column. The names of these formations can be very confusing
for the students. At school, when they are told to "get in
line" they line up one behind the other, in what we call
column formation. With the kids I call the formations "firing
line" (like a firing squad), and "marching column."
Units may change formation at the start or end of their movement,
but can only change formation once per turn.
Sequence of Play:
1. British Move
2. British Shoot
3. French Move
4. French Shoot
5. Charges
6. Melee
Movement: Units in line formation move 6", units in column formation move 12". Cannons may move 6" but cannot fire on the turn that they moved. Cannons can pivot in place and still fire, however. During movement units may not move closer than an 1" to enemy units.
| Movement |
|
|
|
| Infantry | 6" |
|
|
| Cannon | 6" | 6" |
|
| Commander |
|
|
|
Shooting: Infantry that are in line formation and artillery that didn’t move this turn may fire. Range is measured from the centre of a unit to the nearest part of the target unit. Units may only fire to the front and may not fire through narrow gaps between friendly units. Roll one dice per infantry base or four dice per cannon. The chart indicates the number needed for a hit. Remove one base for each hit rolled by the firing unit. It takes three hits in the same turn to remove a cannon. Note that you only use the 1" firing column when shooting at a charging unit. If a unit is reduced to a single surviving base then the last base is immediately removed. Units in column are good targets. Roll two extra dice when shooting at columns.
| Shooting |
|
|
|
|
| Infantry | 5-6 |
|
|
|
| Cannon | 4-6 | 5-6 |
|
|
Morale checks: If a unit has to take a morale check, roll one die and add any modifiers. If the roll is less than or equals to the number of bases (plus a commander if one is present), then it has passed. If the roll is greater then it fails. Cannons pass on a roll of 4
Melee: If a charging unit contacts an enemy unit there will be a melee. Each side rolls a die and applies the modifiers. High roll wins. The loser removes a stand and retreats 12". If the roll is a tie, each side removes a stand and rolls again. A cannon counts as three bases in melee.
Commander: A commander may join or leave one of his units during movement. This unit gets a +1 bonus on all melee rolls and the officer counts as a base when testing morale. Every time a unit with an attached commander is completely eliminated by enemy fire (last base removed) or is engaged in a melee (win or lose) roll one die. If the roll is a 6, the commander is a casualty and is removed from play. This is the only way commanders can be eliminated.
Resources:
Salamanca 1812 Ian Fletcher Osprey Publishing 1997 Campaign Series 48.
www.regiments.org (for British units and histories)
www.britishbattles.com (for history of battles)
The Scottish Regiments D. Henderson Harper Collins 1996
"The Battle of Salamanca" from Wikipedia the free encyclopedia www.wikipedia.org