
Fast Play Rules for Students
Battle of Ia Drang (1965 AD)
Fast Play Rules for Students
By Matt
Fritz
Historical Background:
Vietnam War (1954-1976)
The Vietnam War remains fresh in America's collective memory. The war divided America and was a bitter defeat for a nation accustomed to military victories. The Vietnam Veterans Memorial remains one of the most visited sites in Washington D.C., and no landmark evokes half as much emotion. The battle for Landing Zone X-Ray in the Ia Drang valley was called "the battle that changed the war in Vietnam." In 1965 the 1st battalion of the 7th cavalry was dropped by helicopter into the Ia Drang valley where three regiments of the North Vietnamese Army (NVA) and a battalion of Vietcong (VC) surrounded them. In the first major engagement between American and NVA soldiers the badly outnumbered Americans successfully defended the landing zone, suffering heavy casualties in the fighting. This scenario focuses on the Vietnamese attack on the morning of the second day of the battle.
Battle 1: The Americans were in a loose circle defending
the perimeter of the landing zone (LZ), with a small reserve in
the center under the command of Col. Moore. The Vietnamese had
spent the night maneuvering into position for a dawn attack. They
planned to overrun the landing zone and wipe out the Americans,
as the Sioux and Cheyenne had done to Custer and the 7th cavalry
in 1865. The American commanders were confident that this time
the outcome would be different. After all, Custer didn't have
access to Huey gunships, 105mm howitzers, A-1 Skyraiders, F-100
super sabers, and B-52s! The NVA attacked the American perimeter
defenses from the southeast and northwest, while the VC attacked
from the southwest. The ferocity and effectiveness of their attack
shocked the Americans out of their complacency. On the second
turn of battle the NVA and VC were already threatening to breakthrough
in the south, and Col. Moore's command post came under fire. The
colonel shouted "Broken Arrow! Broken Arrow!" into the
radio, the code that they were in danger of being overrun. He
immediately received additional air support which, combined with
an accurate concentration of artillery, slowed the Vietnamese
advance. American planes pounded the Vietnamese without mercy.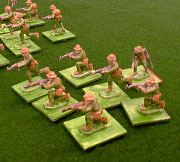
In the north the NVA attack had stalled. Company A of the 1st battalion, finding itself unengaged, had moved swiftly to support the troopers defending the northern perimeter. Meanwhile in the south the situation was becoming critical. The Americans had been forced out of their defensive positions, and the battalion command post was under heavy fire. The VC were threatening to break through the American lines. Col. Moore, pinned down by enemy fire, received the welcome news that A Co., 2nd Battalion was already inbound on helicopters and would be arriving shortly. The Americans knew they had to counterattack the VC, who now controlled the tree line in the southwest and were pouring fire into the LZ. Once again it was A Co. to the rescue. They crossed the LZ and launched a gutsy and costly attack that surprised the VC and put them on their heels just as the helicopters zoomed in at treetop level with the desperately needed reinforcements.
For the troopers in A Co., 2nd
Battalion it was the hottest LZ any of them would ever see. They
were taking heavy fire even before they landed, and as they dashed
out of the helicopters they were forced into an immediate firefight
with a platoon of charging VC. The Vietnamese were astonished
to see more Americans suddenly arrive just when they thought they
had won the battle. They called for a retreat, satisfied that
they had done enough damage. Although the surviving Americans
claimed victory, and still controlled the precious LZ, they had
suffered too many casualties to stay any longer. They were evacuated
as quickly as possible, leaving the Vietnamese to brag that they
had driven the Americans out of the valley.
Battle 2: : This time the Vietnamese plan was to attack
the Americans from all directions, find a weak spot in the defenses,
and exploit it with their reserves. Again the VC were sent to
attack the southwest, and the NVA assaulted the rest of the perimeter.
The initial attack ran into heavy and accurate American fire and
wavered. In the east Captain Edwards and C Co. crushed the NVA
attack. When the Vietnamese sent some reserves to support the
attack in the north C Co. counterattacked, slamming into the flank
of the NVA assault and throwing it into chaos. The Vietnamese
had more success in the south where they hammered the Americans.
Col. Moore responded by ordering all available artillery and air
support to attack the NVA and VC in that sector. The Vietnamese
commanders watched in horror as American firepower clobbered their
men, stopping the assault in its tracks. There was a brief lull
in the fighting as the Vietnamese tried to recover from this devastating
blow.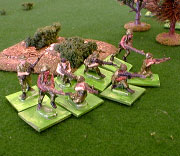
The Americans were able to use
the opportunity to land their reinforcements into the LZ with
relative ease. The extra troopers were just in time to repulse
a VC attack that broke into the clearing. The Vietnamese attack
rose in intensity as they tried desperately to break the will
of the Americans. The 7th cavalry bent, but refused to break.
They had taken the best the Vietnamese could dish out, and they
had endured. The Vietnamese were forced to withdrawal. The Americans
had won a narrow victory.
Rules
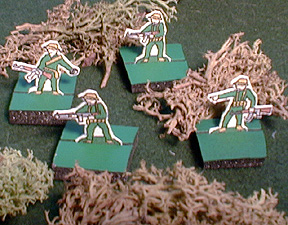
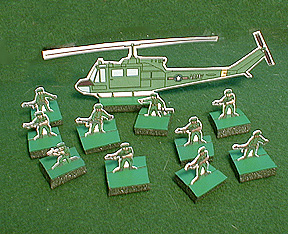
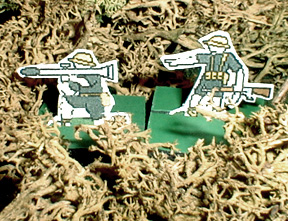
The Miniatures: The figures used were 1/72-scale plastics from Esci #228 U.S. Elite Forces, and Esci #229 North Vietnamese. Unfortunately these figures have been out of production for a long time and are difficult to find. Italeri has reissued Esci 228 and 229 as 6078 and 6079. All figures were mounted individually on 3/4" bases. The VC were painted in black uniforms to distinguish them from the green clad NVA. I used the green beret figures for the American commanders, and painted a red line on the bases of the NVA and VC commanders so they could be easily identified. Here are some paper soldiers you can print and use.
 Formations: There are no set formations. American
units consist of 8 figures, NVA and VC units have 10 figures.
All the figures in a unit should be in contact, so double and
triple rank lines work well.
Formations: There are no set formations. American
units consist of 8 figures, NVA and VC units have 10 figures.
All the figures in a unit should be in contact, so double and
triple rank lines work well.
|
US Forces: 7th Cavalry HQ: Col. Moore (Overall Commander) 1st Battalion 2nd Battalion Reserves: 2nd Battalion, arrives turn
4: |
Vietnamese Forces H-15 Main Force VC Battalion: 66th NVA Regiment: Reserves, released at start of turn
3: |
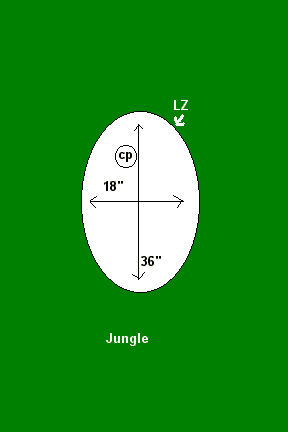
The Board: A 7.5 X 5 foot table was used. The board is considered to be covered by jungle and elephant grass except for Landing Zone X-Ray, a roughly oval shaped clearing in the center of the board, about 36" long and 18" wide. It's inconvenient to cover the board with trees, so simply mark the perimeter of the LZ with a magic marker, or line it with trees (model railroad trees work well). A small round area (no more than 6" in diameter) inside the LZ should be marked as the large termite mound that was used as the battalion command post. Any sort of small hill or piece of felt will do the job, or use your trusty magic marker.
Deployment: The Americans should deploy in the jungle around the perimeter of the LZ, prepared for an attack from any direction. The American HQ group should deploy anywhere inside the LZ. The American reserves are not deployed at this time, they will arrive by helicopter later in the battle. The NVA and VC (including their reserves) may deploy anywhere around the board, at least 18" from the nearest American figure.
Sequence of Play:
1. Vietnamese Move
2. Vietnamese Shoot
3. Americans Move
4. Americans Shoot
5. Artillery
6. Air Support
Movement: All units and commanders move 6", and they may move in any direction. There are no charges or melee. A unit may not move closer than 1" to an enemy unit. All the figures in a unit should move together, with their stands touching. A commander may freely move on his own, or join a friendly unit.
 Shooting: Figures may shoot through 12" of
jungle, and they may fire in any direction. If any member of a
unit can see the target then the entire unit may fire. Units may
not fire through friendly troops, and should not be permitted
to fire through narrow gaps between friendly troops. Roll 1D6
for each figure in the unit. US figures hit on a roll of 5-6,
Vietnamese figures need a 6 to hit. Each hit removes one enemy
stand (player losing figures decides which are removed). A Vietnamese
unit that is reduced to one stand, not counting commanders, is
immediately removed. US units with one stand left are not removed.
US commanders attached to a unit roll two dice when shooting,
Vietnamese commanders attached to a unit roll one die. Commanders
do not shoot, and cannot be targeted if they are not attached
to a unit.
Shooting: Figures may shoot through 12" of
jungle, and they may fire in any direction. If any member of a
unit can see the target then the entire unit may fire. Units may
not fire through friendly troops, and should not be permitted
to fire through narrow gaps between friendly troops. Roll 1D6
for each figure in the unit. US figures hit on a roll of 5-6,
Vietnamese figures need a 6 to hit. Each hit removes one enemy
stand (player losing figures decides which are removed). A Vietnamese
unit that is reduced to one stand, not counting commanders, is
immediately removed. US units with one stand left are not removed.
US commanders attached to a unit roll two dice when shooting,
Vietnamese commanders attached to a unit roll one die. Commanders
do not shoot, and cannot be targeted if they are not attached
to a unit.
First Fire: The Americans have spent the night clearing fields of fire and preparing their positions. This give them an advantage in the opening phase of the battle. Place some kind of marker next to every American unit (I used pipe cleaners) except the reserves and the HQ group. Each unit loses its marker when it moves or fires for the first time. The Vietnamese players may not fire at a unit until it has lost its marker. This allows the Americans to get the first shot.
Artillery: The Vietnamese have mortars, they get
to toss a total of three cotton balls at the Americans. The Americans
have artillery support, they get to throw a total of six large
(triple size) cotton balls at the Vietnamese. Cotton balls may
be thrown from any direction, but the thrower must be an arm's
length away from the table edge. After all cotton balls have been
tossed remove any figure that is touching a cotton ball and any
figure that has a ball covering any part of its base. When in
doubt remove the figure. If a cotton ball ends up on a friendly
figure that's too bad, the figure is still removed.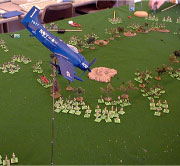
Air Support: The Americans have air support. Each turn, during the air support phase, they get to place two markers anywhere on the board where they want an air attack. The attacks are resolved during the air support phase of the following turn. Roll 1D6 for each marker. If the roll is a 1-4 then the closest enemy unit loses that many figures, if there are no enemy figures within 12" then the attack misses. If the roll is a 5 the attack misses. If the roll is a 6 then the nearest American unit is attacked if it is within 12" of the marker, otherwise it's a miss. If an American unit is attacked roll a second time to determining the results, a 1-4 eliminates that many American figures, a 5 or 6 is a miss. I used 1/72 scale airplane and helicopter models mounted on TV antennas (see WWI Aerial Combat scenario) to add some excitement to the battle. Allow the Americans to select one helicopter or airplane model for each air attack marker, and place the model in the vicinity of the marker. The model doesn't have any real effect on the battle, it's just for decoration, so you don't need them. But they look really cool! Here are some paper aircraft you can print and use.
Broken Arrow: Once per game the Americans can call for "broken arrow." This announcement is made during the air support phase. This will allow them to place four air attack markers during the next two turns instead of the usual two markers.
American Reserves: The American reserves arrive at the LZ via helicopter during the air support phase of turn four. They may be deployed anywhere in the LZ that is at least 6" away from any enemy figures. If the enemy is inside the LZ and some of the reserve units cannot be deployed then they remain off the board, and can try to land during the next air support phase.
Vietnamese Reserves: The Vietnamese reserve units are deployed
at the start of the battle, and may move around as long as they
don't come within 12" of any American units. During turn
three they are released, and may move closer to the Americans
just like any other Vietnamese unit. If an American unit moves
up and shoots at a reserve unit during turn one the reserve unit
is automatically activated and it can move normally on its next
turn.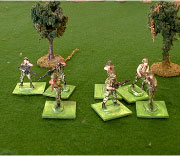
American Command Post: The American command post was set up near a large termite mound that provided some protection from enemy fire. The termite mound is large enough to provide protection for only one unit, and any number of attached commanders. When a unit on the mound takes hits roll 1D6 for each hit scored. If the roll is a 1-3 then the hit is ignored, if the roll is a 4-6 then the hit is applied, and the unit loses a figure.
Resources: A search of the Internet, library, and Magweb, turned up some useful resources for wargaming Ia Drang and the Vietnam War.
|
|
Range | To Hit |
| US | 12" | 5-6 |
| NVA, VC | 12" | 6 |
| Air Attack die roll |
|
| 1-4 | lose that many figures |
| 5 | miss |
| 6 | attack friendly unit, re-roll for result |