 Medieval Castle Siege
Fast Play Rules for Students
Medieval Castle SiegeHistorical Background: A well-built castle could control the surrounding countryside and was very difficult to capture. If you couldn't take it by trickery or treachery your best option was to wait for disease and starvation to force the garrison to surrender. If the castle was well provisioned, or the attackers were in a hurry, then a direct assault might be attempted. The tactics used were basically unchanged since ancient times. Moats could be filled, a ram could bash in the gate, and catapults and trebuchets could knock down the walls. Ladders or a siege tower could also surmount the walls. Another popular (and dangerous) tactic was to undermine the walls with a tunnel.
Battle 1: The attackers decided to concentrate their attacks on the front and rear of the castle. The catapults and ballistae were set up to fire on the rear wall. The ram and siege tower were sent at the front gate and walls. The defenders quickly concentrated their men on these threatened areas. The frontal attack ran into problems almost immediately. Deadly accurate fire from the defenders punished the advancing soldiers. Large rocks rained down on the attackers after they crossed the moat, and by the time the siege tower dropped its bridge and the ram broke through the drawbridge there were only a handful of men left to exploit these openings. The first man through the gatehouse was doused with boiling oil, killing him instantly and dampening the spirits of his comrades. The emboldened defenders counterattacked through the gate and through a hidden sally port. Soon the frontal attack had been completely eliminated.
In the rear the attackers decided
to keep most of their men out of arrow range until they could
breach the walls. The men operating the ballista and the archers
behind their mantlets were, unfortunately, in range and they suffered
the consequences. The attackers had to replace the ballista crew
again and again, and many men were lost in a foolish attempt to
retrieve a mantlet that had been abandoned near the castle walls.
The attackers soon realized that the work would proceed more quickly
if both catapults fired on the same section of wall. Soon they
had two breaches and the soldiers began to advance towards them.
For a while it looked like they might be able to win the day,
but the defenders stubbornly defended the breaches, and the attack
failed.
 Battle 2: This time the
castle was attacked from all sides. The siege tower approached
from the rear, the ram from the front, and one catapult fired
on each sidewall. The fire from the attackers was just as fierce
as that from the defenders. One tower suffered so much from arrow
and ballista fire that it became known as "the tower of death."
The determined defenders continue to send replacements for the
casualties. The attackers decided the time was ripe and put up
ladders on the North and East walls. A barrage of rocks slowed
the attack, and the few defenders that made it up the ladders
were quickly eliminated. At the front the ram reached the drawbridge
and the defenders dumped their boiling oil on it. The oil failed
to ignite and the ram went to work on the drawbridge.
Battle 2: This time the
castle was attacked from all sides. The siege tower approached
from the rear, the ram from the front, and one catapult fired
on each sidewall. The fire from the attackers was just as fierce
as that from the defenders. One tower suffered so much from arrow
and ballista fire that it became known as "the tower of death."
The determined defenders continue to send replacements for the
casualties. The attackers decided the time was ripe and put up
ladders on the North and East walls. A barrage of rocks slowed
the attack, and the few defenders that made it up the ladders
were quickly eliminated. At the front the ram reached the drawbridge
and the defenders dumped their boiling oil on it. The oil failed
to ignite and the ram went to work on the drawbridge.
The East and West walls were breached
almost simultaneously, and attackers moved in for the kill. A
fierce battle raged in both breaches, and the attackers in the
West were stopped. At the East wall the attackers changed tactics.
All the defenders had come down off the wall to defend the breach,
so the attackers used ladders to climb the undefended walls. Soon
they controlled the wall, and captured both of the corner towers.
Another attacking force was sent for the breach to overrun the
compound.
The drawbridge was quickly broken in and attackers poured through
the gatehouse, while at the rear the siege tower had finally moved
close enough to drop the bridge. On the verge of total defeat
the defenders counterattacked ferociously. A small force heroically
defeated the attack from the gatehouse. Then the defenders drove
the attackers back across the fighting bridge and back into the
siege tower. When the defenders dared to cross the bridge and
take the fight inside the tower the attackers were outraged. With
time running out they fought back and drove the defenders back
onto the walls. As the attackers poured into the compound the
defenders controlled only two towers. Any hope of holding out
was obliterated when a catapult destroyed one of the towers. A
volley of arrows eliminated the last of the defenders.
 Rules
Rules
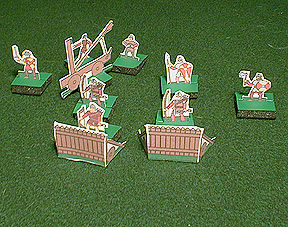
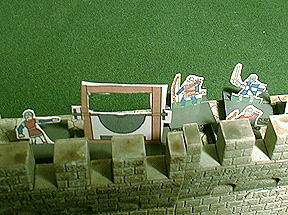
The Miniatures: The figures used were 1/72-scale plastics mounted two per stand, a mix from several sets. Most of the figures were from Revell's English Men at Arms and French Knights. It would have been better if the figures had been mounted singly (pennies work well) but I already had my figures mounted for some earlier battles and didn't want to do it over again. Here are some paper soldiers you can print and use.
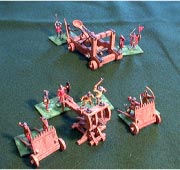
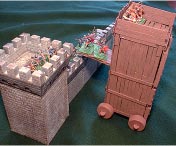
Siege Equipment: My siege engines were made by Zvezda. Their Siege Machines kit #1 includes a catapult, ballista, and three mantlets (I built two of these kits). Siege Machines kit #2 comes with a covered ram, a mantlet, two ladders, and a cauldron. I also used the ladders from their Medieval Fortress kit which I purchased for a future project (it's a wooden fort and not suitable for use as a stone castle). A cheap alternative is to simply draw ladders onto strips of cardboard. Four scorpions from Hat #8035 Roman Catapults were small enough to fit in the towers, so they were used for the defense. I built a siege tower by covering an orange juice carton with craft sticks - the thin rectangular kind (also called splints). A flap cut near the top of the container served as a fighting bridge after being covered and extended with craft sticks. The top of the tower has a protected area for the archers. The wheels and axles were made from popsicle sticks and 2-liter bottle caps. The tower is serviceable but a bit too wide. Hopefully Zvezda will produce a siege tower soon. Here are some paper siege weapons you can print and use.
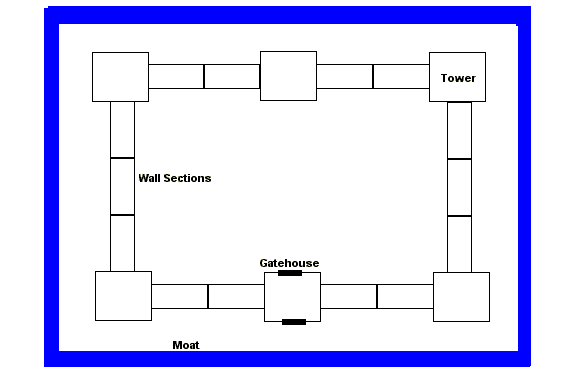
The Castle: I decided to use Zvezda's Ancient Stone Fortress for my castle. For about $40 you get four square towers, two gatehouses, and a bunch of wall sections. They sell additional wall sections and towers separately, and I bought two more sections of wall. If this is too rich for your blood then it's not too hard to scratch build a decent castle. Rob Dean, in Saga #67, reports making a castle from heavy cardboard and oatmeal containers for a class of fourth graders. During the battle the second gatehouse was treated as tower. Many paper castle models are available for free on the web. There's a good looking one made by By Rob Lazzaretti, Dennis Kauth, and Todd Gamble available from Wizards of the Coast. If you don't like that one try looking for a paper castle at freepapertoys.com. Here is a paper castle you can print and build.
|
Attackers: Group 1 Group 2 Group 3 Group 4 |
Defenders: 4 leaders |
The Board: A 5 X 5 foot table was used with the castle located in the middle. This was a tight fit, but a larger table would make it too difficult for the students to reach into the center.
Deployment: The defenders have one ballista (scorpion) on each corner tower. The rest of the defenders should be on the walls or in the center as a reserve. The attackers are organized into four groups and should be 18" from the walls. You can let them decide where to attack, but the battle will go more smoothly if one group attacks each side of the castle. Fill in the moat with small stones in front of the gatehouse and three other locations of the attacker's choosing. These are the only places where the moat can be crossed.
Sequence of Play:
1. Attackers Move
2. Attackers Shoot
3. Melee
4. Defenders Move
5. Defenders Shoot
6. Melee
 Movement: All infantry move 6". Each stand
may move on its own, there are no formations. It takes one move
to go from inside the castle onto the walls, or to go from the
walls up into a tower. Catapults, ballistae, the ram, and the
mantlets can be pushed 6" per turn. The ram takes two stands
to move, other equipment takes only one stand to move. The ballistae
on the castle towers cannot be moved. The Siege tower can be pushed
3" per turn, and requires four stands. A stand which begins
its movement phase at the base of a wall can use it's move to
put up a ladder and climb. One stand can climb if there is a defender
above him (they will fight a melee). Two stands can climb up a
ladder if there is no defender. Once the bridge of the siege tower
has been lowered two stands may cross onto the walls each turn
if there are defenders in the way (they will fight a melee). If
there are no defenders then four stands can cross per turn.
Movement: All infantry move 6". Each stand
may move on its own, there are no formations. It takes one move
to go from inside the castle onto the walls, or to go from the
walls up into a tower. Catapults, ballistae, the ram, and the
mantlets can be pushed 6" per turn. The ram takes two stands
to move, other equipment takes only one stand to move. The ballistae
on the castle towers cannot be moved. The Siege tower can be pushed
3" per turn, and requires four stands. A stand which begins
its movement phase at the base of a wall can use it's move to
put up a ladder and climb. One stand can climb if there is a defender
above him (they will fight a melee). Two stands can climb up a
ladder if there is no defender. Once the bridge of the siege tower
has been lowered two stands may cross onto the walls each turn
if there are defenders in the way (they will fight a melee). If
there are no defenders then four stands can cross per turn.
Shooting: Shooting is targeted at a wall section, tower, or group of men. The person suffering casualties selects which stands are removed. Archers and Ballistae have a range of 18". Catapults have an unlimited range and will generally fire from beyond range of the arrows and ballistae. Roll 1D6 for each archer stand in range. The Archery Table shows the number needed for a hit. Every hit removes one enemy stand. Units that are engaged in melee may not fire, and may not be targeted. Ballistae roll 1D6 and use the Ballistae and Dropped Rock Table. Each time a catapult fires it inflicts 1D6 damage to the wall or tower. Keep track of the accumulated damage until the wall or tower collapses. One stand is required to operate each catapult and ballista. The battering ram inflicts 1D6 damage per turn to the drawbridge, keep track of the damage until the drawbridge is breached. Use common sense when considering line of sight. Most of the attacker's fire will be directed up at the walls and can be fired over the heads of their infantry. Catapults should not fire at an area if attackers are in front of the target and are inside the moat. Catapults cannot fire indirectly at targets inside the walls. The defender's ballistae cannot fire at attackers that have crossed the moat.
Dropping Rocks: Rock dropping is done during the defender's shooting phase. The defenders have four loads of rocks (represented by pebbles) for each side of the castle which can be dropped on attackers after they cross the moat. Roll 1D6 for each load dropped and consult the Ballistae and Dropped Rock table for the results. There are no reloads for dropped rocks.
Boiling Oil: A cauldron of boiling oil is ready for use above the gatehouse. This can be dumped once per game. It can be used on the battering ram during the defender's shooting phase - roll a 5 or 6 on 1D6 to destroy the ram. Alternatively it can be dumped through murder holes when the attackers move through the gatehouse. In this case resolve it during the attackers movement phase. Roll 1D6 for each stand that moved through the gatehouse during the turn. The stand is eliminated on a roll of 3-6.
Melee: Enemy units in contact with one another will fight a melee. Each fight is handled as a one on one battle and resolved separately. Although this slows the game down it adds to the suspense. Each player rolls 1D6 simultaneously and adds any bonuses that apply - check the Melee Table. The player with the lower modified roll is eliminated, the castle defenders win all ties. If two large groups meet in melee you can keep rolling off the battles as a series on one on one fights until all the stands from one side have been eliminated.
Breaching the Walls and Drawbridge: Wall sections can withstand 16 points of damage, towers can take 25 points of damage, and the drawbridge can take 13 points of damage before breaking. When a wall section or tower collapses any figures that were on it are eliminated. Remove the wall section or tower and replace it will a small pile of pebbles to represent the rubble. Attackers can move across the breach on future turns. When the drawbridge is broken the gates should be opened and the attackers can move through on the next turn.
Siege Tower: Once the siege tower gets within a few inches of the walls it can try to lower the fighting bridge. If the defenders have at least one stand on the walls in front of the tower they can attempt to prevent this (poles would be used to keep the bridge up). The defender rolls 1D6 and a roll of 5 or 6 prevents the bridge from dropping, any other number and the bridge is lowered and can be used next turn. The defender must roll each turn to prevent the bridge from lowering but once lowered it cannot be forced closed again.
Sally Port: Allow the defenders to secretly designate
one wall section as the location of a concealed sally port. During
their movement phase the defenders may open the sally port and
move units through it for a counterattack. They may close it again
at the end of a subsequent defenders movement phase as long as
they have a stand next to the wall. Attackers cannot break open
the sally port, but they may move through it if it is left open.
Mines, Flaming Arrows, and Other Cool Stuff: I followed the "Keep it Simple" philosophy and left out rules for some actions that players might want to try. If you want to include these things just make up your own rules, or check out the Tactica Medieval Rulebook for some good ideas.
Victory Conditions: The attackers must take decisive control of the castle by the end of the game (about 90 minutes).
Resources: A search of the Internet, and Magweb, turned up some useful resources for wargaming Agincourt.
|
|
|