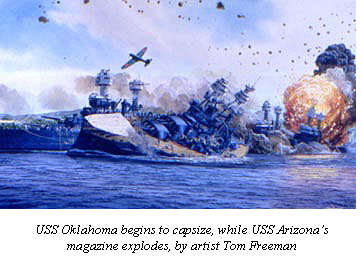
Tora! Tora! Tora!
The Attack on Pearl Harbor, December 1941
By Pete Pellegrino
 Background:
November 1941. War clouds
are gathering in the Pacific. Tensions have been increasing between Japan
and the US since Japan’s invasion of China in 1931. The US has enacted an
oil embargo against Japan following the invasion of French Indochina in
1940. Diplomatic negotiations are at an impasse. Anticipating hostilities,
the Imperial Japanese Navy has planned a surprise attack against US forces
at Pearl Harbor, HI. US intelligence has intercepted coded Japanese
messages and has concluded that an attack is likely somewhere in the
Pacific, most likely in the Philippines, between December 1st and
10th. As a precaution, the Alert Status on the Hawaiian island
of Oahu has been raised from peacetime Alert Level 0 to Alert Level 1.
Limited resources are available to selectively increase the Alert Level to 2
or 3, but extended increases in alert levels will unnecessarily tire men and
consume limited supplies.
Background:
November 1941. War clouds
are gathering in the Pacific. Tensions have been increasing between Japan
and the US since Japan’s invasion of China in 1931. The US has enacted an
oil embargo against Japan following the invasion of French Indochina in
1940. Diplomatic negotiations are at an impasse. Anticipating hostilities,
the Imperial Japanese Navy has planned a surprise attack against US forces
at Pearl Harbor, HI. US intelligence has intercepted coded Japanese
messages and has concluded that an attack is likely somewhere in the
Pacific, most likely in the Philippines, between December 1st and
10th. As a precaution, the Alert Status on the Hawaiian island
of Oahu has been raised from peacetime Alert Level 0 to Alert Level 1.
Limited resources are available to selectively increase the Alert Level to 2
or 3, but extended increases in alert levels will unnecessarily tire men and
consume limited supplies.
Tora! Tora! Tora! is a game played in two parts – a strategic planning phase followed by a tactical attack phase. US players must decide how to employ limited forces in and around Pearl Harbor over the 10 day vulnerability period. Japanese players must select the timing, direction, and composition of the attack in order to inflict enough damage to prevent the US Pacific Fleet from interfering with future Japanese war plans in Southeast Asia. Game file downloads are located at the bottom of the screen.
US Forces
US aircraft are arranged in groups of two to four fighters per 2”x2” token or “unit” and consist of 96 P-40 Warhawks (24 units), 36 P-36 Hawks (12 units), 14 P-26 Peashooters (7 units), 20 F-4F Wildcats (10 units), and 8 F-2A Buffalos (4 units).
|
US Forces |
||
|
Unit |
Scores Hit |
Location |
|
P-40 Warhawk |
4-6 |
Hickam / Wheeler |
|
P-36 Hawk |
5-6 |
Hickam / Wheeler |
|
P-26 Peashooter |
6 |
Hickam / Wheeler |
|
F-4F Wildcats |
4-6 |
Kaneohe / Ewa |
|
F-2A Buffalo |
6 |
Kaneohe / Ewa |
|
Ship AAA Batteries |
6 |
Pearl Harbor Anchorage |
|
Shore AAA Batteries |
6 |
Oahu Zones 2SE and 2SW |
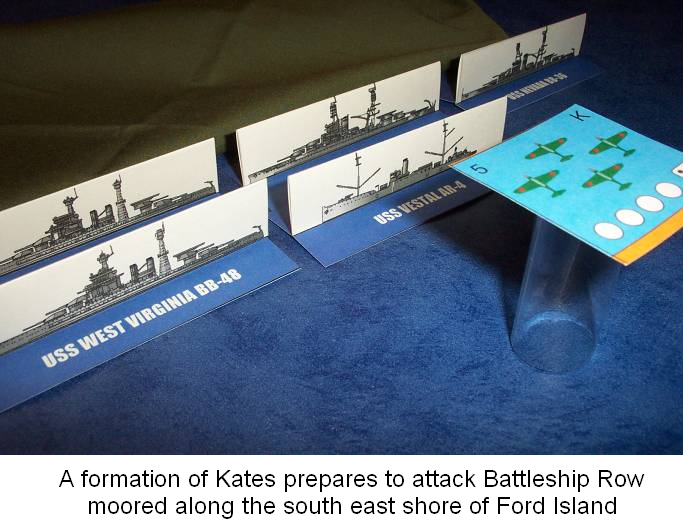
The US Navy ships in play are the Pacific Fleet battleships and other vessels that were originally anchored around Ford Island:
|
USS Lexington (CV-2) USS Enterprise (CV-6) USS Nevada (BB-36) USS Oklahoma (BB-37) USS Pennsylvania (BB-38) USS Arizona (BB-39) |
USS USS Tennessee (BB-43) USS USS California (BB-44) USS USS Maryland (BB-46) USS USS West Virginia (BB-48) USS USS Utah (AG-16)
|
USS USS Raleigh (CL-7) USS USS Detroit (CL-8) USS USS Neosho (AO-23) USS USS Tangier (AV-8) USS USS Vestal (AR-4)
|
USS
Oahu and Pearl Harbor
 Zones:
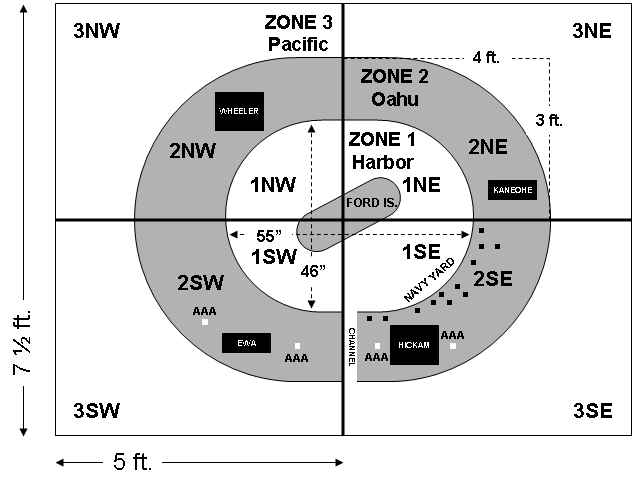
The playing area is divided up into 12 zones resembling a three ring target
cut into quadrants. Zone 1: Pearl Harbor and Ford Island, subdivided into
quadrants 1NW, 1NE, 1SW, 1SE; Zone 2: Surrounding island of Oahu, subdivided
into quadrants 2NW, 2NE, 2SW, 2SE; Zone 3: Pacific waters adjacent to Hawaii
subdivided into quadrants 3NW, 3NE, 3SW, 3SE.
Zones:
The playing area is divided up into 12 zones resembling a three ring target
cut into quadrants. Zone 1: Pearl Harbor and Ford Island, subdivided into
quadrants 1NW, 1NE, 1SW, 1SE; Zone 2: Surrounding island of Oahu, subdivided
into quadrants 2NW, 2NE, 2SW, 2SE; Zone 3: Pacific waters adjacent to Hawaii
subdivided into quadrants 3NW, 3NE, 3SW, 3SE.
Airfields: There are four airfields around Oahu in Zone 2: USAAF airfields Hickam (2SE) and Wheeler (2NW), and NAS Kaneohe (2NE) and MCAS Ewa (2SW). Wheeler and Hickam are presented by 8”x10” sheets of gray construction paper, with room for 20 aircraft units (4x5), though additional aircraft can be stationed there if parked “wingtip-to-wingtip” (i.e. stacked on top of one another). The smaller Marine and Navy fields at Ewa and Kaneohe use 4”x10” half sheets, with room for 10 units (2x5) or more if stacked.
Anti-Aircraft Artillery (AAA) Batteries: Fort Barrette and Fort Weaver (2SW) and Fort Closson and Fort Auha (2SE) can only engage targets in their zone.
Navy Facilities: Zone 1 contains Ford Island and the surrounding harbor anchorages. The Navy Yard in Zone 2SE consists of 12 dry dock, repair and machine shop, and fuel storage tank units. Also in Zone 2SE is a channel connecting the harbor with the Pacific Ocean.
Refer to the end of these instructions for more detailed information regarding island setup.
US Strategic Planning Phase
Alert Readiness: Using the US Alert Planner (in Player Aids file) US players can selectively increase the alert status for Airfields, Ships and AAA Batteries, as well as plan for radar and patrol plane surveillance. The alert levels all start at “1” for each of the ten days. Players may add up to 6 ‘points’ to each alert status. For example, increasing the Airfield Alert from Level 1 to Level 2 on Dec 3rd costs 1 point; from Level 1 to Level 3 on Dec 4th costs two more points. Likewise for increases to Level 2 on Dec 5th and Level 3 on Dec 6th for a total of 6 points. Similar 6 point increases can be made for Ship and AAA Battery Status. Note that alert levels apply to all units of that type, i.e. all airfields, all ships, etc.
Alert Levels affect reaction time and capability. US forces in Alert Level 1 can only begin to respond on Turn 4, or when Japanese forces reach Zone 1, whichever occurs first. Likewise, Alert Level 2 forces can respond on Turn 3/Zone 2, and Alert Level 3 forces on Turn 2/Zone 3 (i.e. Turn + Alert = 5, Zone = Alert). If radar or PBYs are searching the same sector from which IJN planes first attack, then all US forces may respond one turn sooner (i.e. Turn + Alert = 4). On Turns 7 and 13, all Alert Levels are increased by 1 level.
The higher the Alert Level, the more planes, ships, and guns are manned and ready to respond. See the chart below for specifics. Note the conditions YOKE and ZEBRA under Ship Status. This refers to the degree to which a ship has closed watertight doors throughout the vessel. YOKE allows some doors to remain open to facilitate movement around the ship; ZEBRA closes all doors to improve battle damage survivability.
|
Alert Level |
Airfield Status |
Ship Status |
AAA Battery Status |
|
1 |
“Stand By” 2 fighter units can launch/field/turn |
Minimum watch standers. Condition YOKE set. Roll 3d6 (2d6 + 1d6 per Alert Level) to score AAA hits |
Sites manned, ammo in bunkers. Roll 3d6 (2d6 + 1d6 per Alert Level) to score AAA hits |
|
2 |
“Strip Alert” 3 units can launch/field/turn |
Full crew onboard. Condition YOKE set. Roll 4d6 to score AAA hits |
Sites manned, ammo distributed. Roll 4d6 to score AAA hits |
|
3 |
“Combat Air Patrol” 3 fighters from each field airborne on patrol overhead. 3 additional fighter units can launch/field/turn |
General Quarters, battle stations manned. Condition ZEBRA set (add 1 to ship strength). Roll 5d6 to score AAA hits |
Sites manned, guns loaded. Roll 5d6 to score AAA hits |
|
Radar |
Newly installed radar is still unreliable. One search sector per day. Roll 1d6: Radar malfunctions and is inoperable on a given day on a roll of 1-2. |
||
|
Patrol Planes |
Limited numbers of PBY’s available for long range patrol. One search sector can be assigned each day. |
||
Force Deployment: P-40s, P-36s, and P-26s may deploy in any mix to the USAAF airfields, while the F-4Fs and F-2As may deploy to any NAS/Marine Corps field. If stacking units, top most units launch before underlying units. If in Alert 3 CAP, airborne fighters may station in any zone. The aircraft carrier USS Enterprise has orders to deliver aircraft to Wake Island, while USS Lexington must deliver planes to Midway. Prior to departing, each carrier will need to be in Pearl Harbor one day. When in port, carriers anchor along the north side of Ford Island. Battleships anchor anywhere next to Ford Island or along the Navy Yard. All other ships may anchor anywhere in Zone 1. Ships may “nest” together, i.e. one ship anchored next to another, though no more than two ships may nest together. To move, the outside ship must move first. Ship bases may overlap. Carriers cannot nest.
IJN Forces
Japanese forces consist of 120 B5N Kate torpedo bombers (30 units), 96 D3A Val dive bombers (24 units), and 84 A6M2 Zero fighters (21 units), arranged in groups of two to four planes per 2”x2” unit.
|
Imperial Japanese Navy |
||||
|
Aircraft |
Scores Hit |
Ordnance |
Targets |
Notes |
|
A6M2 Zero Fighter |
3-6 |
None |
Aircraft |
Strafing hits score the same as airborne hits |
|
D3A Val Dive Bomber |
4-6 |
GP Bomb |
Aircraft (parked), Buildings, AAA |
If bombing stacked aircraft, score hits against top target first. If top unit destroyed, any remaining hits can be scored against lower unit |
|
B5N Kate Torpedo Bomber |
4-6 |
GP Bomb |
Aircraft (parked), Buildings, AAA |
|
|
4-6 |
AP Bomb |
Ships |
Re-roll 6’s for additional damage |
|
|
4-6 |
Torpedo |
Ships |
Need 2”x2” of open water next to target for torpedo run |
|
IJN Strategic Planning Phase
Using the IJN Attack Planner (in Player Aids file) IJN players must determine the following details of their attack:
Day of Attack – pick a date between December 1st and 10th.
Direction of Attack – pick initial approach sectors, NE, NW, SE, or SW for each group of aircraft.
Number and Composition of Waves – a wave may consist of any mix of Kates, Vals, and Zeros up to 48 units in a wave, and no more than 48 total units can be in play on the map at any one time. A maximum of three waves may be launched, though no planes from Wave 2 may participate in Wave 3. See “Pressing Your Luck” notes below.
Ordnance – General Purpose (GP) bombs can be used against parked aircraft, structures and AAA batteries. Armor Piercing (AP) bombs and torpedoes are used against ships. Zeros do not carry any ordnance other than machine guns/20mm cannons. All bomber aircraft in a single unit carry the same type of ordnance, as indicated by an ordnance token placed beneath the unit token. Ordnance tokens are not limited and may be reused as necessary.
 Tactical
Attack Phase
Tactical
Attack Phase
After each side has made its plans, the IJN players first announce the day of the attack. US players refer to their Alert Status Planner and set forces according to the plan for that day. For Turn 1, IJN players then place all first wave planes on the Zone 3 sector(s) per their attack plan. Based on their radar coverage, sea plane patrol sector and alert status, the Americans may or may not be able to respond. IJN players continue to move their planes/attack targets turn by turn until the Americans are able to respond, after which IJN forces always move/attack first followed by US. Use the Turn Tracker (in Player Aids file) to keep track of the turns.
Movement: Airplanes either move from one zone to another OR attack any one target in their current zone per turn. Taking off from an airfield counts as a move. Ships can move 1 base length per turn in the Zone 1 harbor and the Zone 2 channel; up to 3 lengths in Zone 3 waters. Note that a single ship sunk in the channel blocks the channel.
Attacks: Any target in the same zone as the attacker can be engaged.
Air-to-Air: A fighter unit may attack one other air unit per turn, and any air unit can only be attacked once per turn by another air unit (this is easily tracked by first laying out all plane-against-plane pairings, then resolving combat). Fighters may dogfight with other fighters or attack bomber formations. If a fighter unit pairs off with another fighter, then a dogfight ensues and BOTH attacker and defender roll simultaneously for hits. Note that this does NOT count as the defenders’ turn, and surviving defending units may move or attack freely during the second half of the turn. Bombers do not dogfight and do not make defending rolls.
Air-to-Ground: A bomber unit can make a single attack against one target, rolling 1d6 for each strength point remaining, scoring a hit for each 4, 5 or 6 rolled. If bombing stacked aircraft on the ground, score hits on top unit first, then the lower. Aircraft on the ground can only be attacked once per turn. For torpedo attacks, there must be a patch of open water 2” x 2” next to the long edge of the target ship’s base (this is easily checked as the torpedo token is 2”x2”). For armor piercing bomb attacks, re-roll any 6’s for additional damage; continue to re-roll until no 6’s appear. After a bombing attack the ordnance token is set aside (may be reused for later waves). Fighters can attack one target per turn, no limit on the total number of attacks. Zeros may also strafe aircraft units on the ground; any hits are scored the same as bombs.
Ground-to-Air: AAA batteries and ships may engage aircraft in their zone. Each battery or ship may attack one air unit per turn. Multiple batteries and ships may engage the same target on the same turn. Navy Yard facilities can throw up small arms fire from windows and roof tops. If attacked, a targeted yard facility can roll 1d6 against the attacking unit. A six is needed to hit. In AAA Alert Level 1, roll 1d6 once; Alert Level 2 roll 1d6 twice; and in Alert Level 3 roll 1d6 up to three times. Regardless of the number of sixes rolled, only one hit can be scored.
Pressing Your Luck: Limited fuel, the time to rearm, launch and recover aircraft, approaching nightfall, the unknown whereabouts of the US carriers, fear of detection, increasing effectiveness of US defenses – all these factors influenced the Japanese decision as to whether or not to launch a third wave. Commencing with Turn 11, the IJN task force begins to be exposed to increasing risk the longer they remain in Hawaiian waters. From an ordinary deck of playing cards, select the Ace through Ten of Hearts and Diamonds, and the Ace of Spades and of Clubs. Set aside the rest of the deck. Shuffle the red suits together with the Ace of Spades. If at least one US carrier is NOT in port on the day of the attack, shuffle in the Ace of Clubs as well and place deck face down near the map board. At the end of each turn, starting with Turn 11, IJN turns over one card. As long as a red card is turned over, fate continues to favor the Japanese; however if a black card is turned over, the Japanese task force must hastily withdraw and all IJN aircraft in Zones 1 – 3 fail to return to the carriers in time and are considered lost. The game ends at this time!
Outcome
Winning: Japan desires further expansion into Southeast Asia in early 1942. Japan wins a strategic victory if they are able to inflict enough damage at Pearl Harbor such that the US Pacific Fleet is out of action for the next six months and unable to interfere, while preserving enough of their own carrier air power to conduct follow-on operations. To counter Japanese plans, the USN must have at least five capital ships (carriers (CV) or battleships (BB)) available after the last IJN plane exists Zone 3 (or IJN “luck” runs out). If the USN has fewer than five undamaged capital ships, it may be able to repair some damaged (but not sunken) ships in time if sufficient repair facilities remain intact. The more widespread the damage to ships, fuel farms, and machine shops, the slower the repairs and the fewer the ships available for any spring action.
USN Strategic Victory While the US suffered losses, the damage is not great enough to prevent the US Pacific Fleet from deploying forces to Southeast Asia and disrupting Japanese strategic plans.
IJN Tactical Victory Moderate US casualties sidelines of much of the Pacific Fleet for nearly a year, but with the remaining ships and repair capacity, the USN is able to deploy a small task force to thwart IJN plans to capture Port Moresby in May 1942 at the Battle of the Coral Sea.
IJN Strategic Victory Severe damage at Pearl Harbor prevents the US from interfering in Japan’s southward expansion of the empire and securing access to vital raw materials in Southeast Asia needed to sustain Japan’s war effort. But in order to claim a strategic victory, the IJN must preserve at least 50% of its carrier aircraft for future operations. If losses exceed 150 aircraft, the best the IJN can achieve is a tactical victory, but strategic defeat.
|
USN Capital Ships |
Outcome |
||||||
|
OK |
Damaged |
Sunk |
|||||
|
5+ |
NA |
NA |
USN Strategic Victory |
||||
|
4 |
4-6 |
0-2 |
|
|
|
|
|
|
1-3 |
3-5 |
IJN Tactical Victory |
|
|
|||
|
3 |
5-7 |
0-2 |
but Strategic Defeat |
|
|
||
|
2-4 |
3-5 |
|
|
|
|
||
|
2 |
7-8 |
0-1 |
|
|
|
|
|
|
3-6 |
2-5 |
|
|
|
|||
|
1 |
8-9 |
0-1 |
|
|
|||
|
4-7 |
2-5 |
IJN Strategic Victory |
|||||
|
0 |
5-10 |
0-5 |
|
||||
|
Navy Yard Damage |
0-20% |
21-40% |
41-60% |
61-80% |
81-100% |
||
|
Number of Hits |
0-12 |
13-24 |
25-36 |
37-48 |
49-60 |
||
Optional Intelligence Rules
Option 1: Can You Keep a Secret? Players conduct the planning phase one day, the tactical attack phase the next. See if the players are able to keep their plans secret from one another, or successfully spread misinformation. Prior to the start of the attack phase, allow USN (or USN and IJN) players to make any last minute changes to their plans.
Option 2: Code Breaker! The US has intercepted a coded IJN message. Have the IJN players give the US players a cipher to work out. The code needs to make reference to the attack date with month and day with spelled numbers, for example, “December Tenth” or “Twelve Ten.” The message can be cryptic such as “Climb Mt. Nitaka Twelve Eight,” which was Yamamoto’s actual coded message sent to Nagumo’s fleet. See “Secret Codes for Kids” at http://www.topspysecrets.com/secret-codes-for-kids.html.
Play Tips
- This is a large game that works best with multiple players, with groups essentially playing four simultaneous games in each of the four compass quadrants.
- Read all the directions, including those which are part of the download files! Examples of how to use the Alert and Attack Planners are included as part of the Player Aid file. In some cases, you will need to make multiple copies of the same sheet of tokens in a file.
- When selecting the aircraft for each IJN wave, use a piece of paper marked with the wave number and divided into the compass quadrants to initially hold the wave, using a separate piece of paper for each wave. This makes it easier to transport the wave to the map table from the planning area then sort them into the attack quadrants. When aircraft fly out of Zone 3 and return to the carriers, put them back on the same sheet of paper. This makes figuring out which planes are eligible for the optional third wave easier.
- On each turn, starting in Zone 1, resolve combat first - pairing up attacker to target, then resolve movement. Repeat for Zones 2 and 3. This minimizes confusion over who has attacked and who has moved in a given turn in a given zone. Remember there are lots of airplanes flying around!
- When counting up IJN aircraft losses, don’t forget to count hits on units which were not completely shot down. For example, there may be a unit of Kates from the second wave which took two hits out of four which is sitting on the Japanese players’ table which would count as two aircraft lost. You may want to keep a running tally.
- In the interest of time, you may want to limit the IJN to only two waves and/or change when (or even if) “Pressing Your Luck” becomes a factor.
Island Set Up for TORA! TORA! TORA!
Two 5 x 7 ½ foot tables covered with blue cloth are recommended. Each quadrant of Zone 2 Oahu is approximately 3 x 4 feet. Oahu and Ford Island can be made from green felt, poster board, or construction paper, or outlined in string or tape. The exact shape of each quadrant is not important as long as:
(1) Each quadrant has sufficient room to place its specific airfield,
(2) The resultant harbor is approximately 55 inches east-west and 46 north-south, and
(3) The Channel connecting the Zone 1 Harbor to the Zone 3 Pacific is 3 x 16 inches.
Dimensions for specific features:
Ford Island: 8 ½ x 22 inches Pearl Harbor: 55 x 46 inches
Channel: 3 x 16 inches Hickam and Wheeler: 8 x 10 inches
Ewa and Kaneohe: 4 x 10 inches
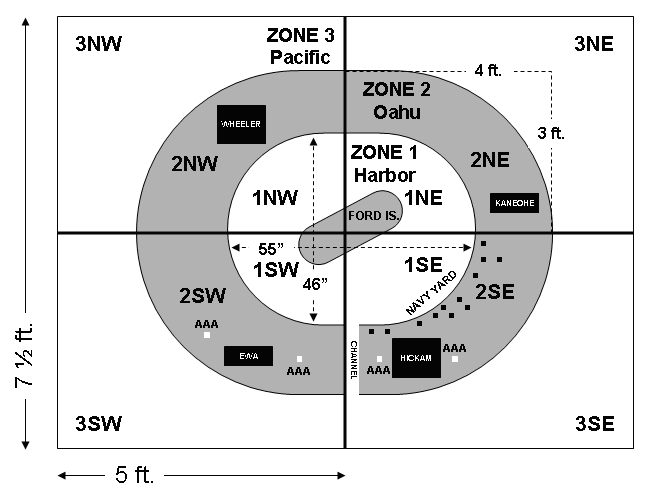
Place Hickam Field in Zone 2SE, Wheeler in 2NW, Ewa in 2SW and Kaneohe in 2NE. Place two AAA batteries near Ewa and two near Hickam. Place the 12 Navy Yard tokens anywhere along the harbor shore of Zone 2SE.
Use tape to mark the zone quadrant boundaries. The channel is considered to be part of Zone 2SE.
Game Files
Game files are available in either PowerPoint or PDF format. The PowerPoint versions tend to have crisper detail.
Planes and Ordnance Tokens.ppt Planes and Ordnance Tokens.PDF
Ship Pieces.ppt Ship Pieces.PDF
Navy Yard and AAA.ppt Navy Yard and AAA.PDF
Player Aids.ppt Player Aids.PDF
Also available are the game rules as a PDF for easy reference during play.
Bonus! Download 3D USS Arizona Memorial models in PowerPoint or PDF format.
Special thanks to Jon Oldham for his ship designs and Clive for his AAA battery.