"Damn the Torpedoes!"
The Battle of Mobile Bay
Design and Fight a
Civil War Ironclad
< Home
>
By Pete Pellegrino
(Naval War College)
 Historic
Background: On August
5, 1864, Admiral Farragut led a flotilla of 14 wooden ships, four
ironclads, and numerous gunboats into Mobile Bay to seal off the
city of Mobile, one of the two remaining Confederate ports. Guarding
the bay were Forts Morgan and Gaines, natural and manmade obstructions,
torpedo (mine) fields, and a small confederate naval force under
the command of Admiral Buchanan, embarked in the ironclad CSS
Tennessee.
Historic
Background: On August
5, 1864, Admiral Farragut led a flotilla of 14 wooden ships, four
ironclads, and numerous gunboats into Mobile Bay to seal off the
city of Mobile, one of the two remaining Confederate ports. Guarding
the bay were Forts Morgan and Gaines, natural and manmade obstructions,
torpedo (mine) fields, and a small confederate naval force under
the command of Admiral Buchanan, embarked in the ironclad CSS
Tennessee.
While entering the bay, the Union
monitor USS Tecumseh struck a submerged torpedo and sank. Under
fire from both the Confederate fleet and Fort Morgan, Farragut
had to choose between retreating or risking the minefield. He
then issued his famous order, "Damn the torpedoes! Full speed
ahead!"
Passing the minefield safely,
Union ships defeated the Southern flotilla, while Union ground
forces captured the forts. Although the city of Mobile remained
in Confederate hands, the last blockade-running port on the Gulf
Coast east of the Mississippi was closed.
Though both ironclad and wooden
ships fought at Mobile Bay, this game gives players the opportunity
to see how an all ironclad engagement may have been fought with
ships of varying designs, and consider the trade offs naval engineers
must make when designing a warship.
Battle 1 (Playtest): The Union fleet bravely steamed right
through the mine field, suffering only minor damage to one vessel.
One large ocean going Union ironclad led the the attack, moving
far ahead of her sister ships. She engaged the Confederate fleet
at short range, directly under the guns of Fort Morgan. This aggressive
tactic succeeded in pinning most of the Confederate fleet, allowing
the remaining Union ships to maneuver freely. Both sides opted to
engage the enemy at close range, and ramming attacks did considerable
damage to both sides. One light Confederate ironclad was able
to slip past the Union fleet, steaming through shallow water where
the heavier ships couldn't follow, and attack the Union ships
from behind. Two Union ironclads were assigned to chase her down
and, after a lively pursuit and battle, the battered Confederate
was forced to surrender. Slowly the Union fleet was able to destroy
the Confederates, while suffering fearful damage in return. Fort
Morgan, in particular, did a lot of damage. In the end the Confederates
were defeated, and the battle was a Union victory.
Instructions for Using the Construction
Kit
You can download the necessary files
as one PDF file or individual GIF files:
Ironclad Construction Kit.PDF (182 KB) All the files combined
ironclad construction
template.gif
ironclad
status sheet.gif
fort templates.gif
fort
status sheets.gif
historic
examples.gif
Mobile
Bay map.gif
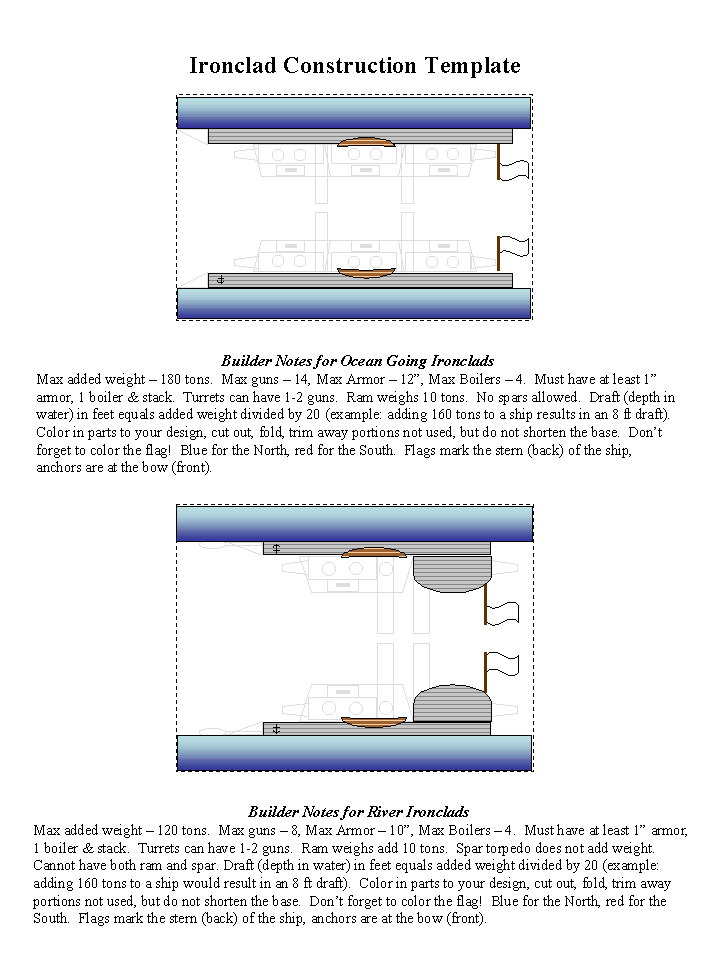
Ironclad: After deciding on an ironclad class, darken the
outlines and color in those portions of the ship template that
correspond to your design. If your ship has guns on both the right
and left sides of the ship, ensure you color in the right number
of gun ports. If a turret has only one gun, color in the fore
or aft facing gun, otherwise color in the two side spots (on one
side only! Remember, the turrets can turn, so don't worry about
which side the guns are colored in on.). Other building tips are
on the templates. You can add extra items like masts, rigging,
and additional flags that are not on the template, but no additional
guns, armor or stacks other than those already on the template.
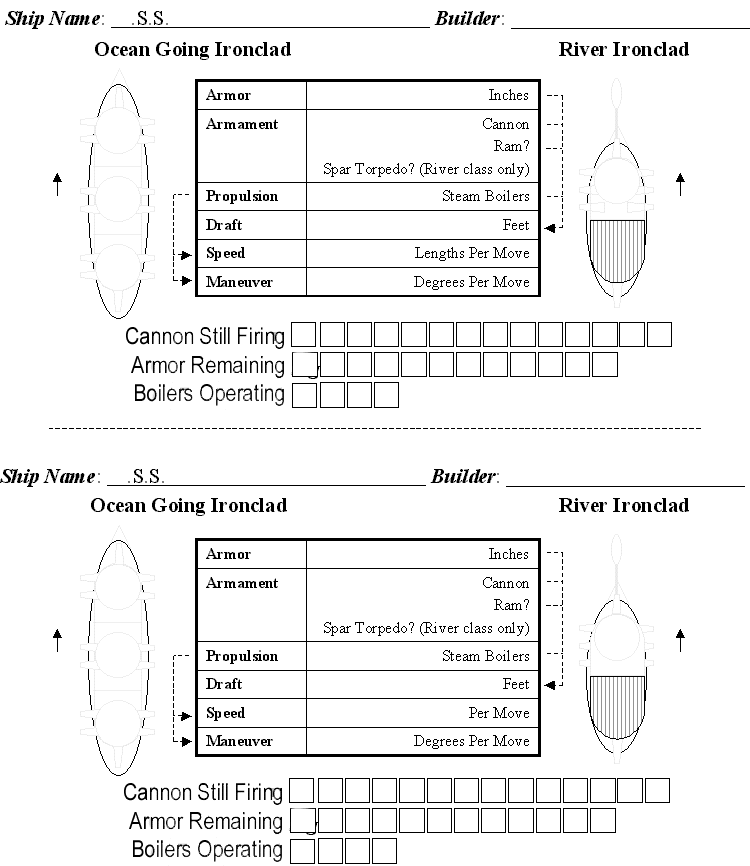
Status Sheet: Once your ship is designed, fill in the
status sheet. Be sure to darken the appropriate lines on the status
sheet template to represent your ship. This will be used to mark
off which cannons are damaged. Fill in the characteristics of
your ship in the center boxes. Finally, cross off the unused damaged
boxes next to Cannons, Armor and Boilers. There should be one
block for each inch of armor, cannon and boiler. These will be
used to track overall damage during the battle.
Construction: A player may customize either one Ocean-Going
ship or two River ships as follows:
Displacement and Draft: Builders may add an additional 180 tons
to the basic hull of the large Ocean-Going Class ironclads and
120 tons to the smaller River Class ironclads. Every cannon, overall
inch of armor, steam boiler/furnace, and ram adds 10 tons. A ship
sits in the water (draft) as deep as the total added weight divided
by 20, rounded up (adding 150 tons to a ship would result in an
8 ft draft).
Armor: Maximum iron plate armor is 12 inches on Ocean
Class, 10 inches of iron/wood backed armor on River Class. Every
ship must have at least 1 inch of armor.
Steam Power (Boilers/Furnaces): Both classes use steam power. Ocean Class
ironclads use screw propellers below the water line, River Class
use paddlewheels mounted in armored structures near the stern.
Every ship must have 1-4 boilers/furnaces. 1-2 boilers need one
smoke stack; 3-4 boilers need two stacks. Stacks do not add weight.
Cannons and Mountings: Maximum number of cannons on an Ocean
Class is 14; River Class is 8. Guns can be in revolving turrets
or fixed casements. An Ocean Class has room for any combination
turrets and casements up to a maximum of three 'structures' (3
end-to-end casements, or 2 turrets and 1 casement, or 3 turrets,
etc) . A River Class has room for two structures; however, one
structure is required to house and protect the paddlewheel, though
has room inside for one optional aft pivot gun. The builder may
therefore only add one turret or one casement to the forward part
of the ship. A turret can hold 1-2 guns. Turrets can fire in all
directions not blocked by another part of the ship (excluding
stacks). Broadside casement guns must be pointed within 10 degrees
of the target. Fore and aft casement guns can pivot up to 45 degrees
either side of centerline.
Rams: Rams attach to the bow and increase the chance
of causing damage when ramming. Rams add 10 tons of weight to
the ship. Both Ocean and River Class may use rams.
Spar Torpedoes: Only River Class ironclads may have a
spar torpedo. When rammed against another ship, the torpedo explodes.
A spar can only be used once. A spar does not add weight, however
a spar limits turns to no more than 45 degrees per move, regardless
of number of boilers operating. Turns greater than 45 degrees
will cause the spar to break off. A ship cannot have both a ram
and a spar torpedo.
Set Up
The game is played on a 5' x 7
½' table covered with blue cloth. Green felt shapes can
be cut out to represent Mobile Point, Dauphin, Pelican and Sand
Islands. Place Forts Morgan and Gaines on Mobile Point and Dauphin
Is. respectively. Blue yarn is taped down to mark the boundary
between deep water (10+ feet) and shallow 5 foot water. Green
yarn is used to mark the boundary between shallow 5 foot water
and 3 foot shoal water. If any part of a ship base touches the
yarn, it is considered to be in the shallower water for grounding
purposes. Place the Confederate navy anywhere north of Forts Morgan
and Gaines. Place the Northern navy anywhere south of the Sand
Is.

Obstacles: Pilings - Southern players may place
8 pennies any where in water 5 feet deep or less to represent
pilings. To pass a piling, no part of the ship's base can touch
the penny. Torpedoes (or mines) - Cut out eight 1 inch squares
from blue construction paper. Place an 'X' on one side of two
squares (tip: use pencil, markers tend to bleed through). Turn
the X's face down and shuffle with the unmarked squares. Southern
players then lay the squares face down anywhere north of the Sand
Is. If a ship's base touches a square, turn over the square. If
there is an X, a torpedo has exploded! Roll for damage per spar
torpedo rules.
 Play
Play
Move Sequence: (1) Union navy moves/fires, (2) Forts
fire, (3) Confederate navy move/fires.
Movement: An ironclad may move one base length and turn 45
degrees for each boiler operating. Moves ahead and turns can be
conducted in any order. A ship with three boilers operating can
therefore move three lengths and make up to three turns totaling
135 degrees, though any one turn cannot exceed 45 degrees. A ship
may also move backward, but cannot move forward and backward in
the same turn.
Attack: First check for hits - Roll 1d6 for each operable
gun able to bear. (Note: If firing more than one gun, for each
pair of 'snake eyes' rolled, one breach explodes!) Short range
(0-4 inches) hits on 4-6; medium range (5-8 inches) on 5-6, and
long range (9-12 inches) on 6.
Second, check for armor penetration
- Attacker re-rolls dice that indicated hits. Defender rolls 1d6
for each 2" of armor remaining, rounding up. Pair highest
attacker/defender rolls, larger number wins. Check next highest
pair, etc. Ties go to defender. If the attacker has more dice
then any unmatched dice automatically penetrate the defender's
armor. Defender determines distribution of any damage by marking
off a gun, armor inch, or boiler from his status sheet. If last
gun is destroyed, ship can no longer fire. If last boiler is lost,
ship can no longer move. If last inch of armor is lost, ship is
destroyed!
Ramming/Collision: If ship bases overlap, each ship rolls
dice equal to the sum of armor remaining + boilers operating,
divided by 2. If the ship ramming has a ram bow installed, roll
one additional dice. Pair highest dice. Higher dice inflicts damage
on lower. If defender rolls a 6, attacker also loses ram. In ties,
both are ships damaged. Players determine damage distribution
per Attack Rules; however at least one damage point must be applied
against a gun on the side rammed. If rammed from behind, at least
one damage point must be applied to a boiler.
Grounding. If sailing into water less than ship's
draft, then ship will run aground. On grounding, roll 1d6. 1-2
causes 1 damage point to boilers, 3-6 causes 1 damage point to
armor. If engines are still operable, roll 1d6 each turn to break
free. Successful on roll of 5-6.
Spar Torpedoes. If a River Class ship hits another ship
with its spar torpedo, attacker rolls 3d6 and defender rolls 1d6
for each inch of armor remaining. Tie goes to defender. Each winning
attacker dice causes 2 points of damage. Damage is distributed
the same as ramming.
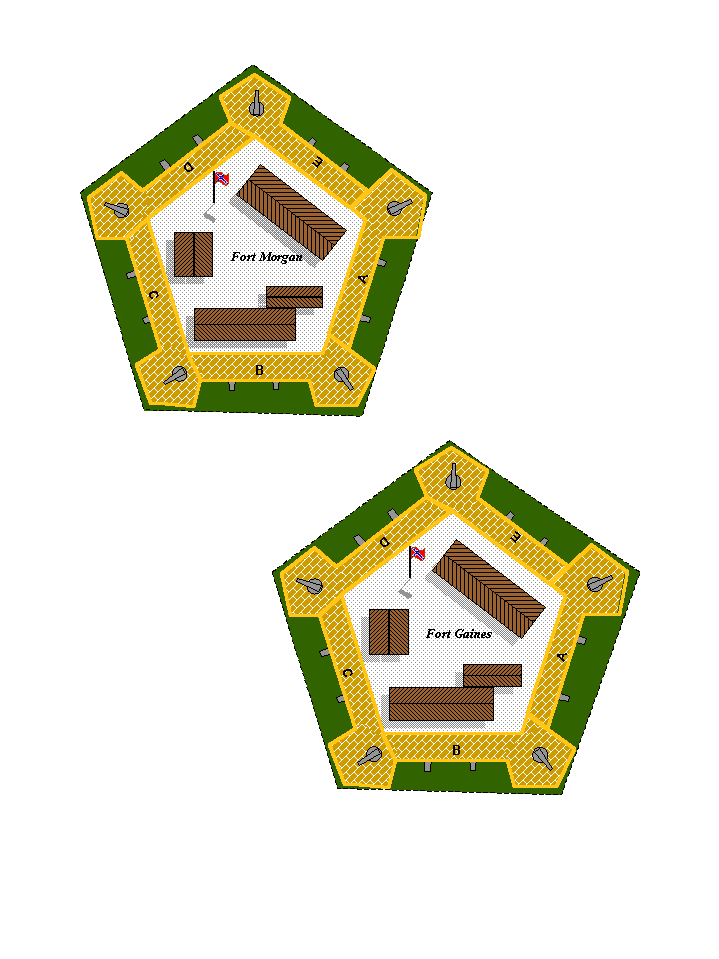
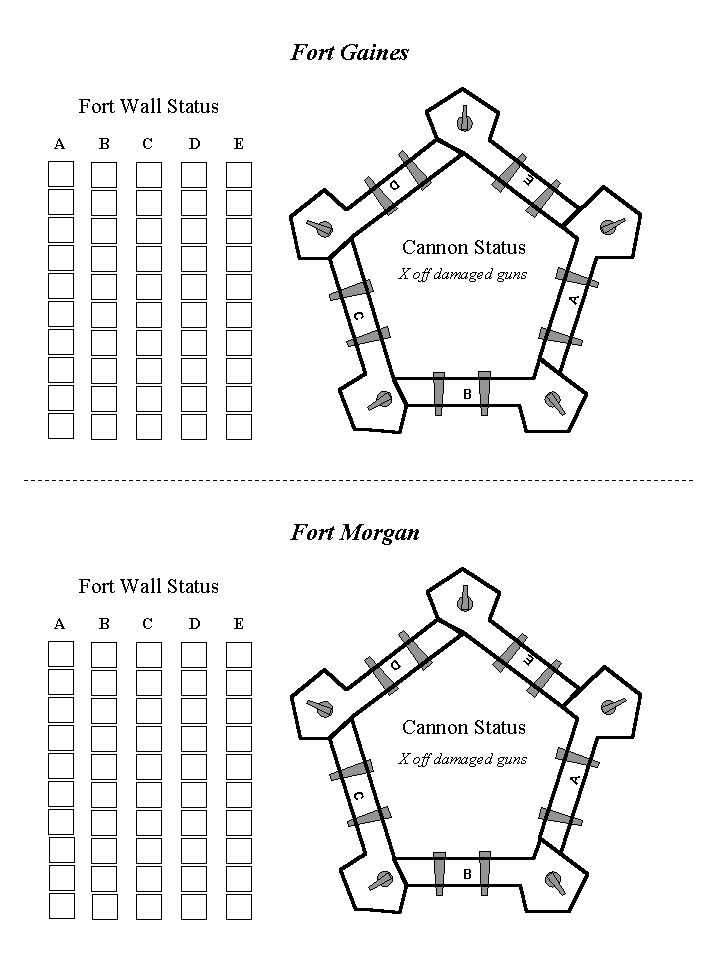
Forts. Players who lose ships can man the forts and roll
for submerged torpedo hits. Each fort is divided into five batteries,
A to E. Each battery fires and defends in the same manner as ships.
Each battery consists of 2 casement guns which can pivot up to
45 degrees either side of centerline, and one cannon mounted on
top of the bastion capable of firing 360 degrees. When firing
on ships, battery rolls 1d6 for each gun able to bear. When defending,
the fort walls are treated the same as 10 inches of armor. When
attacked, the battery struck is determined by rolling 1d6. 1 =
A, 2 = B, etc. 6 = defender choice. Damage within a battery (gun
vs. wall) is determined by defender and marked on the fort status
sheet.
< Home
>