A Terrible Resolve
Fast Play Rules for
the Battle of Midway
< Home
>
by Matt
Fritz
 Version 2: I made some changes to these rules. The original
version can be found here. The main
change made was to the sequence of play. The turns were subdivided
to eliminate confusion created by having the kids try to do several
different things at once. Fighter escort rules were also changed,
and some notes about 1/700 and 1/1200 models were added. Improved
carrier and plane counters were created. New battle reports and
pictures are included.
Version 2: I made some changes to these rules. The original
version can be found here. The main
change made was to the sequence of play. The turns were subdivided
to eliminate confusion created by having the kids try to do several
different things at once. Fighter escort rules were also changed,
and some notes about 1/700 and 1/1200 models were added. Improved
carrier and plane counters were created. New battle reports and
pictures are included.
Background:
The Japanese hoped that World War II would make them the masters
of the Pacific. They recognized the industrial might of the United
States. Their strategy was therefore to destroy the American Navy
with a surprise attack on Pearl Harbor. The plan almost worked.
The Japanese ran wild in the Pacific and seemed invincible. The
most devastating weapons in their navy were their aircraft carriers.
In 1942 the Americans had been driven from the Philippines and
Australia was in peril. The next step in their campaign was to
seize control of the American controlled island of Midway. The
Japanese admiral, Yamamoto, also hoped the attack would bring
the remnants of the American Navy out to fight so that he could
finish it off.
The Americans had different ideas. They had cracked the Japanese
code and were routinely reading their secret messages. They uncovered
the Japanese plan to attack Midway and decided to gamble everything
on ambushing the Japanese carriers. The Yorktown was rapidly repaired
and sent to join the Enterprise and Hornet. The Japanese air strike
hit Midway Island hard. But then the Americans located the enemy
carriers and attacked. The shocked Japanese retaliated but lost
all four of their carriers. Pearl Harbor had been avenged (The
Japanese carriers had participated in the surprise attack). The
Americans lost just one carrier, the Yorktown. In one battle the
tide of the war in the Pacific had turned. The Japanese would
never regain the initiative. Yamamoto had once said that he was
afraid that the United States was a sleeping giant, which would
awaken with a terrible resolve. He was right.
Battle 1: The
first wave of American bombers caught the Japanese by surprise.
Dive bombers from the Yorktown devastated the Soryu, leaving her
burning out of control as her crew abandoned ship. The Hiryu was
also crippled in the attack, and the Kaga and Akagi suffered minor
damage. The Japanese retaliatory strike destroyed the Yorktown,
and damaged the Hornet. The Japanese put up a powerful fighter
umbrella over their carriers and launched a second strike of their
own. When the American second strike reached the Japanese fleet
they were without fighter protection, and the Japanese zeroes
chewed them to pieces. The surviving bombers bravely attacked
the Japanese flattops, finishing off the Hiryu and crippling the
Akagi. The powerful Kaga, however, was still operational. The
Japanese second attack wave was more successful. Their bombers
concentrated on the Enterprise, overwhelming her air defenses.
Kate torpedo bombers scored a series of direct hits, sinking the
Enterprise. and leaving the Hornet a burning wreck. Another wave
of Japanese bombers soon arrived, courtesy of the Kaga. They bravely
flew through heavy anti-aircraft fire to deliver the knock out
to the Hornet. The Japanese had succeeded in destroying the American
carriers, although at a higher cost than they'd expected.
Battle 2: This
battle was closely fought, with the two fleets trading blows and
the outcome in doubt until the very end. The Americans struck
first, crippling the Soryu with their Dauntless dive bombers.
The Japanese quickly scrambled an effective fighter cover and
struck back, crippling the Hornet. The Americans retaliated, first
crippling the Akagi, then sinking her along with the Soryu. The
next wave of Japanese bombers finished off the Hornet, and destroyed
the Enterprise. The Americans had one more strong attack wave
left, and it scored big, sinking the Akagi and leaving the Kaga
badly damaged. The Japanese counterpunch was a glancing blow,
inflicting minor damage on the Yorktown. Both sides put everything
they had left into a final strike. The Americans arrived first,
just as the Kaga launched her bombers. The Japanese pilots watched
in horror as the American bombs scored direct hits on the Kaga,
forcing her crew to abandon ship. The pilots knew that their attack
would be a one-way trip since there would be no Japanese carriers
for them to land on after their attack run. They now had only
one thought in mind: sink the Yorktown! The Yorktown went into
evasive maneuvers as Kate torpedo bombers and Val dive bombers
attacked her with a desperate fury. Miraculously, only one bomb
hit the Yorktown. For a moment it looked like that would be enough
to finish off the ship, but soon her crew had managed to put out
the fires and save the ship. The Yorktown limped back to port
for repairs, keeping a watchful eye out for enemy submarines.
This battle was an American victory.
Rules
 Models: I used 1/700 scale waterline ship models for this
battle. Hasegawa makes models of the Kaga, and Akagi. They
also have a Yorktown model, but this is the Yorktown II, not the
one that was sunk at Midway. Tamiya has models of the Hornet and
Enterprise. Aoshima makes models Models of the Hiryu and Soryu.
These model kits are rather expensive, and not easy to build.
Yorktown II comes with 20 planes, Kaga and AKagi have 28 planes
each (including 12 seaplanes), additional 1/700 planes are available
from Hasegawa's US Naval Planes and Japanese Naval Planes sets.
The sets include fighters, dive bombers, and torpedo bombers,
but not the right ones for Midway. But seriously, at 1/700 scale
does it really matter? These ship model kits are rather expensive
($15-$35), and not easy to build. A cheaper alternative is to
use 1/1200 scale Revell Miniships. These models are cheap, and
the kids can put them together with ease, despite the poor instructions.
Unfortunately they only make models for the Hornet and Enterprise.
Each has 19 generic looking planes, and Hornet also has 16 bombers
for Doolittle's Raid. I have created paper plane and carrier counters
you can print and use instead, they can be found here: Japanese,
American. I actually prefer the paper
planes over the 1/700 plastic planes.
Models: I used 1/700 scale waterline ship models for this
battle. Hasegawa makes models of the Kaga, and Akagi. They
also have a Yorktown model, but this is the Yorktown II, not the
one that was sunk at Midway. Tamiya has models of the Hornet and
Enterprise. Aoshima makes models Models of the Hiryu and Soryu.
These model kits are rather expensive, and not easy to build.
Yorktown II comes with 20 planes, Kaga and AKagi have 28 planes
each (including 12 seaplanes), additional 1/700 planes are available
from Hasegawa's US Naval Planes and Japanese Naval Planes sets.
The sets include fighters, dive bombers, and torpedo bombers,
but not the right ones for Midway. But seriously, at 1/700 scale
does it really matter? These ship model kits are rather expensive
($15-$35), and not easy to build. A cheaper alternative is to
use 1/1200 scale Revell Miniships. These models are cheap, and
the kids can put them together with ease, despite the poor instructions.
Unfortunately they only make models for the Hornet and Enterprise.
Each has 19 generic looking planes, and Hornet also has 16 bombers
for Doolittle's Raid. I have created paper plane and carrier counters
you can print and use instead, they can be found here: Japanese,
American. I actually prefer the paper
planes over the 1/700 plastic planes.
Basing:
One plane model was used to represent a group of fighters or bombers.
The Ship Data table indicates how many planes you'll need for
each carrier. The planes were glued to nails so they would look
like they were flying. The bases were 1.5" x 1" pieces
of foam core. Each base was painted blue and labeled with its
type (fighter, torpedo bomber, dive bomber) and five circles to
represent the strength of the group. The labels were laminated
so they could be marked with dry erase markers. Each base was
also color coded to indicate its carrier. The nail was pressed
into the center of the foam core base. The foam core will hold
the nail firmly, and doesn't need to be glued. This allows you
to remove the plane from the base for easy storage. If this basing
method seems too elaborate you should check out the original
version of these rules, which included simple flat black &
white table top counters which are easy to print and use. The
carriers don't need bases, but you should label them with their
names, AA Fire, Repair Damage, and Damage Points from the Ship
Data Table. This information can be written on index cards, or
the paper carriers can be printed and used.
Ship Data
|
Carrier |
AA Fire |
Repair Damage |
Fighters |
Torpedo Bombers |
Dive Bombers |
|
Enterprise |
16 |
5-6 |
5 |
3 |
8 |
|
Hornet |
12 |
5-6 |
3 |
5 |
8 |
|
Yorktown |
12 |
4-6 |
3 |
5 |
8 |
|
Hiryu |
7 |
6 |
4 |
4 |
4 |
|
Soryu |
6 |
6 |
4 |
4 |
4 |
|
Akagi |
7 |
6 |
4 |
4 |
4 |
|
Kaga |
9 |
6 |
6 |
6 |
5 |
|
Each carrier is crippled when it
has 7 damage points, and sinks at 10 damage points |
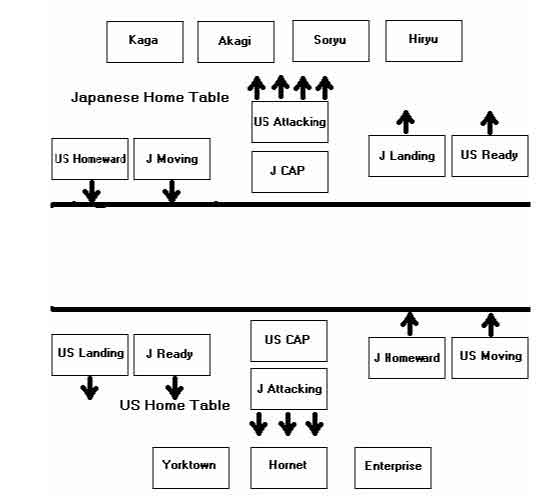
Set Up: Two
gaming tables are needed. They should be some distance apart and
covered in blue felt, if possible. One table will hold the Japanese
fleet, the other will hold the American fleet. Print out the Japanese boxes and American
boxes , or simply write their names on pieces of paper. The
various boxes should be laid out as illustrated. Eight bombers
from each Japanese carrier should be placed in their "Ready
to Land" box. This is the first wave returning from the attack
on Midway Island. They must be landed before new planes can be
launched.
Sequence of Play:
1. Japanese Land Planes
2. Americans Land Planes
3. Japanese Move Planes
4. Americans Move Planes
5. Japanse CAP Attacks
6. Americans CAP Attackse
7. Japanese Carrier Attacks
8. Americans Carrier Attacks
9. Japanese Launch Planes
10. Americans Launch Planes
11. Japanese Planning Phas
12. Americans Planning Phase
13. Japanese Repair Damage
14. Americans Repair Damage
Land Planes: A
carrier can land planes only if it has a clear flight deck (no
planes waiting for take off), and has planes in the Waiting to
Land Box. Each carrier meeting the requirements can land 20 strenght
points of planes (up to four full strength groups).
Move Planes: Planes
that are being sent to attack the enemy move in a circuit. Planes
may choose to stay in their box, or advance to the next box. The
sequence of movement: Moving to Attack Box, Ready to Attack Box,
Attacking Box, Heading Home Box, Waiting to Land Box. Fighter
planes that are put in the CAP box move differently. See the CAP
section below for details.
CAP attacks:
Fighter squadrons that are assigned to fly CAP are initially placed
in the center circle of the CAP Box. Each fighter squadron may
attack enemy planes in the enemy's Ready to Attack Box. If there
are enemy fighters in the Ready to Attack Box the attacking player
must allocate an equal number of his fighters to battle them.
Remaining CAP fighters, if any, can attack the bombers. Attacks
on fighters and bombers should be resolved separately. Roll 1D6
for each fighter strength point in the dogfight, bombers do not
get to fire back. All hits are considered simultaneous. Cross
out one strength point on the opponent's base for every 4, 5,
or 6 rolled. The attacker can decide how many of the bomber hits
are inflicted on torpedo or dive bombers. After a fighter squadron
flying CAP has made an attack it is moved out to the next ring
in the CAP box. Fighters in the last ring of the CAP box are moved
to the Waiting to Land Box. They must land to refuel and rearm.
They may be launched again on a later turn.
Carrier Attacks:
Each bomber group must choose which carrier it will attack and
must be placed in the appropriate section of the Attacking Box.
Fighters do not attack carriers, they should be moved to the Heading
Home Box. All attacks against a carrier are resolved simultaneously
for all the bombers that have been designated to attack it this
turn. All the squadrons attacking one carrier are called an attack
wave. Resolving AA: The player controlling the carrier under attack
rolls dice to see how many planes in the attack wave are shot
down. The dice are rolled only once against the entire wave, not
against each individual bomber group. The Ship Data table indicates
how many dice are rolled (Soryu 6, Akagi & Hiryu 7, Kaga 9,
Hornet & Yorktown 12, Enterprise 12). The Carrier scores one
hit for every 4, 5, or 6 rolled. The attacking players may choose
which bombers are eliminated. If they can't agree then the hits
should be distributed evenly, with the player with the most attacking
groups receiving any extra hits. The surviving bombers in the
attack wave then resolve their attacks against the carrier they
are targeting. Dive-Bombers - Roll 1D6 for every surviving strength
point. Every 5 or 6 scores one hit against the carrier. Re-roll
any 6's and if it comes up 6 again score another hit against the
carrier. Continue re-rolling 6's and scoring hits until there
are no more 6's. Torpedo-Bombers - roll 1D6 per surviving strength
point. A roll of 6 scores 2 hits on the carrier. Re-roll all 6's,
and score one additional hit for every 6 rolled. Continue re-rolling
6's and scoring hits until there are no more 6's. Bombers that
have completed an attack run are immediately placed in the Returning
Home box. They must land and re-launch before they can make another
attack run.
Launch Planes:
A Carrier may launch planes only if it placed the planes on its
flight deck during the previous planning phase. Bombers should
be moved to the Moving to Attack Box. Fighters can either be placed
in the center ring of the CAP Box, or placed in the Moving to
Attack Box so they can protect the bombers.
Planning Phase -
A carrier may launch up to 20 strength points of planes OR land
up to 20 strength points in one turn. If the player is going to
launch planes next turn he must put them on the flight deck of
the carrier. If he wishes to land planes next turn he must leave
the flight deck empty.
Repair Damage:
Each carrier that has sustained damage may attempt to repair one
damage point by rolling one die. A carrier may never have more
than ten unmarked damage circles. Only one damage point may be
repaired on each carrier each turn. A carrier that has been sunk
may not be repaired. Japanese carriers may repair one point if
they roll a 6. The Enterprise and Hornet may repair one point
if they roll a 5 or 6. The Yorktown may repair one point if it
rolls a 4, 5, or 6.
Damaged Carriers:
Carriers are crippled when they have taken 7 or more hits. A crippled
carrier can no longer launch or land planes. Any planes on the
flight deck may not be launched. A crippled carrier can be repaired
during the Repair Damage phase. A carrier that receives 10 points
of damage is sunk and cannot be repaired.
Special Rule:
Finding the Japanese Fleet. At the start of the game the Americans
are looking for the Japanese Fleet. When the first wave of bombers
is ready to move into the Ready to Attack Box they should be divided
into 4 search groups. One die is rolled to determine which of
the four has found the Japanese Fleet (re-roll if the die reads
5 or 6). The lucky group is immediately placed in the Ready to
Attack Box. The other three groups must stay in the Moving to
Attack Box. During their next turn the planes may move normally.
Download the files individually, or all
at once: midway2.zip (480 KB)
US Fleet
US Boxes
Japanese
Fleet
Japanese
Boxes
Resources:
- "Pacific Carrier Strike" by
Mike Crane, Lone Warrior #144, scenario for one or two
players
- "Midway" Warp
Spawn Games (http://www.angelfire.com/games2/warpspawn/HistoricalGames.html)
warning: many irritating pop-up ads at this side
- Nihon
Kaigun (Imperial Japanese Navy)
web site.www.combinedfleet.com
- Department of Navy's Navy
Historical Center: www.history.navy.mil/index.html
- Tom Gallagher provided useful suggestions
during the development of this game