Sea Dogs Attack! - The Defeat
of the Spanish Armada (1588 AD)
Fast and Easy Rules for Students
< Home
>
By Matt
Fritz
 Historical Background: By the year 1588 tensions between
Spain and England had reached the breaking point. The chief causes
of conflict included religious differences, English attacks on
Spanish shipping, and a costly war in the Spanish Netherlands.
King Philip II decided to invade England and depose Queen Elizabeth
I. He assembled a powerful armada of ships and sent them to the
Netherlands to link up with a powerful army led by the Duke of
Parma. As the Armada sailed up the English Channel they were harassed
by English ships. When the Armada arrived at Calais they anchored
off the coast while the army got ready for the invasion. The English
used fire ships to attack the Armada. The tactic forced the Spanish
to cut their anchors and left them scattered and vulnerable to
attack. The English ships pounded the disorganized fleet until
they ran low on powder and shot, causing considerable damage.
With the Armada low on provisions and blown by an uncooperative
wind the Spanish decided to abandon the invasion plan and sail
north around the British Isles and back to Spain. The battered
ships encountered bad weather on the voyage and many were wrecked
on the shores of Ireland. Barely half of the Armada made it back
to Spanish ports. The battle marked a turning point in the fortunes
of Spain and England. The mighty Spanish Empire would see her
power wane while the English Empire flourished with the help of
a powerful navy.
Historical Background: By the year 1588 tensions between
Spain and England had reached the breaking point. The chief causes
of conflict included religious differences, English attacks on
Spanish shipping, and a costly war in the Spanish Netherlands.
King Philip II decided to invade England and depose Queen Elizabeth
I. He assembled a powerful armada of ships and sent them to the
Netherlands to link up with a powerful army led by the Duke of
Parma. As the Armada sailed up the English Channel they were harassed
by English ships. When the Armada arrived at Calais they anchored
off the coast while the army got ready for the invasion. The English
used fire ships to attack the Armada. The tactic forced the Spanish
to cut their anchors and left them scattered and vulnerable to
attack. The English ships pounded the disorganized fleet until
they ran low on powder and shot, causing considerable damage.
With the Armada low on provisions and blown by an uncooperative
wind the Spanish decided to abandon the invasion plan and sail
north around the British Isles and back to Spain. The battered
ships encountered bad weather on the voyage and many were wrecked
on the shores of Ireland. Barely half of the Armada made it back
to Spanish ports. The battle marked a turning point in the fortunes
of Spain and England. The mighty Spanish Empire would see her
power wane while the English Empire flourished with the help of
a powerful navy.
Battle 1: The English squadron commanders led their ships towards the
Spanish forlorn hope using the line-in attack formation. They sailed past
the bow or stern of the Spanish ships, each firing an effective raking broadside
into the unfortunate Spanish galleons. The Spanish fought bravely.
The first great victory for the English came when they surrounded and pummeled
the San Martin. The Triumph ripped into her with a well
aimed broadside and the Spanish fleet commander was forced to raise the flag of
surrender. Elsewhere Hawkins, in command of the Victory, insisted
on boarding and capturing the San Luis. This move infuriated the other
English captains because it took his squadron out of the fight at a crucial time
in the battle. It was regarded as a selfish move. The scattered
Spanish fleet struggled to get organized. They tried to turn into the wind
and close with English but found it very difficult to tack into the wind.
The crews performed brilliantly, but still found themselves "locked in irons" on
occasion. The English began their attack on the main Spanish fleet, which
was still scattered and disorganized. A few of the Spanish ships were too
far from the main formation for protection, and these found themselves singled
out and swarmed by English ships. Howard's squadron found their hands full
when they tried to pick on La Rata Santa Maria Encoronado. The
feisty Spanish flagship gave as good as she took, and the Ark Royal
limped away in shreds. The one major Spanish victory of the day came when
the Triumph got careless and sailed too close to the San
Bernardo. The San Bernardo quickly grappled the Triumph
and Spanish soldiers swarmed onto her decks, capturing Frobisher and his ship.
Overall the English were getting the better of the fight, and many Spanish ships
were left adrift. The surrendered ships were carried by the wind and
current towards the Banks of Flanders, further disrupting the Spanish fleet.
The battle was an English victory.
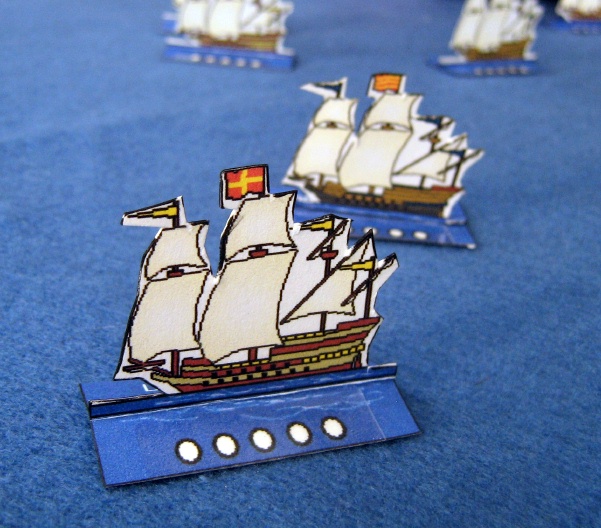
The Fleets: Right now there aren't any cheap plastic ship models
available in a small enough scale for this battle. Here are some
paper ships you can print and use. Ships should be mounted
on 2" x 1" bases. The hit points of the ships should
be indicated on the base of the ship using a marker or small damage
or hit point markers.
Order of Battle: The OB omits the many armed merchant
vessels, galleasses, and smaller ships. Many large Spanish ships
have been omitted to represent the confused state of the Armada
after the ships scattered in the night following the fire ship
attack. The battle is meant to represent the action beginning
about 7:30 AM when Medina Sidonia tried to hold off the English
with five ships while the Armada was regrouping.
|
English Fleet (26 ships)
Howard's Squadron (5 ships)
1 Flag ship: Ark Royal (Howard - Fleet Commander)
4 Other Ships: Elizabeth, Golden Lion, White Bear,
Dreadnought,
Hawkins' Squadron (5 ships)
1 Flag ship: Victory (Hawkins)
4 Other Ships: Mary Rose, Swallow, Foresight, Scout
Frobisher's Squadron (4 ships)
1 Flag ships: Triumph (Frobisher)
3 Other Ships: Achatea, George Hoy, Elizabeth Jonas
Seymour's Squadron (7 ships)
2 Flag ships: Rainbow (Seymour)
5 Other Ships: Antelope, Bull, Tiger, Tramontana, Scout,
Vanguard
Drake's Squadron (5 ships)
1 Flag ships: Revenge (Drake)
4 Other Ships: Swiftsure, Aid, Nonpareil, Hope |
Spanish Armada (35 ships)
Forlorn Hope (5 ships)
5 Flag ships: San Martin (Sidonia - Fleet Commander),
San Juan de Portugal (Recalde), San Marcos, San Juan Bautista,
San Mateo
Spanish Fleet (30 ships)
5
Flag ships: La Rata Santa Maria Encoronado (Levia),
Florencia, San Felipe, San Luis, El Gran Grin
25 Other ships: Santiago, San Bernardo, La Magdalena,
San Juan, La Maria Juan, San Pedro, San Juan de Menor, Santiago
el Mayor, La Asuncion, La Trinadad, La Santa Catalina, San Francisco,
Santa Maria de Juncal, San Bartolome, San Esteban, Santa Marta,
San Buenaventura, La Santa Cruz, La Urca Doncella, La Regazona,
San Juan de Sicilia, San Nicolas Prodaneli, La Juliana, La Trinidad
de Scala, Santa Maria de Vision |
The Board: I covered a 7.5' x 5' table with a blue
table cloth and used colored yarn taped around the edges to indicate
the wind direction. Green yarn marked the East and South table
edges (wind at your back, full speed). Yellow yarn bordered the
West edge, and 2/3 of the North edge (close quartered, half speed).
Red yarn ran 2.5' south from the northwest corner (can't move
directly into the wind).
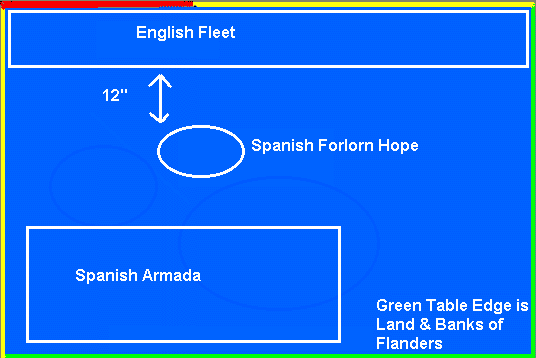
Deployment: The ships deploy as shown on the map.
The English fleet can begin anywhere along the northern edge of
the map so long as they are not closer than 12" to the Spanish
Forlorn Hope. The English squadrons used the "line in"
attack, sailing in a line behind the leader to deliver broadsides
against the enemy. The Spanish Armada is disorganized, and the
ships must start at least 6" apart in the area shown on the
map. This does not apply to the Forlorn Hope. The Spanish, once
they were regrouped, fought in a close defensive formation.
Sequence of Play:
1. Drift
2.Spanish Move
3. British Move
4. British Shoot
5. Spanish Shoot
6. Grappling & Boarding Actions
Drift: Any ships that are fouled or grappled may attempt
to get loose. The commander wishing to get loose rolls a die.
The ships remain fouled or grappled if the roll is 1-4. If the
roll is a 5-6 the ships are freed and may move normally this turn.
Both captains may roll (but not drifting wrecks), and if either
is successful the ships are free. Any ships that remain fouled
or grappled and any ships that surrendered on a previous turn
now drift downwind 3" (SE). If a drifting ship's
base hits another ship it may become fouled (see below). If any
ship drifts onto the table edges marked in green it has become
grounded and cannot move for the rest of the table (the south
edge is land and the east edge is the Flanders Banks (sandbars).
Grounded ships can still shoot, grapple, and fight boarding actions.
Movement: The speed of movement depends on what direction
the ship is pointing at the start of the turn. If the ship is
pointing towards the green then the wind is behind the ship and
it may move up to 6" and make one turn up to 90 degrees.
If the ship is pointing towards the yellow it is close quartered
and may move up to 3" and make one turn up to 90 degrees.
If a ship is pointing towards the red then it is "locked
in irons." If must pass a skill check to move. Spanish ships
need to roll a 5-6, British need to roll a 4-6. If the roll is
successful the ship may move up to 3" and make one turn up
to 90 degrees. If the roll fails the ship does not move. Note:
ships may not turn through the red during their move. If they
turn towards the red during their move the ship must end its move
pointed in that direction and attempt a "locked in irons"
roll next turn.
|
Start Turn Pointing
at |
Movement |
|
Locked in Irons Skill
Check |
|
Green |
6" |
|
British |
4-6 |
|
Yellow |
3" |
|
Spanish |
5-6 |
|
Red |
Pass Check or 0" |
|
|
|
 Fouling: If at the end of any drift or movement
phase the bases of two ships are in contact there is a chance
they will become entangled. Roll one die, the ships are fouled
on a 6. If two or more ships are fouled then this is indicated
by placing their bases so they overlap. Fouled ships do not move,
they drift, but they may fire. Ships may attempt to cut themselves
loose during the Drift phase.
Fouling: If at the end of any drift or movement
phase the bases of two ships are in contact there is a chance
they will become entangled. Roll one die, the ships are fouled
on a 6. If two or more ships are fouled then this is indicated
by placing their bases so they overlap. Fouled ships do not move,
they drift, but they may fire. Ships may attempt to cut themselves
loose during the Drift phase.
|
Fouling & Grappling |
|
Fouling |
6 |
|
Grappling |
5-6 |
|
Cut Loose |
5-6 |
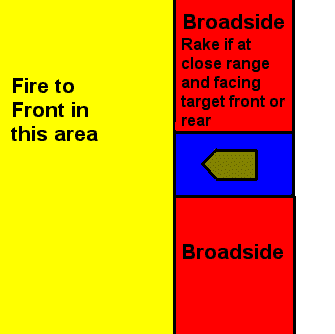
Shooting: Ships may fire once to the front OR broadside.
The front is defined as the area in the 180-degree arc in front
of the ship. The broadside of the ship is defined by the base
(see diagram). Ships may only fire a broadside if part of the
target ship's base is in this area. British ships roll 5 dice
when firing broadsides, Spanish ships roll three dice for broadsides.
Ships roll just 1 die if firing to the front. Flagships always
get to roll one extra die. The firing ship rolls its dice to determine
hits. Long range is 4"- 8" and 6's are required
for hits. Short range is 0" - 4" and a 5-6 is a hit.
A rake is defined as broadside fire at short range from a ship
whose base is mostly in the front or rear of the target ship as
defined by the target ship's base (see diagram). Raking fire hits
on a 4-6. Flagships can take 6 hits, other ships can take five
hits. When a ship loses its last hit point it surrenders (strikes
its colors). This can be marked by putting some cotton on it.
A ship which has surrendered can no longer move or fire. It is
not removed from the board, however, since it will drift and can
become an obstacle. Note: each ship may only fire once per turn,
and ships may not fire through or "over" other ships,
or fire fire through narrow gaps between ships.
|
Shooting |
# Dice |
|
Range |
To Hit |
|
British Broadside |
5 |
|
Long Range 4"-8" |
6 |
|
Spanish Broadside |
3 |
|
Short Range 0"-4" |
5-6 |
|
Fire to Front |
1 |
|
Rake |
4-6 |
|
Flagships: +1 die |
|
|
|
 Grappling: If there is an enemy ship within 1"
the captain can attempt to grapple and board it. If one of the
ships wants to grapple the captain should roll one die and he
is successful on a roll of 5-6. Both captains may roll to grapple,
and if either or both are successful then the ships are grappled.
Move the bases of the two into contact so that they are overlapping.
Grappled ships do not move, they drift, but they may fire. Ships
may attempt to cut themselves loose during the Drift phase.
Grappling: If there is an enemy ship within 1"
the captain can attempt to grapple and board it. If one of the
ships wants to grapple the captain should roll one die and he
is successful on a roll of 5-6. Both captains may roll to grapple,
and if either or both are successful then the ships are grappled.
Move the bases of the two into contact so that they are overlapping.
Grappled ships do not move, they drift, but they may fire. Ships
may attempt to cut themselves loose during the Drift phase.
Boarding Actions: If two or more enemy ships are grappled
or fouled together they must fight a boarding action. Each ship
may attack once, and may target any enemy ship that is directly
grappled or fouled to them. English captains roll one die for
each remaining hit points. Spanish captains roll 2 dice for each
remaining hit point. Hits are scored on a 4-6. Ships that lose
their last hit point surrender. If all the ships in a boarding
action surrender on the same turn then the captain's roll one
die. The high roller is the winner (re-roll ties) and survives
with one hit point.
< Home
>
Resources
- The Spanish Armada by Colin Martin and Geoffrey Parker
- The Armada Campaign 1588 by Angus Konstam, Osprey Campaign Series
#86
- "La Felicissima Armada"
rules by Jim Wallman