 Battle
of Liegnitz (1241 AD)
Battle
of Liegnitz (1241 AD)Fast Play Rules for Students
Battle
of Liegnitz (1241 AD)
Historical Background: In 1241 the mighty Mongol army launched
an invasion into Europe. While the main force headed for a showdown
in Hungary a smaller army was sent into Poland as a diversion.
A large Polish and Germany army, led by Henry the Pious of Silesia,
marched off to link up with King Wenceslas of Bohemia's army.
The Mongols confronted them as they passed the town of Liegnitz.
Although outnumbered, the Mongols fought brilliantly and inflicted
a devastating defeat on their opponents.
Battle 1: The Poles smelled a trap so the knights advanced cautiously with the infantry close behind. Their suspicions were confirmed when they discovered several Mongol units concealed by some hills. Boleshaw of Moravia led an attack on the Mongols but he was killed in the fighting. Henry the Pious sent his knights charging to the rescue but they ran right into an ambush and were massacred. Only the courage of the Teutonic knights kept the center from collapsing.
Henry desperately gathered all
his archers and crossbowmen into the center. Their massive barrage
of missiles broke up the Mongol assault. Kadan ordered a withdraw
so his men could regroup. Unfortunately, while he was distracted,
he was caught and killed by the Silesian infantry. Meanwhile Baidar
found himself in a desperate fight against Sulishaw and his Cracovian
knights. Baidar, his nerves frayed, wondered out loud whether
General Orda was ever going to get into the fight. Over on the
Mongol right flank Orda watched as Henry's archers and crossbowmen
foolishly advanced too far, exposing their flank. The Mongol charge
that hit them was devastating. Orda then led his men in a charge
against Henry, but Henry turned to fight and his heavy infantry
rushed to his aid. The Polish infantry delayed Mongol reinforcements
until it was too late. Orda and his men were killed. The battered
remnants of the Mongol army began the long retreat homeward. They
had annihilated the Polish knights and achieved their strategic
objective. The big winner, however, was Henry the Pious. After
successfully turning back a Mongol army his power in the region
would surely grow.
Battle 2: . The Mongols deployed their Mangudai division
in the center, backed by Baidar's heavy division. The Poles put
the Teutonic Knights in the center, and Henry of Silesia guarded
the left flank. The knights advanced towards the Mongols but were
hit with a damaging barrage of arrows followed by a Mangudai attack.
The Mangudai division began their planned retreat and the reckless
knights pursued. The knights never saw the heavy division coming
until it was too late. The Polish center began to crumble. Henry
ordered his knights to aggressively attack on the left flank to
try and draw the Mongol reserves away from the center. Then, in
a panic, Henry formed his infantry into a square around himself.
Curiously, General Kadan had not committed his men to battle on the Mongol left flank. Sulishaw of Cracow decided to abandon his positions in front of Kadan to try and plug the center of the Polish lines. As the Mongol elite cavalry galloped for the opening a unit of crossbowmen fired a devastating volley into them at point blank range. The Mongols reeled back in confusion and the Poles began to rally. General Orda, however, defiantly rode alone through the Polish lines to personally challenge Henry. Henry's heavy infantry cut him down before he could get to the King. Messages were sent to Kadan begging him to attack the Polish flank and relieve some of the pressure on the Mongols. He refused to move, telling them to "Just hold on a little longer."
The Polish knights, led by Henry's
Silesians, broke through the Mongol center. Again Baidar begged
Kadan for help. Kadan's patience had paid off. His men were able
to turn the Polish right flank and they began to methodically
demolish everything in their path. "Hold on a little longer,"
he signaled back, "I'm on the way." But it was too late.
Three units of knights, led by Henry the Pious, broke free of
the fighting and headed off the battlefield. Boleshaw of Moravia
gallantly sacrificed himself fighting a doomed rearguard action
to prevent the Mongols from pursuing the Polish knights. The Mongols
had won the battle, but had failed to prevent the Poles
 and Bohemians from joining forces.
Rules
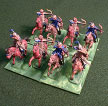
The Miniatures: The figures used were 1/72-scale plastics mounted two per stand, a mix from several sets. The Mongol figures came from Italeri (#6020) and Zvezda (#8003). I needed eleven boxes of Mongols to build my army and still had to use some Italeri Saracens (#6010) to fill out my units! If you're on a tight budget you may want to mount the Mongols one figure per stand. The Zvezda has better combat poses, and very nice leader figures, but unfortunately also includes infantry. Mongol infantry? Sounds like an oxymoron to me. The Italeri Mongols give you more cavalry figures per box. The Polish army was made up figures from Italeri's "The Knights" set (#6009), Revell's English Foot Knights and French Knights, and Italeri's Teutonic Knights (#6019). A better choice for the Polish knights might be the newly released Zvezda Livonian Knights (#8016). The set includes 9 mounted knights, 15 infantry, and 4 crossbowmen. All units were six stands in size - 3 stands in the front rank, three in the rear rank. Here are some paper soldiers you can print and use.
|
Mongols: Baidar (Commander in Chief) Kadan Orda General X General Y (Mangudai Division) |
Poles: King Henry the Pious of Silesia
(Commander in Chief) Boleshaw of Moravia Sulishaw of Cracow Mieszko of Opole Poppo van Ostern |
The Board: A 7.5 X 5 foot table was used. I placed a number of hills on the table. Some were large enough to give an advantage in melee to the unit with a height advantage, most were smaller and only blocked line of sight.
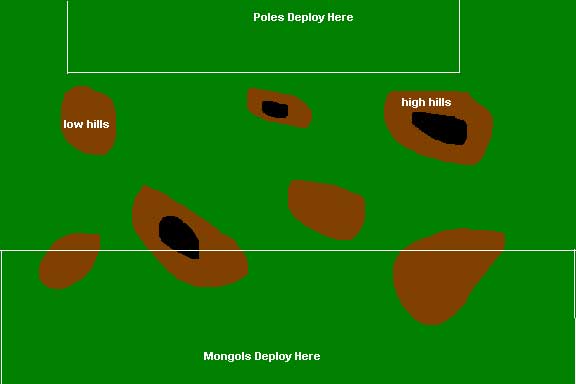
Deployment: Each army must deploy in their box. The Poles must put the knights in front of the infantry. The Mongols may secretly conceal four units behind the hills outside their box, out of sight of the Poles. These units are only revealed when they move, or after a Polish unit moves into a position where it can see one of the units. Once revealed, the unit may place itself facing any direction and may make its normal move and charge during its move and charge phases.
Sequence of Play:
1. Poles Move
2. Poles Shoot
3. Mongols Move
4. Mongols Shoot
5. Charge into Melee
6. Melee
7. Light Cavalry retreat from Melee & Pursuit
Movement: All infantry move and charge 6", cavalry move and charge 12".
Shooting: All the Mongol units have bows and may shoot. The only Polish units with missile fire weapons are the archers and crossbowmen. Roll 1D6 for each stand in range (up to 12"). Every 6 is a hit and one enemy stand is removed. If any part of a unit is in range the entire unit may fire. Units that are engaged in melee may not fire, and may not be targeted.
Charge into Melee: Both sides may charge into melee. If it
makes a difference the Mongols make their charges first. This
is the only way to get into hand-to-hand fighting. Foot units
may charge up to 6", cavalry may charge 12". Units may
only charge if they can reach an enemy unit.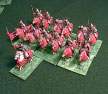
Melee: Each side rolls 1D6 for each stand in the fight. The Close Combat table shows the number needed to score hits. Remove one enemy stand for every hit . Both sides roll simultaneously. If both units still have stands left they remain engaged and fight again next turn.
Light Cavalry Retreat From Melee: A Mongol light cavalry unit may decide to retreat after melee. This is a free 12" move backwards. If they were fighting a unit of knights the knights may pursue if they wish. If the don't want to pursue there is still a chance that they will disobey orders and pursue. Roll 1D6, the unit makes an unwanted pursuit if the die roll is a 6. If the retreating unit is from the Mangudai division then the unwanted pursuit occurs on a roll of 4 - 6. If there is a pursuit roll 1D6 to see if they catch the retreating unit. If the roll is a six the pursuit succeeds, both units move 6" and the pursuers get to immediately attack the fleeing unit in the rear. If the pursuit fails the pursuing unit moves 9" towards the retreating unit.
Higher Ground: A unit has an advantage in melee if it is fighting on higher ground than its opponent. A unit in such a position gets to roll one extra die in melee. This only applies to the large hills indicated on the map.
Last Stand: If a unit is reduced to one stand this
last stand is removed immediately.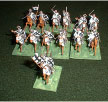
Generals: Generals may not be targeted individually if they are attached to a unit. If they are attached to a unit they count as an extra stand in melee (but not shooting). If the unit they are attached to loses stands in melee roll 1D6. If the roll is a 6 then the General is eliminated. If the general is charged while alone he may be eliminated just like any other stand.
Victory Conditions: The Poles would like to either exit the Mongol side of the board with a sizable force so they can link up with the Bohemian army or defeat the Mongols and hold the field at the end of the fight. The Mongols want to destroy the Polish army and kill Henry the Pious of Silesia without losing their own army.
Resources: I received a lot of useful advice and a map of the battlefield from Jeff Ball. A search of the Internet, and Magweb, turned two very useful resources for wargaming Liegnitz.
|
|
|