The Fate of a Continent
- The Battle of Ayacucho (1824)
Fast and Easy Rules for Students
< Home
>
Historical Background: By 1824 the liberation of South America
from Spanish rule was nearly complete. The last remaining seat
of Spanish power was in Peru. The final battle was fought on December
9 at Ayacucho. Shouting "Paso de vencedores (onward
to victory)" General Cordoba led the right wing of the rebel
army in the attack that finally broke the back of the royalist
army. This decisive battle marked the end of Spanish colonial
rule in South America.
Battle 1: The Republicans launched an all out attack. They met with
some success, and the cavalry captured two cannons. Eventually, though,
the superior numbers of the Royalists started to tell. The Republican
attack was slowed, then stopped, then reversed. The result was a close run
victory for the Royalists.
Building the Armies: Right now there aren't any 1/72 plastic
soldiers designed for the Latin American wars of liberation. You
can substitute Napoleonic era figures. Check out the Plastic
Soldier Review to see the many figures that are available. Here are some
paper soldiers you can print and use.
The Map: The battle was played on a 5' x 7.5' table. The
battlefield was for the most part open ground and can be replayed
without modeling any important terrain features.
Deployment: Republican and Royalist forces deploy
at opposite ends of the battlefield. No unit can be closer than
18" from the enemy.
Orders of Battle: All
units have six bases. Infantry units represent about 400 men,
cavalry units represent about 200 men.
Republican Army (All units 6 bases)
General Antonio Jose de Sucre
(Overall Commander)
1 cannon model
1st Colombian Division - Gen.
Jacinto Lara
1 unit Rifles (British Legion)
2 units Infantry (Vencedor & Vargas Battalions)
2nd Colombian Division - Gen. Jose Cordoba
6 units Infantry (Bogota, Voltigeros, Pichincha, and Caracas
Battalions)
Peru Division - Gen. Jose
La Mar
3 units Infantry (1st, 2nd, & 3rd Peruvian Battalions, Peruvian
Legion)
Cavalry - General Guillermo
Miller
3 units Cavalry (Horse & Colombian Grenadiers, Junin &
Colombian Hussars) |
Royalist Army (All units 6 bases)
Viceroy Jose de La Serna (Overall
Commander)
2 cannon models
Vanguard Division - Gen. Jeronimo
Valdez
5 units Infantry (Cantabria, Centro, Castro, and 1st Imperial
Alexandro Battalions)
2 cannon models
Monet's Division - Gen. Juan
Antonio Monet
5 units Infantry (1st Burgos, Infante, Victoria, 2nd Guias, and
2nd Battalions
Villalobos' Division - Gen.
Alejandro Villalobos
4 units Infantry (2nd Burgos, 2nd Imperial Alexandro, 1st Battalions)
Cavalry - Brig. Valentin Ferraz
5 units Cavalry (Guard Grenadiers, Fernando VII Hussars, Union
& Peru Dragoons, San Carlos, Viceroy's Guards) |
Turn Sequence:
1. Republicans Move
2. Republicans Shoot
3. Royalists Move
4. Royalists Shoot
5. Charges
6. Melees
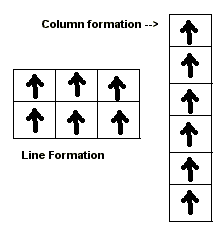
 Formations: There are only two formations for infantry
- line and column. The names of these formations can be very confusing
for the students. At school, when they are told to "get in
line" they line up one behind the other, in what we call
column formation. With the kids I call the formations "firing
line" (like a firing squad), and "marching column."
Lines may be single or double rank, and may bend. Columns are
single company. Units may change formation at the start or end
of their movement, but can only change formation once per turn.
Cavalry stay in line formation at all times. Artillery don't have
formations.
Movement: Infantry can move 6" if they are
in line formation or 12" if they are in column formation.
Cavalry and Commanders may move 12". Cannons can move 12"
but may not fire on a turn when it was moved. A cannon which has
moved and cannot fire should point away from the enemy. Cannons
can pivot in place during movement and still fire. Units may not
move within 1" of an enemy unit except when charging.
Shooting: Infantry that are in line formation and artillery
that didn't move this turn may fire. Range is measured from the
center of a unit to the nearest part of the target unit. Units
may only fire to the front and may not fire through narrow gaps
between friendly units. Roll one die per infantry base or two
dice per cannon. The chart indicates the number needed for a hit.
Remove one base for each hit rolled by the firing unit. It takes
three hits in the same turn to remove a cannon. Note that you
only use the 1" firing column when shooting at a charging
unit. If a unit is reduced to a single surviving base then the
last base is immediately removed. Units in column are good targets.
Roll two extra dice when shooting at columns.
Movement Table
|
Unit Type |
Line |
Column |
Charge |
|
Infantry |
6" |
12" |
6" |
|
Cavalry |
12" |
- |
12" |
|
Cannon |
12" |
- |
|
Commander |
12" |
|
Cannons cannot shoot if they
move |
|
Shooting Table
|
Range |
1" |
6" |
12" |
|
Infantry |
5-6 |
6 |
- |
|
Rifles |
5-6 |
6 |
6 |
|
Cannon (2 dice) |
4-6 |
5-6 |
6 |
|
If the target is in column -
add two dice |
|
Charges: Both sides may charge during the charge phase.
If it matters the Republicans charge first. Cavalry can charge
12", infantry can charge 6". Cannons do not charge.
A unit may not declare a charge unless it is in line formation
and can reach an enemy unit. A player may measure to see if a
unit is within charge range. One enemy unit must be chosen as
the target of the charge. A unit that wishes to charge must first
pass a morale check. If the unit fails morale nothing happens,
it cannot charge this turn. If the unit passes its morale check
then the target must pass a morale check. If the target fails
it loses one base and immediately retreats 12", the charging
unit is moved into the position vacated by the retreating target
unit. If artillery is the target and it fails morale it is eliminated.
If the target passes the morale check it has the option of firing
at the chargers (assuming the unit is eligible to fire this turn)
or counter charging. If the unit counter charges the two units
meet in the middle and fight a melee. If the target decides to
fire at the chargers it does so at a range of 1". If the
charging unit survives the fire it moves into contact with the
target and they fight a melee.
Morale Checks: If a unit has to take a morale check
Roll one die and add any modifiers. If the roll is less than
or equal to the number of bases (plus a commander if one is present),
then it has passed. If the roll is greater then it fails. Cannons
pass on a roll of four.
Morale Die Roll Modifiers
|
Commander Present |
-1 |
|
Rifles |
-1 |
Melee: If a charging unit contacts an enemy unit there
will be a melee. Each side rolls a die and applies the modifiers.
High roll wins. The loser removes a stand and retreats 12".
If the roll is a tie each side removes a stand and rolls again.
Melee Die Roll Modifiers
|
More stands than opponent |
+1 |
|
Hitting the flank or rear |
+1 |
|
Commander leading charge |
+1 |
|
Cannon, or Column Formation |
-1 |
|
Cavalry |
+1 |
Commanders: A Commander may join or leave one of
his units during movement. This unit gets a +1 bonus on all melee
rolls and the officer counts as a base when testing morale. Every
time a unit with an attached commander is completely eliminated
by enemy fire (last base removed), or is engaged in a melee (win
or lose) roll one die. If the roll is a 6 the commander is a casualty
and is removed from play. This is the only way a commander can
be eliminated.
< Home
>
Useful Resources:
- Liberators! by John Fletcher, a wargamer's guide
to the wars of South American Independence, includes historical
background, maps, orders of battle, and uniforms guide, for Grenadier Productions
- Time Portal Passages Spring 2003, by Rudy Scott Nelson, the
whole issue is about the wars of Latin American Independence
and includes background information, uniform notes, and orders
of battle - very useful!
- Liberators by Robert Harvey
- The Armies of Bolivar and
San Martin by Terry Hooker
and Ron Poulter, Osprey Men-At-Arms Series #232
- Regimientos de America website about South American historic
uniforms and battles
- Liberation! website about gaming the South American wars of
liberation
- Wars of Liberation website by Richard Holling, information for Principles
of War rules and a good article on Royalist uniforms by Chris
Johnson
- "Troops from Simon Bolivar's
Army" by J. Balaguer, El Dorado Vol. 5, #2
- "Royalist Troops in America"
by J. Balaguer, El Dorado Vol. 8, #3
 Formations: There are only two formations for infantry
- line and column. The names of these formations can be very confusing
for the students. At school, when they are told to "get in
line" they line up one behind the other, in what we call
column formation. With the kids I call the formations "firing
line" (like a firing squad), and "marching column."
Lines may be single or double rank, and may bend. Columns are
single company. Units may change formation at the start or end
of their movement, but can only change formation once per turn.
Cavalry stay in line formation at all times. Artillery don't have
formations.