 Ruler
and T-Square: For measuring, and drawing straight and perpendicular
lines
Ruler
and T-Square: For measuring, and drawing straight and perpendicular
lines
How to Print and Base Paper Soldiers
by Matt Fritz
Basing Stand Ups using Foam Core: There are many ways to base paper soldiers. This method uses foam core to create reusable bases.
Materials
Ruler
and T-Square: For measuring, and drawing straight and perpendicular
lines
 1.
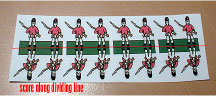
Cut, Copy, and Paste - Download and save the paper soldiers
you want to make on your computer. Use your favorite software
to cut, copy, and paste the paper soldiers onto a page to get
the mix of figures you want. I prefer to do this in PowerPoint,
but that's because I'm accustomed to that program. Try to line
up the dividing line between front and back of soldiers so you
have a whole line of figures that can be cut out together. Some
people like to outline the figures in black so that when you cut
them out you won't see a fringe of white paper.
1.
Cut, Copy, and Paste - Download and save the paper soldiers
you want to make on your computer. Use your favorite software
to cut, copy, and paste the paper soldiers onto a page to get
the mix of figures you want. I prefer to do this in PowerPoint,
but that's because I'm accustomed to that program. Try to line
up the dividing line between front and back of soldiers so you
have a whole line of figures that can be cut out together. Some
people like to outline the figures in black so that when you cut
them out you won't see a fringe of white paper.
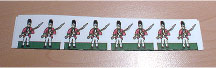
 2. Print
- Print out your figures
on paper, use heavy paper if you have it. If you don't have a
good color printer you can use the black and white soldiers and
color them by hand, or print opposing armies on different colored
paper. You can also reproduce pages on a photocopier to preserve
your precious ink cartridge.
2. Print
- Print out your figures
on paper, use heavy paper if you have it. If you don't have a
good color printer you can use the black and white soldiers and
color them by hand, or print opposing armies on different colored
paper. You can also reproduce pages on a photocopier to preserve
your precious ink cartridge.
3. Cut, Score and Glue- Use your scissors to cut out the figures in strips, leaving plenty of white space around their edges. Use an X-Acto knife to cut along the dividing line, being careful not to cut completely through the paper. You want to score the line without cutting through it. This will make it easier to fold them in half. Try to make the line straight so the two sides will match. It's a good idea to place a ruler along the fold line to guide the knife as you cut. Fold the figures in half along the scored line so the front and back of the figures match. Apply glue to both halves and firmly press them together. Use a book or similar item to smooth out the crease. Put the glued figures under a heavy book to allow the glue to dry flat. Once they are dry and stiff use the scissors to cut out the individual figures. If the figures have been folded and lined up correctly you can cut close to the figure edge. If not, leave a small amount of white space around the figure. Difficult to reach areas can be removed using triangle cuts. I don't cut out areas inside the figure - like between the legs.
4. Blacking the Edges - The edges of the figure will be white. If this bothers you take a black magic marker and color the edge. Work carefully, if your hand slips you could ruin the figure.
 5.
Paint the Foam Core -
Use spray paint to color your sheet of foam core to match your
battlefield. Just paint one side. You can get a nice sandy look
by using American Accents Stone Creations paint. Use black foam
core so that after you cut the bases you won't have to deal with
ugly white edges.
5.
Paint the Foam Core -
Use spray paint to color your sheet of foam core to match your
battlefield. Just paint one side. You can get a nice sandy look
by using American Accents Stone Creations paint. Use black foam
core so that after you cut the bases you won't have to deal with
ugly white edges.
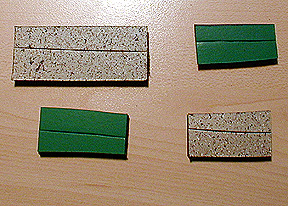
6. Measure and Cut the Foam Core - Divide the foam core into a grid by drawing pencil lines on the back (uncolored side) using your ruler and T-square. I use a utililty knife to cut the foam core because it has a larger blade than an X-acto knife. Hold the foam core down on the cutting board and cut by pressing firmly with the utility knife. Be sure to keep the blade perpendicular to the foam core and cut with a smooth, steady motion. If the blade does not cut cleanly it is too dull and should be replaced. Some people use a metal ruler to guide the blade and get a very straight cut. If you're making a very long cut you can do it in two steps. First cut through the top surface and foam, but not through the bottom surface. Then make a second cut to slice through the bottom layer. At the end of your cut, when the blade comes free of the core, the pieces may move and the surface of the foam core will tear a bit at the corner. Hold both halves firmly while cutting to avoid this. I always cut my foam core into smaller, easy to manage pieces before cutting out individual bases. Then I cut the smaller pieces into strips, then cut out the single bases.
7. Score the Foam Core - Use your utility knife to score the foam core with a straight slit. Cut through the top surface, and most of the foam, but not through the bottom surface. I cut a slit all the way across the base. Normally I use one slit down the middle, or two slits evenly space depending on how many figures will be on the base.
8. Put the Figure on the Base
- Take the base and gently
apply pressure perpendicular to the slit to allow it to open slightly.
Slip the bottom of the figure into the slit and allow it to close.
It will hold the figure firmly. One advantage to this system is
that it is very easy to put the figures on the bases, then take
them off again when the battle is over. This allows you to use
one set of bases for several different armies, and makes storage
much easier.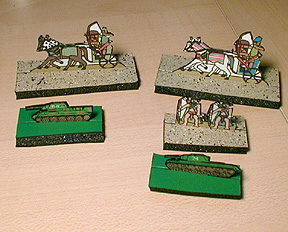
 Basing
Stand Ups Using Transparent Tape:
Alternate way to base the figures
- A simple method that will work with children.
Basing
Stand Ups Using Transparent Tape:
Alternate way to base the figures
- A simple method that will work with children.
3b. When you cut the the figures apart just cut them out into rectangular pieces, leaving a flat top to the figure.
4. Blacking the Edges - The edges of the figure will be white. If this bothers you take a black magic marker and color the edge. Work carefully, if your hand slips you could ruin the figure.3
 5.
Cut bases: Cut some poster board or illustration board into
rectangular bases for your figures. The exact size isn't important,
but they should be wider than the figure, and large enough that
they won't be easily tipped over.
5.
Cut bases: Cut some poster board or illustration board into
rectangular bases for your figures. The exact size isn't important,
but they should be wider than the figure, and large enough that
they won't be easily tipped over.
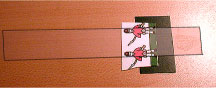
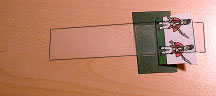
6.
Basing - This part is a lot easier to do than it is to explain.
Once you get the hang of it you'll see that it's quick and easy.
Lay a figure face down flat on the base. The bottom of the
figure should be at the center of the base. Get a long piece of
tape and put it across the base and figure, taping the figure
down. Most of the extra tape should be above the figure's head
(see picture). Next, turn the figure over so it is again flat
on the figure but face up. Fold the tape over the top of the figure
and tape the figure down to the base on the front side. Fold the
ends of the tape under the base - cut the ends if they are too
long. Now the tape should run along the base, up and down the
figure, and along the other side of the base. Turn the figure
upright, and make sure the tape is pressed down firmly on the
paper figure, or it will look a bit opaque.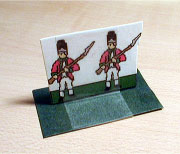
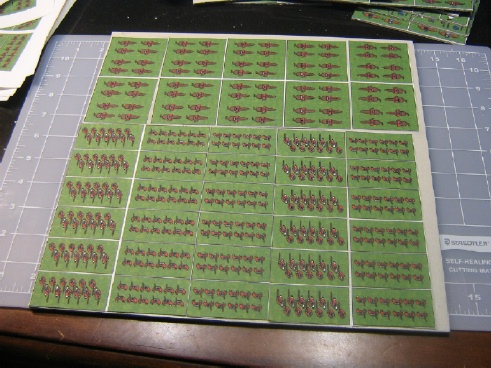
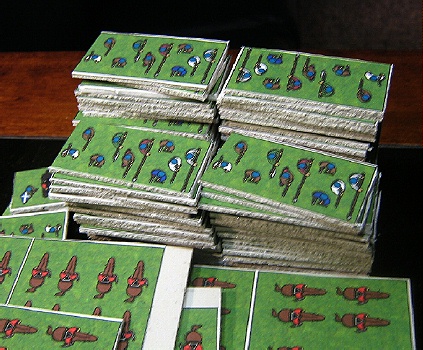
Basing Top-Downs on Vinyl
Floor Tile (this method was suggested by a member of our
forum)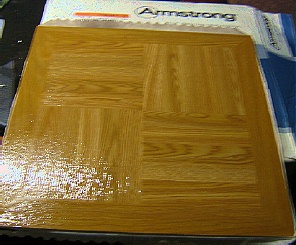
Advantages: The counters will have weight and depth, which makes them durable and easier to pick up, and less like to blow off the table
1. Buy some vinyl floor tiles from your local hardware store. The have a pattern on the top (wood, brick, whatever, it doesn't matter) and adhesive on the bottom
2. Print your top-downs. Try to arrange them on the printed page with very little space between them. That way when you cut them apart you won't have to do a lot of trimming.
3. You'll need a sturdy pair of scissors.
4. Take out the first tile and turn it over so the pattern is on the bottom. Peel off the waxed paper to expose the adhesive.
5. Lay out you sheets of top-downs on the adhesive. Cover the whole tile, they are 12" square so it will take more than one page.
6. Press the paper firmly into the adhesive and smooth it out. The adhesive should adhere nicely.
7. Use the sturdy scissors to cut out the counters. The scissors should be able to right through the tiles. I find it hard to cut a long straight line with the scissors, so try to cut small pieces ( a few counters) at a time.
Making Your Own Figures - It's not that hard! I have no artistic talent, and I was able to make a bunch of reasonably good looking paper soldiers from scratch, so don't be afraid to try. Check out this primer of Drawing Paper Soldiers for some hints.