Fast Play Rules for the Battle of
Towton (1461)
< Home
>
by Graham Harrison
Background: The War of the Roses (1455 -
1487) was an English civil war fought between the House of York and the House of
Lancaster. The Yorkists won a major victory at the Battle of Towton. Fought on Palm Sunday, 29th April 1461, this battle confirmed the
newly crowned Edward IV, son of Richard Duke of York, as king. Many of the
important Lancastrian nobles either died in the battle, or were executed
afterwards. The battle was the bloodiest fought on British soil and was fought
in a snowstorm.
Battle 1: This battle has not yet been playtested.
Building
the Armies: There are many sets of 1/72
plastic soldiers that would be suitable for this battle. Visit
Plastic Soldier Review
to see the many choices available. Here are some
paper soldiers you can print and use.
Infantry and cavalry are mounted two per base. Cavalry bases are
1.5" square, infantry bases are 3/4" x 1.5". Commanders
are based singly on 3/4" x 1.5" bases.
The Board: A 5 by 5 foot table was used. The northern and southern sides of the
table consists of a ridgeline, gently sloping down to the middle of the board.
Down the western edge runs the Beck stream with a small area
of wooded ground on the eastern bank, just behind the Yorkist lines.
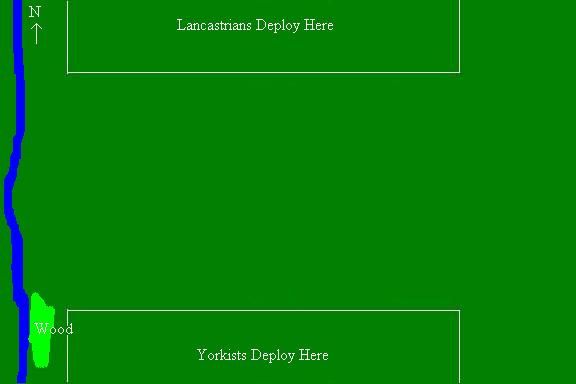
Deployment: The Yorkist deploy at the southern table end.
The Lancastrians deploy at the northern table end and must be at least 24" from
the Yorkists.
| YORKIST ARMY All units 6 bases
Right Flank - Lord Fauconberg
1 unit dismounted Men-at-arms
2 units Billmen
2 units Longbowmen
Centre - Earl of Warwick
1 unit dismounted Men-at-arms
1 unit Billmen
3 units Longbowmen
Left Flank – King Edward IV
1 unit dismounted Men-at-arms
2 units Billmen
2 units Long bow
Duke of Norfolk (Reserve - Arrive after turn 4 )
1 unit dismounted Men-at-arms
2 units Billmen
2 units Long bow
|
LANCASTRIAN ARMY All units 6
bases except the ambush party
Right Flank - Earl of Northumberland
1 unit dismounted Men-at-arms
3 units Billmen
1 unit Longbowmen
Ambush
1 unit cavalry mounted Prickers (4 stands)
Centre - Duke of Somerset
1 unit dismounted Men-at-arms
2 units Billmen
2 units Longbowmen
Left Flank - Duke of Exeter
1 unit dismounted Men-at-arms
2 units Billmen
2 units Long bow
Centre - Earl of Devon (Reserve - Deploy behind the centre
command)
1 unit dismounted Men-at-arms
2 units Billmen
2 units Long bow |
Sequence of Play:
1. Lancastrian Move
2. Lancastrian Shoot
3. Yorkist Move
4. Yorkist Shoot
5. Charge into Melee
6. Melee
Movement: All infantry move and charge 6", cavalry move and charge 12".
Shooting: Longbow units can fire up to 24". Roll 1D6 for each base in range.
The shooting table shows the number needed for a hit. Every hit removes one
enemy base. If any part of a unit is in range the entire unit may fire. Units
that are engaged in melee may not fire, and may not be targeted. Units shooting
towards the southern (Yorkist) table end are shooting into the blizzard,
therefore any units they hit have a saving throw: roll one die for each
hit and on a roll of 5 or 6 the hit is ignored.
Charge into Melee: Both sides may charge into melee. If it makes a difference
the Lancastrian make their charges first. This is the only way to get into
hand-to-hand fighting. Foot units may charge up to 6", cavalry may charge 12".
Units may only charge if they can reach an enemy unit.
Melee: Each side rolls 1D6 for each base in the fight. The Close Combat table
shows the number needed to score hits. Remove one enemy base for every hit.
Both sides roll simultaneously. If both units still have stands left they remain
engaged and fight again next turn.
Last base: If a unit is reduced to one base this last base is removed
immediately.
Ambush: The Lancastrians hid a small unit of “Prickers” (mounted spearmen) in
the wooded area to attack the Yorkist flank. The unit can be placed on the table
next to the wood at the start of any turn.
The Duke or Norfolk: The Duke of Norfolk’s troops arrived late at the battle.
Starting from turn 4 roll a1D6, after all Yorkist movement, On a roll of 4, 5 or
6 the troops arrive anywhere on the Eastern Edge. Norfolk’s command cannot more
until the following turn.
Generals: Generals may not be targeted individually if they are attached to a
unit. If they are attached to a unit they count as an extra base in melee (but
not shooting). If the unit they are attached to loses bases in melee roll 1D6.
If the roll is a 6 then the General is eliminated. If the general is charged
while alone he may be eliminated just like any other stand.
Victory Conditions: The Lancastrians win if they eliminate King Edward. The Yorkists win if they prevent this from happening.
| Melee Table |
| Longbowmen |
6 |
| Billmen/Prickers |
5-6
|
| Men at Arms |
4-6
|
| All Commanders |
4-6
|
|
| Shooting Table
(Longbowmen) |
| Range |
Hit # |
| 0 - 12" |
5-6
|
| 12" - 24" |
6 |
|
| Movement & Charge Table |
| Infantry |
6" |
| Cavalry |
12" |
| All Commanders |
12" |
|
Big Battle Option: As this was one of the largest battles fought in Britain, if
space and available armies allow use the following deployment on a 8 feet table.
YORKIST ARMY All units 6 bases
Right Flank - Lord Fauconberg
1 unit dismounted Men-at-arms
3 units Billmen
4 units Longbowmen
Centre - Earl of Warwick
1 unit dismounted Men-at-arms
3 unit Billmen
4 units Longbowmen
Left Flank – King Edward IV
2 units dismounted Men-at-arms
3 units Billmen
3 units Long bow
Duke of Norfolk (Reserve - Arrive after turn 4)
2 units dismounted Men-at-arms
3 units Billmen
3 units Long bow
|
LANCASTRIAN ARMY All units 6
bases except the ambush party
Right Flank - Earl of Northumberland
1 unit dismounted Men-at-arms
3 units Billmen
3 units Longbowmen
Ambush
1 unit cavalry - mounted Prickers (4 bases)
Centre - Duke of Somerset
1 unit dismounted Men-at-arms
4 units Billmen
3 units Longbowmen
Left Flank - Duke of Exeter
1 unit dismounted Men-at-arms
4 units Billmen
3 units Long bow
Centre - Earl of Devon (Reserve - Deploy behind the centre command)
2 units dismounted Men-at-arms
3 units Billmen
3 units Long bow |
< Home
>
Useful Resources: