Why, These are Regulars!
Fast Play Rules for the Battle of Chippawa (1814)
< Home
>
 Historical
Background: The War of
1812 has been nearly forgotten in the US. Few Americans realize
the "Star-Spangled Banner" is about the War of 1812.
The declaration of war was controversial at the time, and the
war ended as a stalemate, resolving none of the issues that started
it. Several attempts to invade Canada ended in failure. While
American privateers harassed British shipping, the Royal Navy
blockaded the East Coast. In 1814 the British marched on Washington
DC and set the White House on fire. The US won important naval
battles on Lake Erie and Lake Champlain, saving the country from
a costly defeat. The most famous battle, Andrew Jackson's victory
at New Orleans, was fought after the peace treaty was signed ending
the war. The battle of Chippawa (1814) was a landmark victory
for the US army, marking the first time it defeated the veteran
British regulars in open combat. When Winfield Scott's grey jacketed
1st Brigade was first seen the British may have mistaken them
for militia. Watching them under fire, however, it became obvious
that they were in fact well trained regulars. The US and British
lines faced each other at close range, exchanging musket and cannon
fire. After both sides suffered terrible casualties it was the
British that withdrew.
Historical
Background: The War of
1812 has been nearly forgotten in the US. Few Americans realize
the "Star-Spangled Banner" is about the War of 1812.
The declaration of war was controversial at the time, and the
war ended as a stalemate, resolving none of the issues that started
it. Several attempts to invade Canada ended in failure. While
American privateers harassed British shipping, the Royal Navy
blockaded the East Coast. In 1814 the British marched on Washington
DC and set the White House on fire. The US won important naval
battles on Lake Erie and Lake Champlain, saving the country from
a costly defeat. The most famous battle, Andrew Jackson's victory
at New Orleans, was fought after the peace treaty was signed ending
the war. The battle of Chippawa (1814) was a landmark victory
for the US army, marking the first time it defeated the veteran
British regulars in open combat. When Winfield Scott's grey jacketed
1st Brigade was first seen the British may have mistaken them
for militia. Watching them under fire, however, it became obvious
that they were in fact well trained regulars. The US and British
lines faced each other at close range, exchanging musket and cannon
fire. After both sides suffered terrible casualties it was the
British that withdrew.
Battle 1: The British deployed their light infantry, militia,
and native warriors in the woods with their dragoons in open ground
nearby. The Americans also deployed their militia, native warriors,
and dragoons on that side of the battlefield. The Americans fielded
a strong right flank, planning to defeat the British left and
roll up their line. The British responded immediately and extended
their left, deploying their reserves. In the woods the American's
native warriors advanced aggressively and threatened to break
through the British militia. But the light infantry stopped them
cold. Colonel Pearson was killed in the skirmish, so General Riall
sent Major Evans to take command in the woods. Riall was counting
on a victory on that flank. Evans sent his native warriors around
the flank of the befuddled American militia and the American position
soon became untenable. Resistance crumbled, and the British took
control of the woods, threatening the American left flank.
The Americans were having better
success on the open ground. They put relentless pressure on the
British left until all the British reserves had been committed.
The British made the mistake of advancing too quickly and were
ripped by close range American cannon fire. The British left collapsed,
threatening the whole British line. Both sides were in the same
position - they had turned the enemy flank, but were being beaten
on the opposite flank. The victory would go to the side that could
exploit their advantage the best.
The Americans deployed three cannons,
backed by their dragoons, to rake the tree line. The dragoons
and artillerymen came under murderous sniper fire from the British
units in the woods. The dragoons were driven away, leaving the
cannons unprotected. The British jumped on the opportunity. Their
light dragoons charged into the rear of the hapless artillerymen,
scattering them. Then the British dragoons turned and charged
off the US dragoons. On the other side of the battle field the
Americans were having similar success, methodically rolling up
the British line. British resistance on that flank collapsed when
Colonel Hay was killed. Both sides had suffered high casualties,
but which side would withdraw. In the end it was the Americans
that were forced to retreat, barely, resulting in a close fought
British victory.
 Building
the Armies: Right now
there aren't any 1/72 plastic soldiers designed for the War of
1812 but Imex should be releasing some soon. British infantry
and artillery from one of the Napoleonic sets could be used for
regulars and artillerymen on both sides. Some figures suitable
for militia can be found in the Imex Alamo Defenders set. Hat's
Napoleonic KGL Light Dragoons could be used for the British dragoons,
and Italeri's Napoleonic French Dragoons could pass for the US
dragoons (cut the knob off the helmet crest). Nikolai has a Woodland
Indians range that includes a 5 figure set called "Warriors
Fighting" that is suitable. I suppose you could pick a few
of the better poses from Revell's Indians, or Imex's Sioux Indians.
Chris Johnson suggests the following: American and British Commanders-use
the British Staff Officer set, American Artillery-use British
figures for the crew, but French (double trail) carriages, American
Regular Infantry-use British figures (with the Belgic shako) right
out of the box, American Militia-frontier-types from the Alamo
Defenders and/or American Revolution sets (most actually wore
a sort of "top hat", but nobody makes them so far),
American Regular Dragoons-use French dragoons, British Infantry
and Artillery-use Waterloo-era figures (Belgic shako), Canadian
Infantry-use either British Rifles or earlier British Regulars
(stovepipe shako), British Dragoons-use Waterloo-era figures (shako),
Canadian Dragoons-use earlier British dragoons (Tarleton helmet);
may have to use spare RHA riders. (American Militia Dragoons wore these also.)
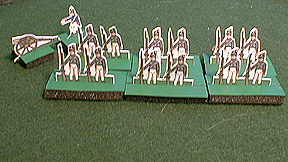
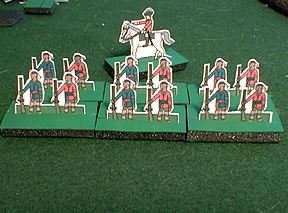
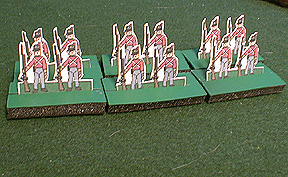
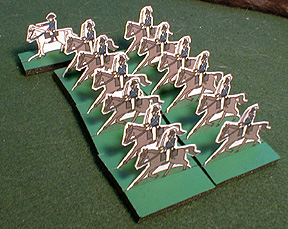
Here are some
paper soldiers you can print and use.
Infantry and cavalry are mounted two per base. Cavalry bases are
1.5" square, infantry bases are 3/4" x 1.5". Commanders
are based singly on 3/4" x 1.5" bases.
Building
the Armies: Right now
there aren't any 1/72 plastic soldiers designed for the War of
1812 but Imex should be releasing some soon. British infantry
and artillery from one of the Napoleonic sets could be used for
regulars and artillerymen on both sides. Some figures suitable
for militia can be found in the Imex Alamo Defenders set. Hat's
Napoleonic KGL Light Dragoons could be used for the British dragoons,
and Italeri's Napoleonic French Dragoons could pass for the US
dragoons (cut the knob off the helmet crest). Nikolai has a Woodland
Indians range that includes a 5 figure set called "Warriors
Fighting" that is suitable. I suppose you could pick a few
of the better poses from Revell's Indians, or Imex's Sioux Indians.
Chris Johnson suggests the following: American and British Commanders-use
the British Staff Officer set, American Artillery-use British
figures for the crew, but French (double trail) carriages, American
Regular Infantry-use British figures (with the Belgic shako) right
out of the box, American Militia-frontier-types from the Alamo
Defenders and/or American Revolution sets (most actually wore
a sort of "top hat", but nobody makes them so far),
American Regular Dragoons-use French dragoons, British Infantry
and Artillery-use Waterloo-era figures (Belgic shako), Canadian
Infantry-use either British Rifles or earlier British Regulars
(stovepipe shako), British Dragoons-use Waterloo-era figures (shako),
Canadian Dragoons-use earlier British dragoons (Tarleton helmet);
may have to use spare RHA riders. (American Militia Dragoons wore these also.)
Here are some
paper soldiers you can print and use.
Infantry and cavalry are mounted two per base. Cavalry bases are
1.5" square, infantry bases are 3/4" x 1.5". Commanders
are based singly on 3/4" x 1.5" bases.
The Map: The battle was played on a 5' x 7.5' table. The
battlefield is open and flat terrain except for the woods in the
west. The woods can be drawn in marker, marked by a piece of green
felt, or represented however you choose.
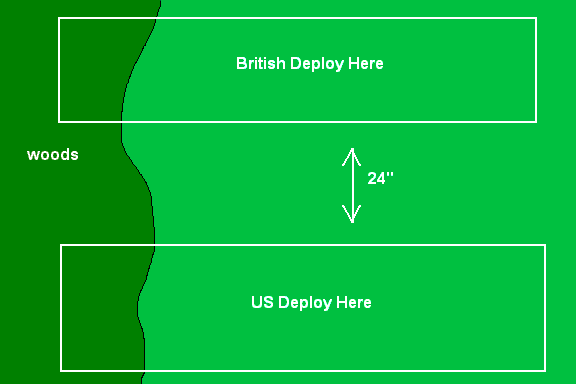
Deployment: The US and British deploy as shown on
the map. Only Militia, Native Warriors, and British Light Infantry
may start in the woods.
Orders of Battle: All
units have six bases. The British organization has been changed
to create additional commands. The 1st, 8th, and 100th Foot were
brigaded together under Gen. Riall. Winfield Scott has been listed
as overall commander for the US, although this position was held
by Major General Jacob Brown. Scott was the commander on the battlefield,
and largely responsible for the victory, and so I've given him
credit. All units have six bases, Each cannon is a single gun
model and one base of artillery crew.
British
Maj. Gen. Phineas Riall (Overall
Commander)
1 unit Grenadiers
1 unit Light Dragoons (19th Light Dragoons)
1 Cannon
1st Foot, Royal Scots - Lt.
Col. John Gordon
3 units Line Infantry
1 Cannon
8th Foot, King's Regiment
- Major Thomas Evans
3 units Line Infantry
1 Cannon
100th Foot - Lt. Col George
Hay
3 units Line Infantry
1 Cannon
2nd Brigade - Col. Pearson
1 unit Light Infantry
2 units Canadian Militia (2nd Lincoln)
2 units Native Warriors (Western & Grand River Indians) |
United States
Brig. Gen. Winfield Scott
(Overall Commander)
1 unit US Light Dragoons
2 Cannons
9th/22nd Infantry - Maj. Henry
Leavenworth
4 units Regular Infantry
1 Cannon
11th Infantry - Maj. John
McNeil
4 units Regular Infantry
1 Cannon
25th Infantry - Maj. Thomas
Jesup
4 units Regular Infantry
1 Cannon
3rd Brigade- Brig. Gen. Peter
Porter
2 units Militia (Pennsylvania Volunteer Infantry)
2 units Native Warriors (Seneca, Oneida, Cayuga Indians) |
Turn Sequence:
1. US Move
2. US Shoot
3. British Move
4. British Shoot
5. Charges
6. Melees
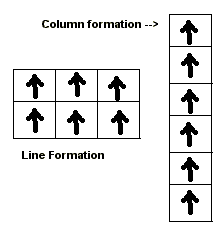 Formations: There are only two formations for regular
infantry - line and column. The names of these formations can
be very confusing for the students. At school, when they are told
to "get in line" they line up one behind the other,
in what we call column formation. With the kids I call the formations
"firing line" (like a firing squad), and "marching
column." Lines may be single or double rank, and may bend.
Columns are single company. Units may change formation at the
start or end of their movement, but can only change formation
once per turn. Dragoons stay in line formation at all times. Militia
and Native Warriors are always in line formation (actually a loose
skirmish formation, but we'll represent it with line formation).
Cannons don't have formations.
Formations: There are only two formations for regular
infantry - line and column. The names of these formations can
be very confusing for the students. At school, when they are told
to "get in line" they line up one behind the other,
in what we call column formation. With the kids I call the formations
"firing line" (like a firing squad), and "marching
column." Lines may be single or double rank, and may bend.
Columns are single company. Units may change formation at the
start or end of their movement, but can only change formation
once per turn. Dragoons stay in line formation at all times. Militia
and Native Warriors are always in line formation (actually a loose
skirmish formation, but we'll represent it with line formation).
Cannons don't have formations.
Movement: Militia and Native Warriors move 6".
Regular Infantry can move 6" if they are in line formation
or 12" if they are in column formation. Dragoons and Commanders
may move 12". Cannons can move 12" but may not fire
on a turn when it was moved. A cannon which has moved and cannot
fire should point away from the enemy. Cannons can pivot in place
during movement and still fire. Units may not move within 1"
of an enemy unit except when charging.
Fire: Infantry that are in line formation and artillery
that didn't move this turn may fire. Range is measured from the
center of a unit to the nearest part of the target unit. Units
may only fire to the front and may not fire through narrow gaps
between friendly units. Roll one die per infantry base or four
dice per cannon. The chart indicates the number needed for a hit.
Remove one base for each hit rolled by the firing unit. It takes
three hits in the same turn to remove a cannon. Note that you
only use the 1" firing column when shooting at a charging
unit. If a unit is reduced to a single surviving base then the
last base is immediately removed. Units in column are good targets.
Roll two extra dice when shooting at columns.
Movement Table
|
Unit Type |
Line |
Column |
Charge |
|
Regular Infantry |
6" |
12" |
6" |
|
Militia, Native Warriors |
6" |
- |
6" |
|
Cavalry |
12" |
- |
12" |
|
Cannon |
12" |
- |
|
Commander |
12" |
|
Cannons cannot shoot if they
move |
|
Shooting Table
|
Shooting |
1" |
6" |
12" |
|
Infantry |
5-6 |
6 |
6 |
|
Cannon |
4-6 |
5-6 |
6 |
|
If the target is in column -
add two dice |
|
 Charges: Both sides may charge during the charge
phase. If it matters the British charge first. Cavalry can charge
12", infantry can charge 6". Cannons do not charge.
A unit may not declare a charge unless it is in line formation
and can reach an enemy unit.. A player may measure to see if a
unit is within charge range. One enemy unit must be chosen as
the target of the charge. A unit that wishes to charge must first
pass a morale check. If the unit fails moral nothing happens,
it cannot charge this turn. If the unit passes its morale check
then the target must pass a morale check. If the target fails
it loses one base and immediately retreats 12", the charging
unit is moved into the position vacated by the retreating target
unit. If artillery is the target and it fails morale it is eliminated.
If the target passes the morale check it has the option of firing
at the chargers or counter charging. If the unit counter charges
the two units meet in the middle and fight a melee. If the target
decides to fire at the chargers it does so at a range of 1".
If the charging unit survives the fire it moves into contact with
the target and they fight a melee.
Charges: Both sides may charge during the charge
phase. If it matters the British charge first. Cavalry can charge
12", infantry can charge 6". Cannons do not charge.
A unit may not declare a charge unless it is in line formation
and can reach an enemy unit.. A player may measure to see if a
unit is within charge range. One enemy unit must be chosen as
the target of the charge. A unit that wishes to charge must first
pass a morale check. If the unit fails moral nothing happens,
it cannot charge this turn. If the unit passes its morale check
then the target must pass a morale check. If the target fails
it loses one base and immediately retreats 12", the charging
unit is moved into the position vacated by the retreating target
unit. If artillery is the target and it fails morale it is eliminated.
If the target passes the morale check it has the option of firing
at the chargers or counter charging. If the unit counter charges
the two units meet in the middle and fight a melee. If the target
decides to fire at the chargers it does so at a range of 1".
If the charging unit survives the fire it moves into contact with
the target and they fight a melee.
Morale Checks: If a unit has to take a morale check
Roll one die and add any modifiers. If the roll is less than
or equal to the number of bases (plus a commander if one is present),
then it has passed. If the role is greater then it fails. Cannons
pass on a roll of four.
Morale Die Roll Modifiers
|
Grenadiers, Light Infantry |
-1 |
|
Dragoons |
-1 |
|
Militia |
+1 |
|
Native Warriors not in woods |
+1 |
Melee: If a charging unit contacts an enemy unit there
will be a melee. Each side rolls a die and applies the modifiers.
High roll wins. The loser removes a stand and retreats 12".
If the roll is a tie each side removes a stand and rolls again.
A cannon counts as three bases in melee.
Melee Die Roll Modifiers
|
More stands than opponent |
+1 |
|
Hitting the flank or rear |
+1 |
|
Commander leading charge |
+1 |
|
Militia, Cannon, or Column Formation |
-1 |
|
Native Warriors in woods |
+1 |
|
Grenadier, Lights, Dragoon |
+1 |
 Commanders: A Commander may join or leave one of
his units during movement. This unit gets a +1 bonus on all melee
rolls and the officer counts as a base when testing morale. Every
time a unit with an attached commander is completely eliminated
by enemy fire (last base removed), or is engaged in a melee (win
or lose) roll one die. If the roll is a 6 the commander is a casualty
and is removed from play. This is the only way a commander can
be eliminated.
Commanders: A Commander may join or leave one of
his units during movement. This unit gets a +1 bonus on all melee
rolls and the officer counts as a base when testing morale. Every
time a unit with an attached commander is completely eliminated
by enemy fire (last base removed), or is engaged in a melee (win
or lose) roll one die. If the roll is a 6 the commander is a casualty
and is removed from play. This is the only way a commander can
be eliminated.
The Woods: During the battle the commanders used
their militia, native warriors, and light infantry for skirmishing
in the woods. If units of this type are in the woods and are shot
at by an enemy unit outside the woods they get saving throws.
Roll 1D6 for each hit, ignore the hit if the saving roll is a
4 - 6. There are no saves against fire from within the woods.
Cannons and cavalry are not allowed into the woods. Regular infantry
may not use column formation in the woods.
< Home
>
Useful Resources:
- Redcoats & Grey Jackets by Donald Graves, great book about Chippawa,
many useful illustrations
- The Perfect Captain web site has a set of rules for the War of 1812
called "Cousin Jonathan," and a Chippawa scenario with
a map and order of battle.
- "Battle of Chippawa"
by Richard Barbuto, Lone Warrior #115