 Siege of
Tenochtitlan (1521 AD)
Siege of
Tenochtitlan (1521 AD)Fast Play Rules for Students
Siege of
Tenochtitlan (1521 AD)In 1519 Hernando Cortes landed in Mexico with a small army of Spanish conquistadors. They marched to Tenochtitlan, the fabulous Aztec capitol city built in the middle of a lake. Emperor Montezuma welcomed them to the city. Cortes promptly made the Emperor his hostage and used him as a puppet ruler to gather the Aztec's gold. The mood in the capitol quickly soured and, after Montezuma was killed, the Spanish had to fight their way out of the city, suffering heavy losses. Cortes was strengthened by reinforcements and recruited many Indian allies. Meanwhile a smallpox epidemic, brought by the Europeans, devastated the Aztec population. When Cortes was ready he surrounded the capitol city and used ships armed with cannons to take control of the lake, cutting off the supply of food and water. The final assault on Tenochtitlan was long and difficult. The desperate Aztecs fought ferociously, street by street, until the last hold outs, starving and dying of thirst, were killed or captured. It was the end of the mighty Aztec Empire. Cortes founded a new city on the ruins of the old - Mexico City.
Battle 1: The conquistadors attacked from the West and South.
The Aztecs decided to allow the invaders to move into the sacred
precinct before launching their counterattack. Leaving a large
part of their army as a reserve, the Aztecs attacked the Spanish
after they had divided their forces to move between the buildings.
The Conquistador attack was thrown into confusion. As their units
became disorganized their swordsmen and pike blocks got in the
way of the cannons, crossbows, and musketeers, negating the Spanish
firepower advantage. The Aztecs took full advantage, showering
the invaders with arrows then charging in for hand-to-hand combat.
In the West the Conquistadors met the counterattack and eventually
turned the tide in their favor when a well-aimed shot from their
cannon disintegrated a charge by jaguar and eagle knights. In
the South commander Alvarado got separated from his men and was
attacked by a group of Aztec warriors. The Aztecs took him prisoner
and started to drag him back to the great temple, planning to
sacrifice him to the Huitzilopochtli, the Sun God. Just in time
a group of musketeers saw the danger, and with one devastating
volley they rescued Alvarado. The weary conquistadors finally
managed to fight their way into the shadow of the great pyramid
only to find a steady stream of fresh Aztec reinforcements headed
their way. Cortes issued the order to withdraw. Tomorrow the battle
for control of Tenochtitlan would continue, but this day belonged
to the Aztecs.
 Battle 2: This time the
conquistadors attacked from three directions, applying pressure
on the Aztec forces right from the start of the battle. A ferocious
fight raged in the West, with the Aztecs slowly tipping the advantage
in their favor. In the North and South the conquistador's crossbows,
cannons, and muskets were used to good effect. One aggressive
Spanish commander in the South, overran her opponents and made
a strong move towards the square, drawing the Aztec reserves into
the battle. Another conquistador commander was also active in
the South. After firing away at the Aztecs for a while he crushed
all further resistance with a powerful combined force of swordsmen,
pike men, attack dogs, and cavalry. When the clock ran out and
the battle ended both sides claimed the win, but this was judged
to be a slim Spanish victory.
Battle 2: This time the
conquistadors attacked from three directions, applying pressure
on the Aztec forces right from the start of the battle. A ferocious
fight raged in the West, with the Aztecs slowly tipping the advantage
in their favor. In the North and South the conquistador's crossbows,
cannons, and muskets were used to good effect. One aggressive
Spanish commander in the South, overran her opponents and made
a strong move towards the square, drawing the Aztec reserves into
the battle. Another conquistador commander was also active in
the South. After firing away at the Aztecs for a while he crushed
all further resistance with a powerful combined force of swordsmen,
pike men, attack dogs, and cavalry. When the clock ran out and
the battle ended both sides claimed the win, but this was judged
to be a slim Spanish victory.
Rules
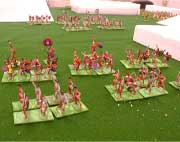
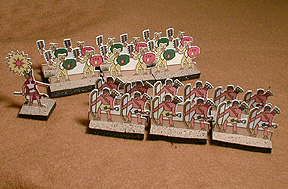
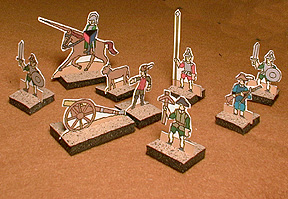
The Miniatures: The figures used were 1/72-scale plastics from Revell - two boxes #2568 Conquistadors, seven boxes of #2569 Aztecs, and one box of #2566 Imperial Artillery. I only used the cannon crews from the Artillery box, the cannons I used came from an IMEX civil war box. The Imperial Artillery box has plenty of crew men, but only two large cannons. The conquistador and Aztec figures are great but can be hard to find. You could substitute for the conquistadors - Revell's 30 Years War line will serve for arquebuses, pikes, and cavalry. Crossbowmen can be found in many different boxes. I don't know of any suitable replacements for the Aztecs. I mounted the Aztecs and cannon crews two per stand, the rest of the conquistadors and the Aztec leaders with back banners were mounted singly. Aztec stands were used for the Indians allied with the Spanish. Here are some paper soldiers you can print and use.
|
Spanish Conquistadors Four Companies each with: 1 company Indian allies organized as the Aztecs and commanded by Ahuaxpitzactzin |
Aztecs: Six companies each with: |
 The
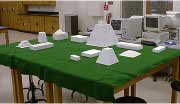
Board: A 7.5 X 5 foot
table was used. Several buildings were placed on the table to
represent the temple area of Tenochtitlan. The buildings were
actually boxes, Styrofoam pieces, or folded paper. The exact layout
wasn't important, I wanted to represent the main pyramid dedicated
to the Sun God and Rain God, and have a large open area in the
center of the table, with the rest of the buildings bordering
the Spanish deployment zone. Since there is no fighting allowed
inside or on top of the buildings you could use flat paper rectangles
to represent the buildings. Look at the picture for the layout
I used for my battles.
The
Board: A 7.5 X 5 foot
table was used. Several buildings were placed on the table to
represent the temple area of Tenochtitlan. The buildings were
actually boxes, Styrofoam pieces, or folded paper. The exact layout
wasn't important, I wanted to represent the main pyramid dedicated
to the Sun God and Rain God, and have a large open area in the
center of the table, with the rest of the buildings bordering
the Spanish deployment zone. Since there is no fighting allowed
inside or on top of the buildings you could use flat paper rectangles
to represent the buildings. Look at the picture for the layout
I used for my battles.
Deployment: The Spanish deploy first. They may start anywhere within 12" of the South, West, or East table edges. The Aztecs deploy after the Spanish and may start anywhere outside the Spanish deployment zone and at least 24" from the nearest enemy unit.
Sequence of Play:
1. Spanish Move
2. Spanish Shoot
3. Aztecs Move
4. Aztecs shoot
5. Charges
6. Melee
Movement: Spanish cavalry moves 12", all other units
move 6". Units can move in any direction. Units which are
in melee cannot move, except for cavalry, which may retreat but
cannot charge on the same turn that they withdrawal.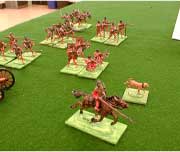
Shooting: Spanish arquebusiers, crossbowmen, and cannons can fire 24". Roll 1D6 for each arquebus or crossbow stand, they hit on a 5 or 6. Roll 1D6 for the cannon. It hits on a 4-6 and destroys 1-6 stands if it hits, but the casualties are limited to the unit hit. Aztec slinger and archer units (and those of the Spanish Indian allies) may fire 12". Roll 1D6 for each stand. They hit on a 6. Units which are in melee cannot shoot, they are too busy fighting in hand-to-hand combat. You may not fire at a unit that is fighting in melee, the chances of hitting your own men are too great. It takes two hits on the same turn of shooting to eliminate a cannon crew.
Charges: Any unit, except cannons, may charge if they are within one move of an enemy unit - 12" for cavalry, 6" for everyone else. The unit is moved into contact with the enemy and will fight them in melee.
Melee: Roll 1D6 for each stand in the fight, except for commanders, attack dogs, and cavalry, which roll 2D6 for each stand. Cavalry which charged on this turn rolls 4D6 per stand. Stands need to roll a 6 to hit, except for the following, which hit on a 5-6: cavalry, attack dogs, pike men, swordsmen, all commanders, eagle and jaguar knights. Cannon crews will fight for their cannon, they roll 1D6 and need a 6 to hit.
 Commanders,
Dogs, and Cavalry: These
figures do not have to be a part of a unit. They may move on their
own, as a single stand, or freely join or leave a unit during
movement. If they are alone they can be targeted and killed like
any other stand. If they are with a unit they will be the last
casualty removed.
Commanders,
Dogs, and Cavalry: These
figures do not have to be a part of a unit. They may move on their
own, as a single stand, or freely join or leave a unit during
movement. If they are alone they can be targeted and killed like
any other stand. If they are with a unit they will be the last
casualty removed.
Capture: If a Spanish commander is killed in combat roll 1D6. If the roll is 4-6 he is eliminated, if the roll is 1-3 he is captured. Captured commanders move with the unit that captured them. They can be rescued if the capturing unit is destroyed in melee.
Resources: A search of the Internet, library, and Magweb, turned up some useful resources for wargaming this conflict.
| Movement | Charge | |
| Cavalry | 12" | 12" |
| Cannon | 6" | 0" |
| Everyone else | 6" | 6" |
|
|
Range | To Hit |
| Arquebus, Crossbow | 24" | 5-6 |
| Cannon | 24" | 4-6, D6 hits |
| Slings, Arrows | 12" | 6 |
| Melee |
|
|
| Pikes, Swords | 1 | 5-6 |
| Dogs, Commanders, Cavalry | 2 | 5-6 |
| Charging Cavalry | 4 | 5-6 |
| All Others | 1 | 6 |