Arnold's Finest Hour
Fast Play Rules for the Battle of Saratoga 1777
< Home
>
Version 2: I made some changes to these rules. The
original version can be found here.
The rules were simplified and are now very similar to the rules
I use for other battles. The rules for morale checks and charges
were simplified.
 Historical
Background: Everyone remembers that Benedict Arnold was a
traitor during the Revolutionary War. What is often forgotten
is that prior to his treachery he was America's finest general.
Perhaps his greatest display of leadership and courage was at
the second battle of Saratoga, also known as Bemis Heights. It
was at this battle that Arnold led a successful American attack
against a British fort. His victory eventually forced General
Burgoyne to surrender his army, and gave the French the encouragement
they needed to declare war on the British. It was the turning
point in the war, and one of the most important battles in American
History.
Historical
Background: Everyone remembers that Benedict Arnold was a
traitor during the Revolutionary War. What is often forgotten
is that prior to his treachery he was America's finest general.
Perhaps his greatest display of leadership and courage was at
the second battle of Saratoga, also known as Bemis Heights. It
was at this battle that Arnold led a successful American attack
against a British fort. His victory eventually forced General
Burgoyne to surrender his army, and gave the French the encouragement
they needed to declare war on the British. It was the turning
point in the war, and one of the most important battles in American
History.
Battle 1: Morgan's rifles had successfully scouted the British
lines and taken up a position in the woods on the British right
flank. After receiving fire from the riflemen the British 24th
foot lowered bayonets and went into the woods to drive them away.
They scattered the riflemen, but soon found themselves swarmed
by other American units. Only a handful of survivors made it back
to the British lines. American reinforcements arrived, including
the charismatic Gen. Arnold. Sadly, Arnold would spend the entire
battle cowering in the rear, rather than leading from the front.
The Americans tried to use the
forest as cover for a move around the British left flank. General
Von Riedesel spotted the danger and led a strong British force
to block the maneuver. His men stopped the American advance in
its tracks and stood toe to toe with several units of Continental
line, breaking them one by one. It was wearying work, however,
and when the Albany Militia moved up and charged the British fled,
much to the surprise of Gen. Von Riedesel. In the center the Americans
were making steady progress, led by Gen. Poor's brigade. Poor's
men captured two British field cannons, forcing their way through
the British line of defense. With the sun going down Poor's brigade
raced for the British redoubts. Unfortunately by the time they
got to the abatis protecting the British redoubts it was too
late in the day to start an assault. The British had won the battle.
 Battle 2: At the start of the battle
the Americans withdrew Morgan's Brigade to use as a reserve, under
the command of Benedict Arnold, for the final assault on the British
redoubts. The rest of the American army advanced in the center,
and tried to turn the British left flank. The British mounted
a series of brilliant counterattacks to stop the American advance
in the center. This strategy came at a cost, however, as both
General Von Riedesel and General Burgoyne became casualties. The
Grenadiers, Rangers, and Indians volunteered to serve as a rearguard
while the British withdrew to the redoubts. The Rangers and Indians
ambushed the Americans trying to sneak through the woods on the
British left flank, buying time for the British to begin their
retreat. In the center the brave Grenadiers were slowly picked
apart as their fellows retired to the safety of the redoubts.
The British field cannons were unable to keep up with the retreating
infantry, and all but two were overrun and captured by the advancing
Americans.
Battle 2: At the start of the battle
the Americans withdrew Morgan's Brigade to use as a reserve, under
the command of Benedict Arnold, for the final assault on the British
redoubts. The rest of the American army advanced in the center,
and tried to turn the British left flank. The British mounted
a series of brilliant counterattacks to stop the American advance
in the center. This strategy came at a cost, however, as both
General Von Riedesel and General Burgoyne became casualties. The
Grenadiers, Rangers, and Indians volunteered to serve as a rearguard
while the British withdrew to the redoubts. The Rangers and Indians
ambushed the Americans trying to sneak through the woods on the
British left flank, buying time for the British to begin their
retreat. In the center the brave Grenadiers were slowly picked
apart as their fellows retired to the safety of the redoubts.
The British field cannons were unable to keep up with the retreating
infantry, and all but two were overrun and captured by the advancing
Americans.
The British right redoubt was
too powerful for the Americans to attack, so they concentrated
their attacks on the left redoubt. The Americans hacked their
way through the abatis in the front of the redoubt, suffering
terrible damage from the defenders. One brigade moved between
the redoubts, suffering fire from both sides, so they could attack
the rear. As the sun set in the West the Americans stormed the
redoubt from two directions, leading to savage hand to hand fighting.
The British drove back both assaults at a heavy cost. The final
American assault, featuring Gen. Arnold and Morgan's Brigade,
didn't arrive in time. The British were relieved to have won a
narrow victory, although they lost General Burgoyne, their commander
in chief.
Victory Conditions: The Americans must capture one of the
British redoubts.
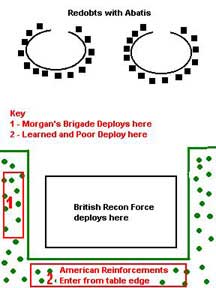 The
Map: The board is 7.5' x 5' and mostly clear terrain. The American
end of the board is surrounded on three sides by forest. This
can be represented by felt, or outlined with marker. I placed
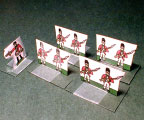
lichen (from model railroad store) along the edges. There are
two redoubts (crude forts) at the British end of the table. The
redoubts should be surrounded by abatis (pointy stakes) and open
at the back. The redoubts and abatis can be drawn in marker or
mapped out with whatever materials you have available. Here's
a section of pointy stakes you can print and use for the
abatis. The British Recon force must start the
game deployed in the clearing. The remaining British forces must
start in one of the redoubts. Learned and Poor's brigades may
start anywhere in the woods in front of the British, and Morgan's
brigade may start in the woods on the right flank of the British.
The
Map: The board is 7.5' x 5' and mostly clear terrain. The American
end of the board is surrounded on three sides by forest. This
can be represented by felt, or outlined with marker. I placed
lichen (from model railroad store) along the edges. There are
two redoubts (crude forts) at the British end of the table. The
redoubts should be surrounded by abatis (pointy stakes) and open
at the back. The redoubts and abatis can be drawn in marker or
mapped out with whatever materials you have available. Here's
a section of pointy stakes you can print and use for the
abatis. The British Recon force must start the
game deployed in the clearing. The remaining British forces must
start in one of the redoubts. Learned and Poor's brigades may
start anywhere in the woods in front of the British, and Morgan's
brigade may start in the woods on the right flank of the British.
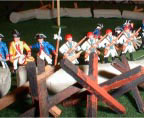
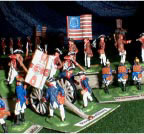
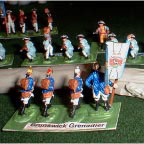
Building the Armies: I used Imex's plastic 1/72 scale Revolutionary
War figures. Unfortunately this set doesn't include any of the
unusual units like Brunswickers, Grenadiers, etc. I fashioned
crude versions of these figures by carving their hats with a sharp
knife and the judicious use of paint. The field cannons were from
Imex's civil war sets, the redoubt cannons from Revell's Thirty
Years War Artillery set, and the crew were modified revolutionary
war figures. I mounted the figure three to a base, although two
would have been better. Commanders were mounted individually,
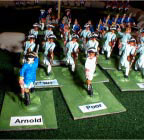
and Benedict Arnold was a mounted figure. The bases were painted
green to match the felt on the gaming table. Each base was then
given a ID label using computer generated mailing labels. The
labels were color coded by regiment using colored pencils. My
flags came from Warflag (www.warflag.com).
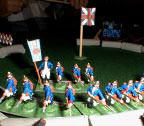
The flagstaffs were made from paperclips. All the continental
line were painted in full uniforms to help distinguish them from
the militia, who were painted in various civilian outfits. Here
are some
paper soldiers you can print and use:
sarafigs.pdf. The black and white versions can
be reproduced on a copying machine (print opposing sides on different
colored paper) or given to the kids to color.
 Orders of Battle: The number
of bases in each unit is indicated inside the parentheses.
Orders of Battle: The number
of bases in each unit is indicated inside the parentheses.
British
Recon Force - Gen. Burgoyne
Right Wing - Gen. Fraser
Butler's Rangers & Indians (2)
British Light Infantry (6)
British 24th Foot (5)
2 Field Cannons
Left Wing - Gen. Von Riedesel
British Grenadiers (6)
Brunswick Von Spaeth Regiment (6)
2 Field Cannons
In Redoubts - von Breymann
Canadian Militia (2)
Brunswick Von Specht Regiment (5)
Brunswick Grenadiers (6)
2 Redoubt cannons |
Americans
Morgan's Brigade - Daniel
Morgan
Virginia Rifles (4)
Dearborn Light Infantry (4)
Learned's Brigade - Gen. Learned
2nd Mass (4)
8th Mass (4)
9th Mass (4)
NY Militia (4)
Poor's Brigade - Gen. Poor
1st NH (4)
2nd NH (4)
3rd NH (4)
1st NY (4)
2nd NY (4)
4th NY (4)
1st Conn Militia (4)
2nd Conn Militia (4)
Enter Turn Two:
Patterson's Brigade - Gen.
Patterson
10th Mass (3)
11th Mass (3)
12th Mass (3)
14th Mass (3)
Glover's Brigade - Gen. Glover
1st Mass (3)
4th Mass (3)
13th Mass (3)
15th Mass (3)
2nd Albany Militia (3)
Duchess & Ulster Militia (3)
Gen. Benedict Arnold |
Turn Sequence:
1. Americans Move
2. Americans Shoot
3. British Move
4. British Shoot
5. Charges
6. Melees
 Formations: There are only two formations - line
and column. The names of these formations can be very confusing
for the students. At school, when they are told to "get in
line" they line up one behind the other, in what we call
column formation. With the kids I call the formations "firing
line" (like a firing squad), and "marching column."
Lines may be single or double rank, and may bend. Columns are
single company. The British light infantry and Virginia Rifles
may deploy in line with up to one stand width between stands.
Inside the redoubts there are no formations, bases can move individually.
Units may change formation at the start or end of their movement,
but can only change formation once per turn.
Formations: There are only two formations - line
and column. The names of these formations can be very confusing
for the students. At school, when they are told to "get in
line" they line up one behind the other, in what we call
column formation. With the kids I call the formations "firing
line" (like a firing squad), and "marching column."
Lines may be single or double rank, and may bend. Columns are
single company. The British light infantry and Virginia Rifles
may deploy in line with up to one stand width between stands.
Inside the redoubts there are no formations, bases can move individually.
Units may change formation at the start or end of their movement,
but can only change formation once per turn.
Movement: Infantry can move 6" if they are
in line formation or 12" if they are in column formation.
Commanders may move 12". Field cannons can move 6" but
may not fire on a turn when it was moved. Redoubt cannons may
not move, but all cannons can pivot in place during movement and
still fire. Units may about face (turn 180 degrees) once per turn.
Units may move backward while still facing to the front at half
speed. Units cannot cross the abatis until cut a gap through it.
Units may not move within 1" of an enemy unit except when
charging.
Fire: Units that are in line formation and artillery
that didn't move this turn may fire. Range is measured from the
center of a unit to the nearest part of the target unit. Units
may only fire to the front and may not fire through narrow gaps
between friendly units, or over the heads of friendly units. Roll
one die per base or two dice per gun model. The chart indicates
the number needed for a hit. Remove one base for each hit rolled
by the firing unit. It takes three hits in the same turn to remove
an artillery base. Note that you only use the 1" firing column
when shooting at a charging unit. If a unit is reduced to a single
surviving base then the last base is immediately removed unless
it is inside the redoubt.
|
Shooting |
1" |
6" |
12" |
24" |
|
Infantry |
5-6 |
6 |
- |
- |
|
Virginia Rifles |
4-6 |
5-6 |
6 |
- |
|
Field Cannon |
4-6 |
5-6 |
6 |
- |
|
Redoubt Cannon |
4-6 |
5-6 |
6 |
6 |
Charges: Both sides may charge during the charge phase.
A unit may not declare a charge unless it is in line formation
and within 6" of an enemy unit. If it matters the Americans
charge first. A player may measure to see if a unit is within
charge range. One enemy unit must be chosen as the target of the
charge. A unit that wishes to charge must first pass a morale
check. If the unit fails moral nothing happens, it cannot charge
this turn. If the unit passes its morale check then the target
must pass a morale check. If the target fails it loses one base
and immediately retreats 12", the charging unit is moved
into the position vacated by the retreating target unit. If artillery
is the target and it fails morale it is eliminated. If the target
passes the morale check it has the option of firing at the chargers
or counter charging. If the unit counter charges the two units
meet in the middle and fight a melee. If the target decides to
fire at the chargers it does so at a range of 1". If the
charging unit survives the fire it moves into contact with the
target and they fight a melee.
 Morale
Checks: If a unit has
to take a morale check Roll one die and add any modifiers.
If the roll is less than or equal to the number of bases (plus
a commander if one is present), then it has passed. If the role
is greater then it fails. Butler's Rangers, Indians, and Artillery
must roll a 4 or less to pass a morale check.
Morale
Checks: If a unit has
to take a morale check Roll one die and add any modifiers.
If the roll is less than or equal to the number of bases (plus
a commander if one is present), then it has passed. If the role
is greater then it fails. Butler's Rangers, Indians, and Artillery
must roll a 4 or less to pass a morale check.
Morale Die Roll Modifiers
|
Militia |
+1 |
|
Grenadiers, Lights, Morgan's Brigade |
-1 |
Melee: If a charging unit contacts an enemy unit there
will be a melee. Each side rolls a die and applies the modifiers.
High roll wins. The loser removes a stand and retreats 12".
He must spend the next turn reforming. If the roll is a tie each
side removes a stand and rolls again.
Melee Die Roll Modifiers
|
More stands than opponent |
+1 |
|
Hitting the flank or rear |
+1 |
|
Commander leading charge |
+1 |
|
Militia unit or artillery crew |
-1 |
|
Defending redoubt wall |
+2 |
|
Grenadier |
+1 |
 Commanders: A Commander may join or leave one of
his units during movement. This unit gets a +1 bonus on all melee
rolls and the officer counts as a base when testing morale. Every
time a unit with an attached commander is completely eliminated
by enemy fire (last base removed), or is engaged in a melee (win
or lose) roll one die. If the roll is a 6 the commander is a casualty
and is removed from play. This is the only way a commander can
be eliminated.
Commanders: A Commander may join or leave one of
his units during movement. This unit gets a +1 bonus on all melee
rolls and the officer counts as a base when testing morale. Every
time a unit with an attached commander is completely eliminated
by enemy fire (last base removed), or is engaged in a melee (win
or lose) roll one die. If the roll is a 6 the commander is a casualty
and is removed from play. This is the only way a commander can
be eliminated.
Attacking the redoubt: To attack the walls of the redoubt the
abatis must be cleared first. A unit must spend one turn in contact
with the abatis to clear it. The unit must not move during the
turn that it is clearing the abatis, and it must pass any morale
checks caused by enemy fire. No unit may cross the abatis on the
turn it is being cleared. Once the abatis is clear attackers may
charge units defending the wall. The walls will protect the defenders
from enemy fire. If a unit defending the wall is hit by enemy
fire roll 1D6 for each hit. If the roll is a 1-4 then there is
not effect, if the roll is 5-6 the hit counts.
< Home
>
Useful Resources:
- 1776 - Wargaming Rules and
a Guide to the American War of Independence by Jay Facciolo and Joe Miceli
- "Saratoga Order of Battle"
by Wesley A. Rogers, Citadel 1996
- Sons of the Revolution, http://www.walika.com/sr/
- Warflag, http://www.warflag.com/