 Make 'em Eat Snakes - Fast Play Rules for the Storming
of the AlamoMake 'em Eat Snakes - Fast Play Rules for the Storming
of the Alamo
Make 'em Eat Snakes - Fast Play Rules for the Storming
of the AlamoMake 'em Eat Snakes - Fast Play Rules for the Storming
of the AlamoHistorical Background: In 1836 Texas was still a part of Mexico. But the Texans revolted against the autocratic rule of President Santa Anna. The most famous battle of the Texas War for Independence occurred at a crumbling old Spanish mission on the outskirts of San Antonio. Four thousand Mexican soldiers stormed the walls of the Alamo, killing all of the defenders. Among those killed were the legendary Davy Crockett and Jim Bowie. Although this was a defeat for the Texans they won their independence later at the battle of San Jacinto. Shouting, "Remember the Alamo" the Texans routed the Mexican army, captured Santa Anna, and secured their independence. Ten years later Texas joined the United States, an event that helped ignite the Mexican American War.
Davy Crockett reportedly said that the Mexicans would "eat snakes" before they got into the Alamo. This remark seems to capture the defiant spirit of the Texans. These rules were developed for the students in my History Club at Crest Memorial Elementary School in New Jersey. The rules for this battle are adapted from "Remember the Alamo!" by George Knapp, which appeared in MWAN 100. I found the article while browsing on Magweb. The original rules are excellent. For the most part the changes I have made are to simplify the game so that they will work well with my students aged 10-13. The battle can be completed in less than two hours. The Mexicans will suffer a much higher casualty rate than they did historically, but the game moves quickly and is fun. Historically the Texans retreated into the buildings and were blasted out by the Mexicans using the Texan's own cannons. This has been left out of the rules for the sake of simplicity. Although intended for the youngsters our gaming club has enjoyed playing these rules on numerous occasions. I urge you to check out Mr. Knapp's original rules if you are looking for a more detailed battle.
Battle Reports - This game
was played twice with the children.
 Battle 1: The Mexicans succeeded in smashing a hole in the
west wall with their cannons. For the main assault two columns
were sent to storm the breach in the wall, two more columns were
assigned to overrun the weak point in the south east corner, and
a fifth column would attack the north wall. Heavy cannon fire
from the Texans halted one of the columns in the west. The second
column reached the wall and began scaling it with ladders before
Jim Bowie and his men threw them back. Bowie was killed in the
melee. The Mexican column in the North made it to the wall easily
but had a terrible time climbing up in the face of fierce resistance.
Eventually they began to wear down the defenders.
Battle 1: The Mexicans succeeded in smashing a hole in the
west wall with their cannons. For the main assault two columns
were sent to storm the breach in the wall, two more columns were
assigned to overrun the weak point in the south east corner, and
a fifth column would attack the north wall. Heavy cannon fire
from the Texans halted one of the columns in the west. The second
column reached the wall and began scaling it with ladders before
Jim Bowie and his men threw them back. Bowie was killed in the
melee. The Mexican column in the North made it to the wall easily
but had a terrible time climbing up in the face of fierce resistance.
Eventually they began to wear down the defenders.
The Mexicans had their greatest success against the log palisade
at the southeast corner. Both columns made it to the wall and
drove their way into the compound. They suffered terribly from
withering rifle fire directed at them from atop the church by
Crockett and his Tennessee volunteers. But there were too many
Mexicans for the King of the Wild Frontier, and they eventually
cornered him and gave him the cold steel. Sensing victory Santa
Anna ordered in his reserves. They surprised the Texans by hitting
the now lightly defended north west corner. Mexicans poured in
from all directions, and the battle was over. The Mexicans had
paid dearly for their victory.
Battle 2: This time the Mexicans breached the south wall.
Two columns were sent against the breach, two were sent against
the northeast corner, and the last column was sent against the
palisade. The Mexicans had a difficult time in the early going.
The Texan cannons obliterated the column assaulting the palisade.
Heavy casualties temporarily halted the columns attacking in the
south. But one column managed to close on the northwest corner.
A ferocious fight followed as the Mexicans gained a precarious
foothold on the walls. As they began to drive back the Texans
they relieved the pressure on the second column and soon the Mexicans
were sweeping the walls. Crockett led his men in a brilliant fighting
withdrawal that exacted a heavy toll on the attackers.
In the south the Mexicans made it to the breach and ran right
into Jim Bowie. He rallied his men to stop one column, but was
struck down by the flashing Mexican bayonets. The second column
followed up and began to force their way through the breach. Santa
Anna ordered in his reserves and sent them for the same breach.
Col. Travis tried to stem the tide but was killed. Crockett was
killed as he tried to get to the church. Soon the Alamo was full
of Mexicans hunting down the survivors. It was another Mexican
victory, but again the price had been very steep.
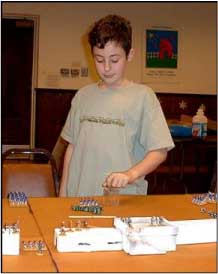
 The
Armies: I decided to go with 1/72 scale
plastic figures for both armies. Students tend to be rough on figures, so it
doesn't pay to spend a lot of time and money on the miniatures. The miniatures
were painted with my usual quick procedure. After washing the figures in the
dishwasher I primed them with white spray paint. I painted the flesh, weapons,
packs, and other details using Folk Art acrylic paints. When they were finished
the Mexicans were mounted on pieces of cardboard (four figures in a row). The
Texans were mounted individually on pennies. I dipped the figures in floor wax
to give them a hard finish that will help prevent paint loss. Here are some
paper soldiers you can print and use.
The
Armies: I decided to go with 1/72 scale
plastic figures for both armies. Students tend to be rough on figures, so it
doesn't pay to spend a lot of time and money on the miniatures. The miniatures
were painted with my usual quick procedure. After washing the figures in the
dishwasher I primed them with white spray paint. I painted the flesh, weapons,
packs, and other details using Folk Art acrylic paints. When they were finished
the Mexicans were mounted on pieces of cardboard (four figures in a row). The
Texans were mounted individually on pennies. I dipped the figures in floor wax
to give them a hard finish that will help prevent paint loss. Here are some
paper soldiers you can print and use.
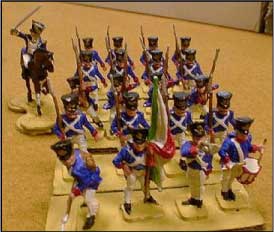
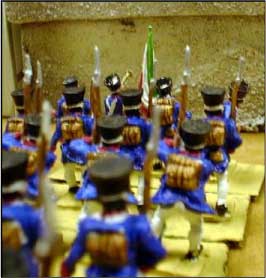
The Mexicans: I bought six boxes of Airfix 1/72 scale French Waterloo Infantry. This provided enough figures for 58 stands of four Mexicans, including six command stands, and a mounted figure for Santa Anna (with a few leftovers). The Airfix figures are really lousy. I suggest buying a different brand, although the Airfix are cheap (under $4 for a box of 50). Imex has now come out with a set of Mexican infantry.
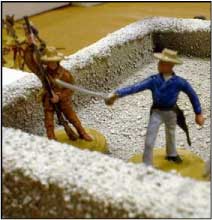
The Texans: One box of Imex Alamo Defenders gave me 50 nice Texans, including New Orleans Grays, and figures for Crockett, Bowie, and Travis. These are nice figures, and I highly recommend them. The Texan's artillery came from two boxes of IMEX Union and Confederate Artillery. This will give you twelve cannons. I used figures from the Alamo Defenders set as gunners (one per cannon).
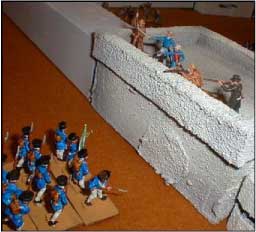
 Building
the Alamo: Following my
keep it simple philosophy I made the walls out of empty aluminum
foil boxes. These were spray painted white, and some textured
paint was used to improve the look. The church was a cardboard
box that was given the same spray paint treatment. I used some
beach obstacles I had on hand from a D-Day game to represent the
palisade in front of the open southeast corner. Here's a
paper
palisade and ladder you can print and use.
Building
the Alamo: Following my
keep it simple philosophy I made the walls out of empty aluminum
foil boxes. These were spray painted white, and some textured
paint was used to improve the look. The church was a cardboard
box that was given the same spray paint treatment. I used some
beach obstacles I had on hand from a D-Day game to represent the
palisade in front of the open southeast corner. Here's a
paper
palisade and ladder you can print and use.
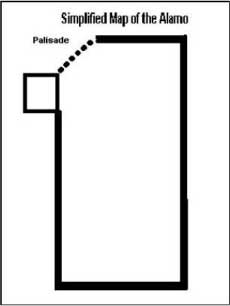
Preliminary Bombardment: The Mexicans have three batteries for the bombardment. These don't have to be represented by models on the board. The Texans have twelve cannons for counter battery fire. These must be placed on the walls, and may not be moved from their starting locations. There will be 5 days of bombardment. Each day the Mexicans decide which wall their cannons will be facing. They may relocate their guns every day. Roll 1D6 for each battery. A hit is scored if the battery rolls a 6. Each hit either creates a breach or destroys a Texan cannon, the Mexicans get to choose which. Remove any cannons that are destroyed. If a breach is created you can mark this by putting a small pile of gravel at the correct location. Each breach is the width of one Mexican stand of infantry. After the Mexican batteries fire the Texans can reply with any cannons that are facing the Mexican batteries. Roll 1D6 for each Texan gun. If a 6 is rolled then one Mexican battery is eliminated. Continue the duel with the surviving guns for 5 days.
Preparing for the Assault: All the Alamo defenders should be deployed on the walls. One figure is needed to crew each cannon. After the Texans have been placed the Mexicans should plan the attack. Their force of 58 stands should be divided into 6 assault columns. There must be one command stand per column, and each column must include at least six stands. Five of the assault columns should be placed 18" from the walls of the Alamo, facing any part of the Alamo that the Mexican commander chooses. The sixth column will be the reserve. It should be kept off table, but the Mexican commander must secretly record where it will enter the table. Santa Anna starts with the reserve column.
 Sequence
of Play:
Sequence
of Play:
Texans Move or Fire
Resolve Melees
Mexican Morale Checks
Mexicans Move
Resolve Melees
Texans Move or Fire:
a. It takes one Texan figure to fire a cannon. Cannons have unlimited range. Cannons on the corner of a wall have an arc of fire of 270 degrees; a cannon off the corner has an arc of fire of 180 degrees. Cannons may not be moved, and may not fire into the Alamo. Cannons hit if the roll a 6 on 1D6. Each hit eliminates one Mexican stand.
b. The range for small arms fire is 7". Texans
eliminate one Mexican stand if they roll a 6 on 1D6.
c. Texan figures that don't fire may move 6".
Texans may attack Mexican stands by moving into contact with them.
Up to two Texans can attack a single Mexican stand.
d. If a Mexican column has not reached the wall and it loses one or more stands then you must check to see if the command stand was a casualty. Roll 1D6 for each stand lost this turn. If you roll a 6 then the command stand is removed instead of one of the regular stands. There is no need to check for this after the column reaches the wall because the command stand functions as a normal stand after reaching the wall.
 Resolve
Melees: A melee is fought
when a Mexican column is in contact with one or two Texans (only
two Texans can attack a Mexican stand). The Mexican column rolls
4 dice, and eliminates a Texan stand on rolls of 4 - 6. Roll one
die for each Texan stand, and they need a 6 to eliminate the column.
Resolve
Melees: A melee is fought
when a Mexican column is in contact with one or two Texans (only
two Texans can attack a Mexican stand). The Mexican column rolls
4 dice, and eliminates a Texan stand on rolls of 4 - 6. Roll one
die for each Texan stand, and they need a 6 to eliminate the column.
Mexican Morale: Mexican columns that have not reached the wall must check morale every turn. Once the column reaches the wall it no longer checks morale. There are three morale states: Advancing (move 6" forward), Halted (stand in place), and Retreating (move 6" away from the wall). Turning the lead stand around to face the rear marks a halted column. A retreating column has all of its stands turned to the rear. Each turn roll 2D6 for each column. If the modified roll is 5 or more, it improves one morale level. If it's modified roll is 4 or less it goes down one level.
Modifiers:
-1 for each stand lost this turn
-3 if command stand was lost this turn
-1 if command stand was lost in a previous turn
+2 if Santa Anna is within 1" of the column (he may only
help one column each turn)
Mexican Move: Columns that have not reached the wall move according to their morale level. Once a column reaches a wall it may move one stand to the left and right of the lead stand each turn. Stands that start a turn next to a wall may attempt to scale the wall, or cross a breach. Once a stand has made it onto the walls or crossed a breach it may move 6" per turn.
Scaling the Walls: A stand that has enemy figures on the wall in front of it may climb the walls by rolling a 4-6 on 1D6. If successful the stand is placed on the wall and will fight a melee with the stands in its path. If it fails it must stand in place until next turn. If no enemy figures are on the wall then the Mexican stand climbs successfully on a roll of 2-6.
Crossing a Breach: If the breach is defended the Mexicans may automatically send one stand per turn through it to melee with the defenders. If the breach is undefended then two stands may move 6" through the breach each turn. The palisade on the South wall is treated as a breach.
The battle continues until all the Texans are dead.
 Special
Figures: The Texans have
several special figures with exceptional abilities -
Special
Figures: The Texans have
several special figures with exceptional abilities -
Davy Crockett: Crockett hits with his rifle on a roll of 3-6.
He kills a stand in melee on a roll of 5-6.
Col. Travis: Travis hits with a roll of 5-6 with his rifle, and
in melee.
Jim Bowie: Bowie shoots successfully with a roll of 5-6, and hits
in melee on a roll of 4-6. Because he is ill he may not move from
his starting position.
Dickinson: He is in charge of the artillery. The gun he is operating
hits on a 5-6, and he hits on a 5-6 in melee.
Santa Anna is a special figure for the Mexicans. He must stay off board with the reserve column until it is sent into battle. Afterwards he may move 24". He may not enter the Alamo, and is immune to Texan fire. He may help rally one Mexican column each turn by moving next to it. He adds +2 to its morale check.
Acknowledgements: These rules are very simple. If you are after a more detailed fight then you should seek out a copy of George Knapp's original article in MWAN. I'm grateful to the gang from South Jersey Confederation of Wargamers for their help in play testing these rules: Tony McBride, Rob McBride, John Burke, Phil Willows, and Ceasar Bennett, Tom Gallagher, and Dustin Weiss. These rules were developed for the students in my History Club at Crest Memorial School in Wildwood Crest, NJ - a great group of kids.
Resources
"Remember the Alamo!" by George Knapp, MWAN #100 July-August
1999
"Going it Alone - The Solo Wargamer's Corner" by Rich
Barbuto, MWAN #90 & 91 Nov. - Dec. 1997, Jan. - Feb. 1998
"Alamo Fast Play Rules" by John McBride, www.magweb.com
"Santa Anna Rules" by Buck Surdu, MWAN #94 July-Aug.
1998