 Rules
RulesHistorical Background: The Korean War included several major surprises: the North's invasion of the South, the Inchon landings, and the intervention of China. Another surprise came when the Russian built Mig-15 jet started flying in the skies over North Korea. It dominated the skies and took a heavy toll on UN bombers, especially the B-29s. The US sent in the F-86 Sabre to fight for air supremacy. Jet vs. jet dogfights took place in "Mig Alley," an area just south of the Yalu River which marked the border with China. UN pilots were not allowed to cross the Yalu, a rule they sometimes ignored. Badly outnumbered and hampered by early technical problems, the Sabre pilots struggled at the start. In time they would turn the tide, and by the end of the war they would have the upper hand. The Sabre and Mig were well matched. The Mig had an advantage at higher altitudes and out gunned the Sabre. The Sabre was a bit more maneuverable, and improved versions would eliminate the Migs altitude advantage. The US pilots outclassed their timid, poorly trained North Korean and Chinese pilots. However some of the Migs were secretly flown by Soviet pilots, many of whom were WW II aces. With a Soviet "honcho" in the pilot's seat the Mig was a match for Sabre.
Design Note: This game is a variant of the WW I air combat rules. I made some Pilot Licenses and paper plane models to go with the game. The only difference between the Korean War rules and the WW I rules are the maneuver cards, so if you are already familiar with the old rules you can skip to that section and start playing.
Battle 1: The American pilots agreed to fly in teams of two, with a lead and wingman. This created some frustration when the wingmen decided to venture out on their own instead of sticking with their leaders. The Mig pilots had no plan whatsoever and roamed the skies seemingly at random. Some appearing to fly aimlessly in circles. This made them easy targets for the US pilots. The Americans got the better of the combat, but were unable to inflict much damage despite getting many opportunities at close range. Often a badly damaged Mig would escape the Americans by zooming out of the battle at full throttle, presumable to safe airfields across the Yalu River. The Americans considered it unfair that they couldn't pursue the Migs, but those were the rules of engagement. After the air battle the victories on both sides were totaled and the Americans were the victors.
Rules
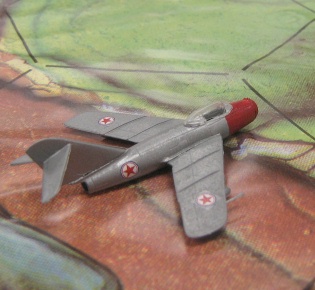
The models: I used plastic 1/144 scale models purchased from Ozmods (an Australian company), they're about $10. Plastic model planes are also readily available in 1/72 for $5 - $7. You can also find die-cast planes from manufacturers like Corgi and Model Power. Here are some simple paper airplane models you and print and use. You can also get origami airplane models for $3 at Fiddler's Green (http://www.fiddlersgreen.net/).
Each Student gets:
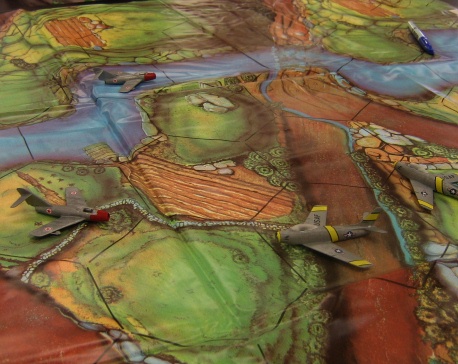
The Board: The game is played on a 4' x 4' mat with a 5" hex pattern. A somewhat larger mat, or smaller hex pattern will work even better since the planes move quickly, and can run out of room on a smaller playing surface. The size of the hex pattern doesn't really matter, as long as the hexes are large enough to accommodate the planes. I used the vinyl "battle mat" that comes with the old Battle Masters board game. These can be purchased on eBay for $15 (a complete game is much more expensive, try to get the mat when sold as a spare part, or part of an incomplete game). Of course you can just draw your own hex pattern on a piece of felt by cutting a hex out of cardboard and using it as a template to trace the pattern. A 4' x 4' mat can handle eight pilots. With a larger group it's better to have a few separate mats rather than combing them into one big battlefield.
Airplane Stands: An airplane stand is not necessary, but it can give the battle a nice 3-D feel. I played the battle with my students without using airplane stands. Check out the the WW I air combat game for a description of how to build a stand.
Maneuver Cards: Each student gets a deck of maneuver cards from which he can choose his moves for the turn. I designed the cards in MS Word so they can be printed on business cards. Each card names the maneuver, illustrates how to move the plane, and describes it in words. The maneuver deck Mic developed contains the following moves: 3 Right Turns, 3 Left Turns, 3 Straight aheads, 3 Right Slips, 3 Left Slips, 3 Straight Fast, 1 Full Throttle, 1 Split S (Immelman turn), 2 Hard Right turns, and 2 Hard Left turns. This is the same deck as the WW I air combat game with the following changes: Remove the stall maneuvers, add 2 Hard Right turns, 2 Hard Left turns, 2 Straight Fast cards, and 1 Full Throttle card. You can download the maneuver cards as a MS Word file jetmancards.doc (117 kb) or as separate gif files page1.gif, page2.gif, page 3.gif. I suggest you write a different letter on the back of each deck so that when the kids drop or lose cards they can be returned to the right deck.
Pilot Licenses: The pilot license is a sheet, about the size of an index card, where the students can record the damage to their planes and record their victories. They were designed to resemble baseball cards, with the name of a Korean War ace, his victory total, and a brief biographical blurb. The sources used in creating the licenses are listed in the resources section at the end of this page. The two most useful sites were Korean War Aces and American Aces of WW II. I laminated the pilot licenses so they could be marked with dry erase markers. They should be printed in landscape mode. You can download the pilot license cards as MS Word files: sabrepilots.doc, migpilots.doc.
USAF Page
1: Blesse, Davis, Fernandez,
Jabara
USAF Page 2: Parr, Johnson, Garrison,
Moore
USAF Page 3: Fischer, McConnell, Baker,
Glenn
Soviet Page 1: Sutyagin, Pepelyaev,
Shchukin, Kramarenko
Soviet Page 2: Fedorets, Suchkov, Smorchkov,
Mihin
Soviet Page 3: Bahayev, Ohay, Karelin,
Samoylov
Deployment: The opposing sides start on any whole hex on opposite sides of the mat. You should line up the hex grain so the hexes run straight across from the opposites sides, not at an angle. Planes should be positioned so the arrow on their base (and the nose of the plane) point at a hex side, NOT a hex corner.
 Sequence of Play:
1. Choose cards
2. Play first card and move planes
3. Resolve shooting
4. Play second card and move planes
5. Resolve shooting
6. Play third card and move planes
7. Resolve shooting
Choose Cards: At the start of the turn each pilot must select three maneuvers from his deck of maneuver cards. Note that there is only one card for some maneuvers so these may not be used more than once per turn. The pilot should try to anticipate the maneuvers of his opponents and plan accordingly. The three cards selected should be placed face down in a stack in the order they will be used, the rest of the cards should be set aside. At the start of each new turn the three cards that were used are returned to the deck and may be selected again for the new turn. Normally everyone gest a deck with the same cards, but see the optional rules for a different method you can try.
Play Card and Move Planes: Each turn has three rounds of movement. When all players are ready everyone reveals their first maneuver card. Each player then moves his plane as indicated on their card. It may be helpful at the start to place the card next to the plane, and turn it to match the orientation of the plane. All moves take place at the same time. Planes should always end their move facing a hex side. This procedure is repeated for the second and third cards after shooting is resolved.
Planes in the Same Hex: Sometimes two planes will end up in the same hex. Planes in the same hex MAY NOT shoot at each other, they are assumed to be flying at different altitudes. Do your best to put both planes in the hex without losing track of their facing. The problem will resolve itself when the planes make their next move.
Resolve Shooting: Planes may ONLY fire at enemy planes that are in the line of hexes directly in front of their nose, they may not fire off to the sides or at an angle. Pilots must fire at the nearest enemy plane, and may ignore any friendly planes that are in the line of fire. If the target is one hex away the pilot rolls five dice, two hexes away roll four dice, and so on. Targets six or more hexes away are out of range. Hits are scored on rolls of 4-6. The target crosses of one circle on their pilot license for each hit received. When a plane has taken six hits it is shot down and removed from play, until then it may be flown normally. All firing is assumed to take place at the same time.
| Range | 1 | 2 | 3 | 4 | 5 | 6+ | Hits on roll of 4-6 |
| Dice | 5 | 4 | 3 | 2 | 1 | 0 |
Crash Landings: When a plane is shot down the pilot may be able to survive by landing the plane safely or bailing out with a parachute. Roll one die - on a roll of 1-4 the pilot survives, on a roll of 5 or 6 the pilot is put out of action (either killed, captured, or seriously wounded). If a student's pilot is put out of action they of course lose all their victories and must start over again with a new pilot license and airplane.
Victories: The pilot that shoots down an enemy plane is credited with a victory. If two planes hit a target on the turn it is shot down the victory is awarded to the player doing the most damage. If both players inflicted equal damage they each roll a die, high roll gets the victory (re-roll ties).
Aces: When a pilot gets 5 victories they become an ace. Ten victories is a double ace. When a pilot becomes an ace they get to throw one extra die each time they fire at an enemy plane.
Leaving the Board: If a pilot's plane has received 4 or more damage points he may escape combat by flying off the mat. If he succeeds in getting off the mat all his damage points are restored and he may return to combat at the start of the next turn.
Returning to Combat: A pilot that has survived being shot down or left the mat voluntarily may return to combat at the start of the next turn. Their plane will start the turn undamaged. They must place their plane on any whole hex on any edge of the mat that is at least six hexes from the nearest enemy plane. This is to prevent them from flying in right behind an opponent. The hex where they start should be indicated to the other pilots before they select their maneuver cards for that turn.
Duels: Occasionally two pilots will want to fight a one on one duel to settle a grudge, or determine which is the better pilot. Two players may declare that they are fighting a duel if they enter the mat on the same turn and both players agree. The two pilots will ignore the movements of all other planes on the mat, and may only fire at each other. Likewise, the other players must ignore the two dueling pilots, and may not shoot at them. The duel continues until one or both planes are shot down. The winning pilot must then fly off the mat before rejoining the dogfight.
Optional Rules: The Mig-15 and Sabre had different strengths and weaknesses. You can model some of the differences with some simple changes. The Sabre was armed with six .50 machine guns, which did less damage than the Mig's cannons. Give the Mig one extra damage point. The Sabre was more maneuverable than the Mig, so remove one Hard Right and one Hard left from the Mig's maneuver deck.
Resources: Here are some useful resources for Korean War air combat