 Battle
of Hastings (1066 AD)
Battle
of Hastings (1066 AD)Fast Play Rules for Students
Battle
of Hastings (1066 AD)Historical Background: When Edward the Confessor, King of England,
died without an heir three men claimed the throne. Harold Godwinson
had the advantage of actually being in England, and he was crowned
king. The other claimants, William Duke of Normandy and Harald
Hardrada (King of Norway), were prepared to fight for the throne.
Hardrada struck first, invading Northern England with a large
Viking army. Harold raced North to meet the threat. He managed
to completely surprise the Vikings at the battle of Stamford Bridge.
The Vikings were routed, and Hardrada was killed. Harold didn't
get much time to celebrate, however, as he was soon informed that
William had landed in Southern England with an army of Norman
knights and mercenaries.
Again Harold raced to meet the threat. He decided to confront
the Normans as soon as possible. Harold's Saxons formed their
shield wall on top of Senlac Hill. With their flanks protected
by rough terrain, they knew the Normans would be forced to attempt
a frontal assault. All day long the Normans tried and failed to
break through the Saxon lines. Then Harold's men made a fatal
error and chased the Normans back down the hill, opening gaps
in their shield wall. The Normans were quick to exploit the mistake,
and they were able to break through and win. Harold was killed
on the field of battle, and William became King of England. Bishop
Odo, William's half brother, commissioned the Bayeux Tapestry
to tell the story of William the Conqueror. The Battle of Hastings
dramatically changed the course of English history.
 Battle 1: The Normans moved
to attack the ends of the Saxon line, leaving their center open.
They hoped the Saxons would be tempted to come down off the hill,
exposing themselves to a counterattack, but the Saxons didn't
take the bait. Instead they began to shift their reserves to the
threatened right and left wings. The Saxon right was aggressively
attacked by the Bretons. Their infantry couldn't even put a dent
in the Saxon shield wall. In desperation, Alan, Count of Brittany
led his cavalry in a charge against the Housecarls. The Bretons
were smashed to pieces, and Alan was cut down by the battle axes
of the Housecarls.
Battle 1: The Normans moved
to attack the ends of the Saxon line, leaving their center open.
They hoped the Saxons would be tempted to come down off the hill,
exposing themselves to a counterattack, but the Saxons didn't
take the bait. Instead they began to shift their reserves to the
threatened right and left wings. The Saxon right was aggressively
attacked by the Bretons. Their infantry couldn't even put a dent
in the Saxon shield wall. In desperation, Alan, Count of Brittany
led his cavalry in a charge against the Housecarls. The Bretons
were smashed to pieces, and Alan was cut down by the battle axes
of the Housecarls.
The keen eyed Normans spotted
Harold's banner and decided to concentrate their attacks on that
part of the line. The Norman archers had little effect on the
Saxon shield wall. William decided to sacrifice his infantry to
open gaps in the line for his cavalry. Harold, felling the pressure,
turned over command of that sector to his brother, Leofwine, and
moved to a safer part of the Saxon line. Bishop Odo was losing
patience with the slow progress of the Norman attacks so he decided
to take matters into his own hands. He led a series of cavalry
charges against the Saxons. This was having the desired effect
until Odo was killed leading yet another charge. His heroic death
energized the Normans. In the frenzied hand to hand fighting that
followed Leofwine was killed, and the Normans broke through the
Saxon lines.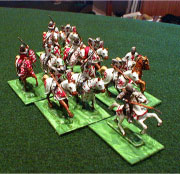
On the Saxon left William's French
mercenaries were making slow but steady progress. As they wore
down the Saxons with a succession of infantry attacks the Saxon
reserves were depleted. William decided that it was time for the
killing blow. He ordered his knights to charge the weakest part
of the Saxon line. Their first and second charges were thrown
back, but then Gyrth's Housecarls disobeyed orders and chased
the retreating knights. They were quickly overwhelmed, opening
a second hole in the Saxon lines. As the surviving Norman Knights
rode through the Saxon lines Harold and his brother Gyrth found
themselves surrounded. Their loyal Housecarls defended the King
with their lives. Attacked from three sides, there was no escape
for Harold. The Normans won a hard fought victory.
Battle 2: The second group of Norman commanders decided
to attack the entire length of the Saxon line. Their plan was
to wait and see which unit had the most success, then reinforce
that attack. The Saxons found themselves fighting off a series
infantry attacks. Although these attacks were beaten back, the
mounting casualties began to drain the Saxon reserves. But time
was running out for the Normans. If they couldn't break the Saxons
by the end of the day they would lose. Their chances looked dim
after the Bretons were smashed. With the threat against the Saxon
right destroyed, Harold would be able to shift valuable reserves
to the rest of the line.
Once again it was Bishop Odo that decided to take the initiative. He led a cavalry charge to test the Saxon line. They rode up, hit the shield wall, and rode back down the hill. Odo was amazed to see the Housecarls pursuing him. Gyrth chased his men, screaming at them to come back, but it was too late. Odo decided to try it again, and this time the Saxon militia followed the Housecarls to destruction. Suddenly, there was a gaping hole in the Saxon line, but were there enough Normans left to exploit the opening? William had kept one group of knights fresh, and he sent them directly at Harold's part of the Saxon line. Harold knew this was his last chance to stop the Normans, so he joined his Housecarls to meet the charge. The opposing forces met in a violent melee. Most of the Normans were stopped by the valiant Housecarls, but a small group broke through to Harold. The last Saxon King of England fell, and William had scored a stunning victory.
Rules
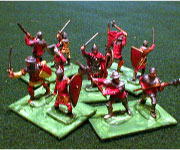
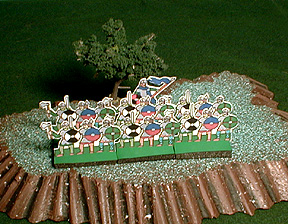
The Miniatures: The figures used were 1/72-scale plastics mounted two per stand, a mix from several sets. Revell from Germany used to make boxes of Normans and Saxons, but I wasn't able to find any. I was forced to improvise. The Normans were represented with figures from Italieri 6009: The Knights. The Saxons were more difficult to find. Italieri 6023: Russian Knights are a good match. They have the right helmets, shields, and weapons to serve as housecarls. The set also has some good foot and mounted leaders which were used for both sides, and some archers. The rest of the Saxon army was filled out with Revell from Germany English Foot Soldiers and French Knights. Here are some paper soldiers you can print and user.
Saxons: Five commands led by Harold, Gyrth, Leofwine, and two anonymous subcommanders. Each command includes two units of fyrd militia (6 stands each), and one unit of housecarls (6 stands). They deploy in a long line across Senlac hill. One unit of fyrd, and the housecarls should be on the front line, with the extra unit of fyrd and the commander behind them as a reserve. The units should be in line formation - two ranks, three stands wide.
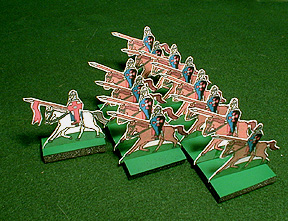
Normans: The five commands are led by Alan (Bretons), Roger (French), William, Bishop Odo, and Robert. Each command has three stands of archers, three infantry units (5 stands each), and a cavalry unit (6 stands). The Bretons deploy on the left flank, the French on the right, and the three Norman commands are in the center. They must start more than 12" from the Saxons. The archers should be in front, followed by the infantry, cavalry, and commander. All units except the Norman cavalry should be deployed in one or two rank lines, three stands wide. Arrange the Norman knights in a wedge formation - two stands in the first rank, four in the second rank.
The Board: A 7.5 X 5 foot table was used. The terrain
was flat except for Senlac Hill, which takes up 1/3 of the table,
stretching from end to end on the Saxon side. The hill can be
represented by brown felt if no sculpted hills are available.
Sequence of Play:
1. Norman Move
2. Archery
3. Saxon Move
4. Charge into Melee
5. Melee
6. Cavalry retreat from Melee
Movement: All infantry move 6", cavalry move 12".
Archery: Only archer units are allowed to shoot. Roll 1D6 for each stand in range. Every 6 is a hit and one enemy stand is removed (if it fails its saving roll). Whenever a 1 is rolled one of the archer stands should be turned to face backwards. This indicates they are running low on arrows. Once all the stands in a unit have been turned around, each subsequent 1 rolled will remove a stand of archers (they've run out of arrows). Stands which have been turned around may still shoot normally until removed. If any part of a unit is in range the entire unit may fire. Units that are engaged in melee may not fire, and may not be targeted.
Charge into Melee: Both sides may charge into melee. This is the only way to get into hand-to-hand fighting. Foot units may charge up to 6", cavalry may charge 12". Units may only charge if they can reach an enemy unit.
Melee: Each side rolls 1D6 for each stand in the fight.
The Close Combat table shows the number needed to score hits.
Remove one enemy stand for every hit (Saxons in shield wall will
get saving throws). Both sides roll simultaneously. If both units
still have stands left they remain engaged and fight again next
turn.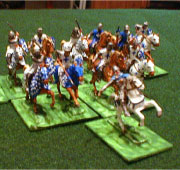
Cavalry Retreat From Melee: A cavalry unit may decide to retreat after melee. This is a free 12" move backwards. The infantry stand they were fighting may pursue. They must roll 1D6. If they roll a 1 - 5 the infantry stand in place. If they roll a 6 they must pursue - move 6" in the direction of the retreating cavalry. The cavalry unit loses one stand. If the pursuing infantry contact any enemy units during their move they immediately fight a melee.
Saxon Shield Wall: The Saxons start the game in shield wall formation - presenting a wall of interlocking shields to the enemy. As long as they are in shield wall they get to roll a saving roll for every casualty inflicted on them from melee or archery. Roll 1D6 for each stand lost. If the roll is a 4 - 6 the shield wall has canceled the hit. As long as the Saxons have a second rank - at least one stand behind the three stands in their front rank - they get the benefits of having a shield wall. Once their second rank has been eliminated they lose the saving rolls for shield wall. Saxon casualties should be taken from the second rank. The shield wall can only save hits inflicted from the front, and has no effect on flank or rear attacks. If the Saxon unit moves, it loses the benefits of shield wall on the next turn.
 Higher
Ground: If the Saxons
are fighting an enemy unit that is downhill from them they get
to roll an extra D6 in melee.
Higher
Ground: If the Saxons
are fighting an enemy unit that is downhill from them they get
to roll an extra D6 in melee.
Saxons Reserves: The Saxons may send individual stands from their reserve unit to reinforce their front line units. These stands may move 6" in any direction. They cannot be used to raise the strength of a unit to more than six stands, and units may not have a frontage of more than three stands.
Last Stand: If a unit is reduced to one stand this last stand is removed immediately.
Generals: Generals may not be targeted individually if they are attached to a unit. If they are attached to a unit they count as an extra stand in melee (but not shooting). If the unit they are attached to loses stands in melee roll 1D6. If the roll is a 6 then the General is eliminated. If the general is charged while alone he may be eliminated just like any other stand. Harold and William may not leave the board.
Victory Conditions: The Normans win if they kill Harold, or if it is clear at the end of the game that he cannot survive. The Saxons win if they kill William, or prevent the Normans from winning.
Resources: A search of the Internet, and Magweb, turned up several useful resources for wargaming Hastings.
|
|
|