Historical Background: In the Battle of Thermopylae of 480 BC, an alliance of Greek city-states fought the invading Persian Empire at the pass of Thermopylae in central Greece. Vastly outnumbered, the Greeks held back the Persians for three days in one of history's most famous last stands. A small force led by King Leonidas of Sparta blocked the only road through which the massive army of Xerxes I of Persia (Xerxes the Great) could pass. After three days of battle, a local resident named Ephialtes betrayed the Greeks by revealing a mountain path that led behind the Greek lines. Dismissing the rest of the army, King Leonidas stayed behind with 300 Spartans and 700 Thespian volunteers. The Persians succeeded in taking the pass but sustained heavy losses, extremely disproportionate to those of the Greeks. The fierce resistance of the Spartan-led army offered Athens the invaluable time to prepare for a decisive naval battle that would come to determine the outcome of the war. The subsequent Greek victory at the Battle of Salamis left much of the Persian Empire's navy destroyed and Xerxes was forced to retreat back to Asia, leaving his army in Greece under Mardonius, who was to meet the Greeks in battle one last time. The Spartans assembled at full strength and led a pan-Greek army that defeated the Persians decisively at the Battle of Plataea, ending the Greco-Persian War and with it the expansion of the Persian Empire into Europe.
The performance of the defenders at the battle of Thermopylae is often used as an example of the advantages of training, equipment, and good use of terrain to maximize an army's potential, and has become a symbol of courage against overwhelming odds. Even more, both ancient and modern writers used the Battle of Thermopylae as an example of the superior power of a well trained army defending native soil.
There is also a large political significance of the Battle of Thermopylae, in that it was the first defining moment in which the disunified Greek city states came together to form a significant alliance. It also possibly signified the beginning of the end for the Persian empire - drawing strength from the Battle, the Greeks began forming assaults against the Persian Empire, as a national body rather than small city states.
Battle 1: Not yet tested.
Rules
The Armies: The battle can be played with plastic 1/72 scale figures. There are many sets of Greek and Persian figures available. Check out the Plastic Soldier Review to see all the possibilities. Figures should be mounted two per base, bases are .75" x 1.5". All units with six bases in size were 3 bases in the front rank, 3 in the rear rank. All units with three bases were deployed in a single rank. Here are some paper soldiers you can print and use.
|
Greek Spartans Thespians Other Greek Allies |
Persians Overall Commander: Xerxes (not present in battle) Medes and Cissians (Persian Vanguard) Persian Immortals (Elite) Persian Main Army |
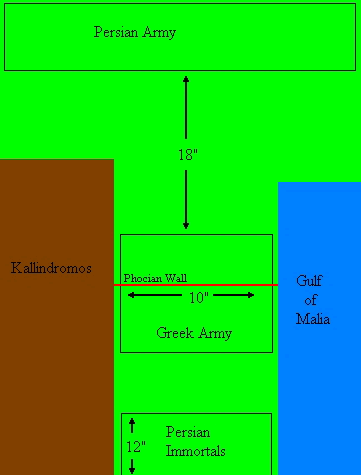
The Board: The terrain narrows to the side of the Greek player between the Gulf of Malia and the Kallindromos Mountains. At the narrowest location the open terrain should be no further than 10". At this point stands an ancient Phoican wall renewed for the fight against the Persians. A 7.5' X 5' foot table should provide enough space for the setting.
Deployment: The armies deploy as shown on the map. The armies begin at least 18" inches apart. The Greek Army may deploy on either side of the wall as their commanders wish. The Persian Immortals start the battle in the main Persian deployment area and move to their encirclement position only later in battle.

Sequence of Play:
1. Greek Move
2. Greek Shoot
3. Persian Move
4. Persian Shoot
5. Charge into Melee
6. Melee
The days of the battle: A day consists of four consecutive turns. After each day all units retreat into their deployment areas for the night and reform. During day #1, only the Persian vanguard and the Immortals may leave the Persian deployment area to fight the Greek as Xerxes wants to keep the main force of his army intact for the conquering of the Peloponnese. After day #1, all Persian units may join the battle.
Movement: All infantry and Hoplite units move 6" and are limited to wheels and obliques of up to 45 degrees per turn. Skirmishers move 8" and may move in any direction. Commanders move 12" in every direction unless attached to an Infantry or Hoplite unit. A unit can not move closer than 1" from the enemy except during charges. Any unit that passes the Phoican wall during movement must stop immediately after having crossed the wall. Units may charge into melee over the wall if they can reach an enemy unit with this restrictions. No unit's way of movement may pass through the Kallindromos Mountains or the Gulf of Malia.
Shooting: Only skirmishers and Persian infantry are allowed to shoot. Eligible units may only fire at targets in the front 45 degree arc of them, they can not fire to the side or rear. Roll 1D6 for each base that shoots. Every 6 rolled is a hit and one base is removed from the targeted unit. Exception: it takes two hits on the same turn to remove a Hoplite or Immortal unit because of their armor and large shields. If any part of a unit is in range the entire unit may fire. Units that are engaged in melee may not fire, and may not be targeted. The Phoican Wall blocks shooting except for a shooting unit standing in contact with the wall.
Charge into Melee: Both sides may charge into melee. This is the only way to get into melee. Units may charge up to their usual movement range. Units may only charge if they can reach an enemy unit.
Melee: Each side rolls 1D6 for each base in the fight. The Melee table shows the number needed to score hits. Remove one enemy base for every hit (it takes two hits on the same turn to remove an Hoplite or Immortal stand). Both sides roll simultaneously. If both units still have bases left they remain engaged and fight again next turn. If a unit is attacked on the flank or rear it may only fight with two bases during the first turn of melee. On the subsequent round of melee the unit may turn so all the bases may fight.
Last Stand: If a unit is reduced to one base (not including any commanders) this last base is removed immediately. This rule does not apply to Spartan Hoplites. Commanders are never removed because of this rule..
Commanders: Commanders may not be targeted individually (though may be charged while moving independent). If they are attached to a unit they count as an extra base in melee (but not shooting). Leonidas counts as two extra bases in melee. If the unit they are attached to fights in melee or is completely eliminated by shooting roll 1D6. If the roll is a 6 the commander is eliminated.
Greek Main Force Withdrawal: When getting word of the Immortals advancing in their rear, Leonidas
gave every tribe of his army the opportunity to withdraw to reinforce the Greek main forces
rallying at the Isthmus of Corinth and preparing for the Battle of Salamis. He himself would
stay with his personal bodyguard of 300 Spartans to cover their retreat against the Persian
cavalry. He was joined by the Thespians who feared that their lands, being located right behind
Thermopylae, would be devastated first by the Persians and thus decided to defend the Pass as
long as possible.
After Turn 8 all remaining units of the Greek Allies are removed from the
game.
Persian Immortals Encirclement: At dusk of the second day a Malian traitor named Ephialtes told Xerxes about a hidden path around Thermopylae and offered to lead the Persians through the mountains. As soon as the sun went down, Xerxes sent Hyadernes with his Immortals and a number of other forces to encircle the Greek army. This force may consist of all Immortal units not engaged in melee at the time of the Persian movement phase of turn 8, regardless of whether they are present on the table or already dead. Furthermore up to 4 units of skirmishers not engaged in melee at the moment may join the Immortals. The Force may deploy within 12" of the Greek player's side of the table before the Greek movement phase of Turn 9.
| Infantry & Hoplites | 6" |
| Skirmishers | 8" |
| Commanders | 12" |
| Unit | Range |
|
| Archer Skirmishers | 12" |
|
| Sling/Javelin Skirmishers, Persian Infantry | 6" |
|
| Weapon |
|
| Spartan Hoplites | 4-6 |
| Allied Greek Hoplites, Immortals | 5-6 |
| Persian Infantry, all Skirmishers | 6 |
| Commanders (when fighting individually; otherwise use the same as the unit they are attached to) |
|
| Any vs. Skirmishers (also other skirmishers) | 4-6 |
Resources